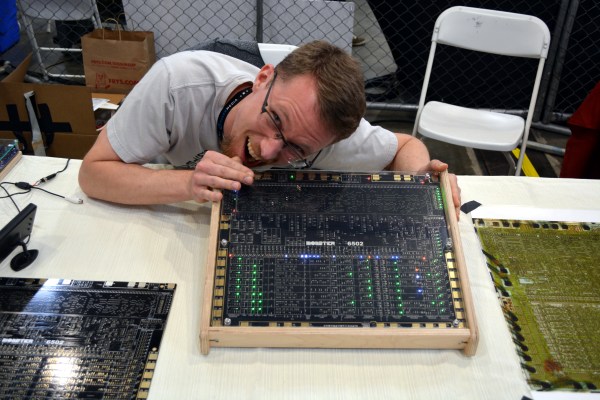
InfoFuse

This Message Will Self Destruct… As You Read It?

A group of Harvard chemists have come up with a novel use for fire. Through experimentation, they have been able to build what they call an InfoFuse. As the name implies, it’s essentially a burning fuse that can “transmit” information.

The fuse is made from flash paper, which is paper made from nitrocellulose. Flash paper burns at a relatively constant speed and leaves no smoke or ash, making it ideal for this type of project. The chemists developed a method of conveying information by changing the color of the flame on the paper. You might remember from high school chemistry class that you can change the color of fire by burning different metal salts. For example, burning copper can result in a blue flame. This is the key to the system.

The researchers dotted the flash paper with small bits of metal salts. As the flame reaches these spots, it briefly changes colors. They had to invent an algorithm to convert different color patterns to letters and numbers. It’s sort of like an ASCII table for fire. Their system uses only three colors. The three colors represent eight possible combinations of color at any given time. Just two quick pulses allow the researchers to convey all 26 letters of the English alphabet as well as ten digits and four symbols. In one test, the researchers were able to transmit a 20 character message in less than 4 seconds.

[Ben Krasnow] found the Harvard project and just had to try it out for himself. Rather than use colors to convey information, he took a more simple approach. He started with a basic strip of flash paper, but left large tabs periodically along its length. As the paper burns from end to end, it periodically hits one of these tabs and the flame gets bigger momentarily.

[Ben] uses an optical sensor and an oscilloscope to detect the quantity of light. The scope clearly shows the timing of each pulse of light, making it possible to very slowly convey information via fire. Ben goes further to speculate that it might be possible to build a “fire computer” using a similar method. Perhaps using multiple strips of paper, one can do some basic computational functions and represent the result in fire pulses. He’s looking for ideas, so if you have any be sure to send them his way! Also, be sure to check out Ben’s demonstration video below. Continue reading “This Message Will Self Destruct… As You Read It?”

Computer Built Into A Board Uses Only 10 Watts

In the realm of low-powered desktop computers, there are some options such as the Raspberry Pi that usually come out on top. While they use only a few watts, these tend to be a little lackluster in the performance department and sometimes a full desktop computer is called for. [Emile] aka [Mux] is somewhat of an expert at pairing down the power requirements for desktop computers, and got his to run on just 10 watts. Not only that, but he installed the whole thing in a board and mounted it to his wall. (Google Translated from Dutch)

The computer itself is based on a MSI H81M-P33 motherboard and a Celeron G1820 dual-core processor with 8GB RAM. To keep the power requirements down even further, the motherboard was heavily modified. To power the stereo custom USB DAC, power amplifier board, and USB volume button boards were built and installed. The display is handled by an Optoma pico projector, and the 10-watt power requirement allows the computer to be passively cooled as well.

As impressive as the electronics are for this computer, the housing for it is equally so. Everything is mounted to the backside of an elegant piece of wood which has been purposefully carved out to hold each specific component. Custom speakers were carved as well, and the entire thing is mounted on the wall above the bed. The only electronics visible is the projector! It’s even more impressive than [Mux]’s first low-power computer.

Tweet Messages From Punch Cards

It all started with a conversation about the early days of computing. The next thing he knew, [Tim Jagenberg’s] colleague gave him a stack of punch cards and a challenge.  [Tim] attempted to read them with a mechanical contact and failed.  Undeterred, he decided to make a punch card-to-keyboard interface using optical parts from disassembled HP print stations.  Specifically, he took apart the slotted optical interrupter switches to use their IR-LEDs and photo-transistors. Next, [Tim] drilled holes into two pieces of plastic, gluing the LEDs on one piece of plastic and the photo-transistors on the other. The photo-transistors tell the Teensy 3.1 whenever a hole is detected.

[Tim] developed an interpreter on the Teensy that reads the punch card according to IBM model 029 keypunch codes. The Teensy enumerates as a USB keyboard when connected to a computer. As a punch card is read, the Teensy outputs the decoded characters as key presses.  When a punch card has been completely read, an ‘Enter’ key press is transmitted.  Tweeting the punch cards is no more complicated than typing the text yourself. Naturally, the first message posted on Twitter from the stack of punch cards was “Hello World!”  [Tim’s] binary and source code is available for download on Github.

We’ve enjoyed covering the backstory of the punch card and a previous project reading these cards using a digital camera setup. It’s always interesting to see the clever ways people use current technology and can-do attitude to read data from obsolete systems that would otherwise be lost.  We wonder what is on the rest of those punch cards?  Let’s hope [Tim] has more punch card tweets soon!

Extreme Repair Of An All-in-One PC

While browsing a local auction site, [Viktor] found himself bidding on a beat up Lenovo A600 all-in-one PC. He bid around $50 and won. Then came the hard part – actually making the thing work. The front glass was cracked, but the LCD was thankfully unharmed. The heat pipes looked like they had been attacked with monkey wrenches. The superIO chip’s pins were mangled, and worst of all, the MXM video card was dead.

The first order of business was to fix the superIO chip’s pins and a few nearby discrete components which had been knocked off their pads. Once that was done, [Viktor] was actually able to get the computer to boot into Linux from a USB flash drive. The next step was bringing up the display. [Viktor] only needed a coding station, so in addition to being dead, the video accelerator on the MXM wasn’t very useful to him. The Lenovo’s motherboard was designed to support video on an MXM card or internal video. Switching over meant changing some driver settings and moving a few components, including a rather large LVDS connector for the display itself. A difficult task, compounded by the fact that [Viktor’s] soldering tools were a pair of soldering guns that would be better suited to fixing the bodywork on a ’57 Chevy. He was able to fashion a hot wire setup of sorts, and moved the connector over. When he was done, only one tiny solder bridge remained!

The end result is a new coding battle station for [Viktor] and a computer which was a basket case is saved from the landfill. If you like this hack, check out [Viktor’s] low power PSU, or his 1 wire network!

Breadboarding A 68000 Computer In Under A Week

We’ve been lurking over at Big Mess ‘o Wires as [Steve] geared up for his 68000 computer build. One of his previous posts mentioned a working breadboard version but we figured it would be a ways off. Surprise, he’s got it working and what you see above took just 6 days of “occasional work” to get running.

The chip in use is actually a 68008 but we remember reading that he does plan to migrate to a 68000 because this one lacks the memory pins to address more than 1 MB of RAM. The trick here was just to get the thing running and he made some common choices to get there. For instance, he grounded the /DTACK in much the same way [Brian Benchoff] explained in his own 68k build.

We’re not sure if his address decoding was a time saver or not. If you study [Steve’s] original planning post you’ll learn that he’s going to use programmable logic to handle the address decoding. But above he wired up 74-series logic chips to perform these functions. On the one hand you know your Hardware Description Language isn’t the problem, but did you terminate one of those wires where you ought not?

Additional tripping points include a bouncing reset pin. Looking at that we’d tell [Steve] there’s a problem with his chip, except that this was his first thought as well. He went the extra mile by building and testing a replica of the reset system. This makes our brain spin… shouldn’t the reset be among the most reliable parts of a processor?

At any rate, great work so far. We can’t wait to see where this goes and we hope that it unfolds in a way that is as exciting as watching [Quinn Dunki’s] Veronica project take shape.

Thinkpad 701c: Reverse Engineering A Retro Processor Upgrade

[Noq2] has given his butterfly new wings with a CPU upgrade. Few laptops are as iconic as the IBM Thinkpad 701 series and its “butterfly” TrackWrite keyboard. So iconic in fact, that a 701c is part of the permanent collection of the Museum of Modern Art in New York.

Being a 1995 vintage laptop, [Noq2’s] 701c understandably was no speed demon by today’s standards. The fastest factory configuration was an Intel 486-DX4 running at 75 MHz. However, there have long been rumors and online auctions referring to a custom model modified to run an AMD AM-5×86 at 133 MHz. The mods were performed by shops like Hantz + Partner in Germany. With this in mind, [Noq2] set about reverse engineering the modification, and equipping his 701c with a new processor.

thinkpad-brainsurgeryThe first step was determining which AMD processor variant to use. It turns out that only a few models of AMD’s chips were pin compatible with the 208 pin Small Quad Flat Pack (SQFP) footprint on the 701c’s motherboard. [Noq2] was able to get one from an old Evergreen 486 upgrade module on everyone’s favorite auction site. He carefully de-soldered the AM-5×86 from the module, and the Intel DX4 from the 701c. A bit of soldering later, and the brain transplant was complete.

Some detailed datasheet research helped [noq2] find the how to increase the bus clock on his 5×86 chip, and enable the write-back cache. All he had to do was move a couple of passive components and short a couple pins on the processor.

The final result is a tricked out IBM 701c Thinkpad running an AMD 5×86 at 133 MHz. Still way too slow for today’s software – but absolutely the coolest retro mod we’ve seen in a long time.

home made keyboard

Delving Into The Design And Manufacture Of A Keyboard

A while back [Dave] decided he wanted to build his own keyboard. [Dave] has no experience in design, or dealing with manufacturing companies, or even sourcing materials – he just wanted to see if he could do it.

That’s the beauty of the DIY world – most of the time, you can do it, you just don’t know it yet. The keyboard is made out of laser cut steel and acrylic sheets. The switches and key caps are Cherry MX Browns, supplied by GONSKeyboards Works. A Teensy 2.0 lies at the heart of the keyboard acting as an HID device, and the whole thing assembled looks pretty slick – but it wasn’t easy getting to that point.

Continue reading “Delving Into The Design And Manufacture Of A Keyboard”