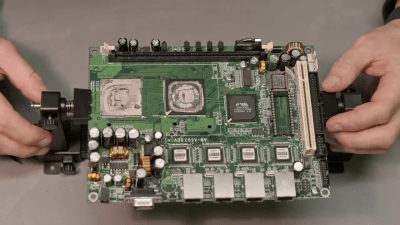
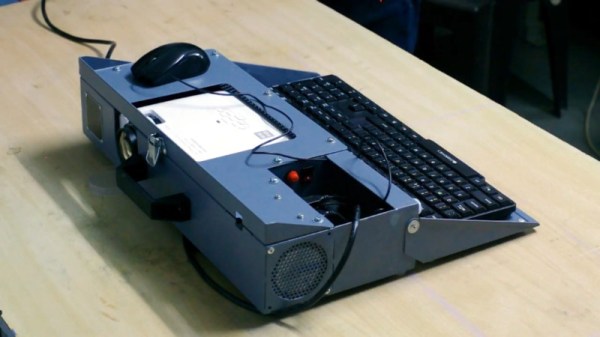
Streaming Video From A Mouse

The first optical mice had to be used on a specially printed mousepad with a printed grid that the four-quadrant infrared sensor could detect. Later, mice swapped the infrared sensor for an optoelectric module (essentially a tiny, very low-resolution camera) and a powerful image processing. [8051enthusiast] was lying in bed one day when they decided to crack the firmware in their gaming mouse and eventually start streaming frames from the camera inside.

Step one was to analyze the protocol between the mouse and the host machine. Booting up a Windows VM and Wireshark allowed him to capture all the control transfers to the USB controller. Since it was a “programmable” gaming mouse that allowed a user to set macros, [8051enthusiast] could use the control transfers that would normally query that macro that had been set to return the memory at an arbitrary location. A little bit of tinkering later, and he now had a dump of the firmware. Looking at the most abundant bytes, it seems to match a profile similar to the Intel 8051. In a fascinating blur of reverse engineering, he traced the main structure of the program back from the function that sets the LED colors for the scroll wheel (which is dependent on the current DPI setting). Unfortunately, the firmware prevented the same macro mechanism from writing to arbitrary locations.

Looking through the code, a good old buffer overflow exploit seemed possible, but it caused the system to reset via watchdog. So he took another approach, invoking recovery mode and loading an entirely new firmware on the device, which a set_report control transfer can invoke.

Next, he moved onto the ADNS-9800 optical sensor (pictured in the top image provided by JACK Enterprises), which had a large encrypted blob in the firmware. Some poking around and deduction lead to a guess that the optical sensor was another 8051 system. With some clever reasoning and sheer determination, [8051enthusiast] was able to crack the XOR stream cipher encryption with a program that showed him versions of the disassembled assembly and allowed him to pick the one that was the most likely. With the firmware decrypted, he was able to see the encryption code and confirm his deducted algorithm.

With the sensor now cracked open, it was onto the 30 x 30 240 fps video stream. The sensor communicates over SPI, and the USB controller has to bit-bang the connection as it doesn’t have the hardware. Putting two custom firmware images on with a few extra functions was easy enough, but the 7 fps was somewhat lacking. The first optimization was loop unrolling and removing some sleeps in the firmware, which bought it up to 34 fps. By measuring the cycle counts of individual instructions, he was able to find some alternatives such as a mov instead of a setb that took one less cycle. Going from a 17 cycle loop to an 11 cycle loop and some other optimizations gave him 54 fps. Not content to stop there, he modified the ADNS-9800 firmware to continuously sample rather than waiting for the USB controller to finish processing. While this yielded 100 fps, there was still more to do: image compression. At a whopping 230 fps, [8051enthusiast] decided to call it done.

However, there was one last thing he wanted to do: control the mouse with the video stream. Writing some image processing into his Python-based program that received the image files allowed him to use the mouse, however impractically.

All in all, it’s an incredible journey by [8051enthusiast], and we would highly recommend reading the whole journey yourself. This isn’t the first time he’s modified the firmware of 8051-based devices, such as modifying the firmware of the WiFi chipset in his laptop.

[Thanks to JACK Enterprises over at Tindie for the use of the image of an ADNS9000].


It Takes A Lot To Build A Hacker’s Laptop

An essential tool that nearly all of us will have is our laptop. For hardware and software people alike it’s our workplace, entertainment device, window on the world, and so much more. The relationship between hacker and laptop is one that lasts through thick and thin, so choosing a new one is an important task. Will it be a dependable second-hand ThinkPad, the latest object of desire from Apple, or whatever cast-off could be scrounged and given a GNU/Linux distro? On paper all laptops deliver substantially the same mix of performance and portability, but in reality there are so many variables that separate a star from a complete dog. Into this mix comes a newcomer that we’ve had an eye on for a while, the Framework. It’s a laptop that looks just like so many others on the market and comes with all the specs at a price you’d expect from any decent laptop, but it has a few tricks up its sleeve that make it worth a glance.

These USB-C based modules are a neat idea.

Probably the most obvious among them is that as well as the off-the-shelf models, it can be bought as a customised kit for self-assembly. Bring your own networking, memory, or storage, and configure your new laptop in a much more personal way than the norm from the big manufacturers. We like that all the parts are QR coded with a URL that delivers full information on them, but we’re surprised that for a laptop with this as its USP there’s no preinstalled open source OS as an option. Few readers will find installing a GNU/Linux distro a problem, but it’s an obvious hole in the line-up.

On the rear is the laptop’s other party trick, a system of expansion cards that are dockable modules with a USB-C interface. So far they provide USB, display, and storage interfaces with more to come including an Arduino module, and we like this idea a lot.

It’s all very well to exclaim at a few features and party tricks, but the qualities that define a hacker’s laptop are only earned through use. Does it have a keyboard that will last forever, can it survive being dropped, and will its electronics prove to be fragile, are all questions that can be answered only by word-of-mouth from users. It’s easy for a manufacturer to get those wrong — the temperamental and fragile Dell this is being typed on is a case in point — but if they survive the trials presented by their early adopters and match up to the competition they could be on to a winner.

What Kind Of GPU Are You?

In the old days, big computers often had some form of external array processor. The idea is you could load a bunch of numbers into the processor and then do some math operations on all of the numbers in parallel. These days, you are more likely to turn to your graphics card for number crunching support. You’ll usually use some library to help you do that, but things are always better when you understand what’s going on under the hood. That’s why we enjoyed [RasterGrid’s] post on GPU architecture types.

If you can tell the difference between IMR (immediate mode) and TBR (tile-based) rendering this might not be the post for you. But while we knew the terms, we found a lot of interesting detail including some graphics and pseudo code that clarified the key differences.

Continue reading “What Kind Of GPU Are You?”

Raspberry Pi Server Cluster In 1U Rack-Mount Case

[Paul Brown] wants to take advantage of off-site server colocation services. But the providers within [Paul]’s region typically place a limit of 1A @ 120V on each server. Rather than search out commercial low-power solutions, [Paul] embraced the hacker spirit and built his own server from five Raspberry Pi 4b single board computers.

The task involves a little bit more than just mounting five Pi4s in a chassis and calling it done. There is an Ethernet switch connecting all the modules to the network, and each Pi has a comparatively bulky SSD drive + enclosure attached. By far the most annoying part of the assembly is the power supply and distribution cabling, which is further complicated by remote controlled power switching relays (one of the computers is dedicated to power management and can shut the other four modules on and off).

Even if you’re not planning on building your own server, check out the thoroughly documented assembly process and parts list — we particularly liked the USB connector to screw terminal breakout connector that he’s using for power distribution. For all the detailed information, assembly instructions and photos, we think a top-level block diagram / interconnection drawing would be very helpful for anyone trying to understand or replicate this project.

There are a lot of connections in this box, and the final result has a messy look-and-feel. But in fairness to [Paul]’s craftsmanship, there aren’t many other ways to hook everything together given the Raspberry Pi form-factor. Maybe a large and costly PCB or using CM4 modules instead of Raspberry Pi boards could help with cable management? In the end, [Paul] reckons he shelled out about $800 for this unit. He compares this expense with some commercial options in his writeup, which shows there are some cheaper and more powerful solutions. But while it may be cheaper to buy, we understand that strong urge to roll your own.

We’ve written about many Pi cluster projects in the past, including this one which contains a whopping 750 Raspberry Pis. Have you ever used a colocation service, and if so, did you use a DIY or an off-the-shelf server?

Software Defined… CPU?

Everything is better when you can program it, right? We have software-defined radios, software-defined networks, and software-defined storage. Now a company called Ascenium wants to create a software-defined CPU. They’ve raised millions of dollars to bring the product to market.

The materials are a bit hazy, but it sounds as though the idea is to have CPU resources available and let the compiler manage and schedule those resources without using a full instruction set. A system called Aptos lets the compiler orchestrate those resources.

Continue reading “Software Defined… CPU?”

CNC Saves Water Cooling Setup

A classic problem. You have a new CPU and a 15-year old water cooling system. Of course, the bracket doesn’t fit. Time to buy a new cooler? Not if you are [der8auer]. You design a new bracket and mill it out of aluminum.

Honestly, it might seem overkill, but it makes sense. After all, no matter how new the CPU is, using water to cool it still works the same way, in principle.

Continue reading “CNC Saves Water Cooling Setup”

The First New Vacuum Tube Computer Design For Well Over Half A Century

In a few museums around the world, there lies the special experience of seeing some of the earliest computers. These room-filling monsters have multiple racks of vacuum tubes that are kept working by the dedication and care of their volunteer maintainers. A visit to the primordial vacuum tube computer, Colossus at Bletchley Park, UK, led [Mike] on the path towards designing an entirely new one. He thinks it’s the first to see the light of day in over five decades. ENA, the Electron tube New Automatic Computer, is the result.

It uses 550 Soviet 6N3P double triodes, and its 8-bit Von Neumann architecture is constructed from the tubes wired up as 5-input NOR gates. ROM is a diode matrix, and RAM comes courtesy of reed relays. The whole thing is assembled as eleven PCBs on a wall-mounted frame, with a console that holds the piece de resistance, a display made from an array of LEDs. A Pong game is in development, meanwhile the machine makes an impressive room heater.

If you’d like to see some more vacuum tube computational goodness, we saw Colossus at the National Museum of Computing, back in 1996.