Hacked Case Fan Follows The Leader With IR Sensor

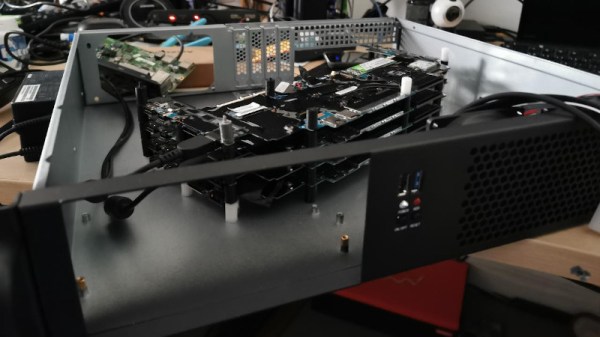
Adding an additional fan to your PC is usually pretty straightforward, but as [Randy Elwin] found, this isn’t always the case with the newer Small Form Factor (SFF) machines. Not only was the standard 80 mm fan too large to fit inside of the case, but there wasn’t even a spot to plug it in. So he had to come up with his own way to power it up and control its speed.

Now if he only needed power, that wouldn’t have been a problem. You could certainly tap into one of the wires coming from the PSU and get 12 V to spin the fan. But that would mean it was running at max speed the whole time; fine in a pinch, but not exactly ideal for a daily driver.

Note the SATA connector pulled from a dead HDD.

To get speed control, [Randy] put together a little circuit using an ATtiny85, an IR LED, and a LTR-306 phototransistor. The optical components are used to detect the GPU fan’s current speed, which itself is controlled based on system temperature. Using the GPU fan RPM as an input, a lookup table on the microcontroller sets an appropriate speed for the 80 mm case fan.

One could argue that it would have been easier to connect a temperature sensor to the ATtiny85, but by synchronizing the case fan to the computer-controlled GPU fan, [Randy] is able to manually control them both from software if necessary. Rather than waiting on the case temperature to rise, he can peg the GPU fan and have the external fan speed up to match when the system is under heavy load.

You may think this is overkill for a simple case fan, but compared to some of the cooling hacks we’ve seen in the past, it’s pretty tame.

An NEC V20 For Two Processors In One SBC

In the days when the best an impoverished student could hope to find in the way of computing was a cast-off 1980s PC clone, one upgrade was to fit an NEC V20 or V30 processor in place of the Intel 8088 or 8086. Whether it offered more than a marginal advantage is debatable, but it’s likely that one of the chip’s features would never have been used. These chips not only supported the 8086 instruction set, but also offered a compatibility mode with the older 8080 processor. It’s a feature that [Just4Fun] has taken advantage of, with V20-MBC, a single board computer that can run both CP/M-86 and CPM/80.

If this is starting to look a little familiar then it’s because we’ve featured a number of [Just4Fun]’s boards before. The Z80-MBC2 uses the same form factor, and like this V20 version, it has one of the larger ATMega chips taking place of the acres of 74 chips that would no doubt have performed all the glue logic tasks of the same machine had it been built in the early 1980s. There is a video of the board in action that we’ve placed below the break, showing CP/M in ’80, ’86, and even ’80 emulated in ’86 modes.

The only time a V20 has made it here before, it was in the much more conventional home of a home-made PC.

Continue reading “An NEC V20 For Two Processors In One SBC”

A Dead Macbook GPU Shouldn’t Stop You, With This BGA Soldering Hack

On some 2011 Macbook Pro models, there is a tendency for the Radeon GPU to fail. This should mean game over for the computer, but surprisingly salvation is offered by its having not one but two GPUs on board. The Intel processor also has a GPU, and Apple use a pile of logic in an FPGA to switch at will between them. The community have produced fresh FPGA code to revive a dead Mac on its Intel GPU, but at the expense of losing brightness control. [Ayilm1] has brought back the brightness with a clever BGA reworking hack that gains access to a brightness control line present on the Intel BD82HM65 Platform Controller Hub chip but not used in the Macbook.

We’re used to impressive soldering work here at Hackaday, and we’ve seen our share of wiring direct to the balls on an upturned BGA chip. This is a similar idea but at another level, as a section of the top insulation on an in-place BGA is removed to expose the microvia above the ball carrying the required signal. A tiny wire is soldered to the exposed pad and taken to a piece of copper tape stuck down to provide mechanical strength, and a piece of enameled copper wire is run from that to the other side of the PCB where lies its destination. It comes with FPGA code to take advantage of it, but even for non-Macbook owners, it’s an extremely impressive piece of work. It’s not the first fine-soldering Macbook fix we’ve seen, either.

Thanks [lightpink784] for the tip.

Netbooks: The Next Generation — Chromebooks

Netbooks are dead, long live the Chromebook. Lewin Day wrote up a proper trip down Netbook Nostalgia Lane earlier this month. That’s required reading, go check it out and come back. You’re back? Good. Today I’m making the case that the Chromebook is the rightful heir to the netbook crown, and to realize its potential I’ll show you how to wring every bit of Linuxy goodness out of your Chromebook.

I too was a netbook connoisseur, starting with an Asus Eee 901 way back in 2009. Since then, I’ve also been the proud owner of an Eee PC 1215B, which still sees occasional use. Only recently did I finally bite the bullet and replace it with an AMD based Dell laptop for work.

For the longest time, I’ve been intrigued by a good friend who went the Chromebook route. He uses a Samsung Chromebook Plus, and is constantly using it to SSH into his development machines. After reading Lewin’s article, I got the netbook bug again, and decided to see if a Chromebook would fill the niche. I ended up with the Acer Chromebook Tab 10, codename Scarlet. The price was right, and the tablet form factor is perfect for referencing PDFs.

Two Asus Netbooks and a ChromeOS tablet.
Behold, my netbook credentials.

The default ChromeOS experience isn’t terrible. You have the functionality of desktop Chrome, as well as the ability to run virtually any Android app. It’s a good start, but hardly the hacker’s playground that a Linux netbook once was. But we can still get our Linux on with this hardware. There are three separate approaches to making a Chromebook your own virtual hackspace: Crostini, Crouton, and full OS replacement.

Continue reading “Netbooks: The Next Generation — Chromebooks”

Fail Of The Week: How Not To Watercool A PC

To those who choose to overclock their PCs, it’s often a “no expense spared” deal. Fancy heat sinks, complicated liquid cooling setups, and cool clear cases to show off all the expensive guts are all part of the charm. But not everyone’s pockets are deep enough for off-the-shelf parts, so experimentation with cheaper, alternatives, like using an automotive fuel pump to move the cooling liquid, seems like a good idea. In practice — not so much.

The first thing we thought of when we saw the title of [BoltzBrain]’s video was a long-ago warning from a mechanic to never run out of gas in a fuel-injected car. It turns out that the gasoline acts as a coolant and lubricant for the electric pump, and running the tank dry with the power still applied to the pump quickly burns it out. So while [BoltzBrain] expected to see corrosion on the brushes from his use of water as a working fluid, we expected to see seized bearings as the root cause failure. Looks like we were wrong: at about the 6:30 mark, you can see clear signs of corrosion on the copper wires connecting to the brushes. It almost looks like the Dremel tool cut the wire, but that green copper oxide is the giveaway. We suspect the bearings aren’t in great shape, either, but that’s probably secondary to the wires corroding.

Whatever the root cause, it’s an interesting tour inside a common part, and the level of engineering needed to build a brushed motor that runs bathed in a highly flammable fluid is pretty impressive. We liked the axial arrangement of the brushes and commutator especially. We wonder if fuel pumps could still serve as a PC cooler — perhaps changing to a dielectric fluid would do the trick.

Continue reading “Fail Of The Week: How Not To Watercool A PC”

Mini Computer Brings Starfleet To Your Desk

It could be said that there are two types of people: those for whom the actor LeVar Burton is the host of Reading Rainbow, and those for whom he is Geordi LaForge, Chief Engineer of Star Trek TNG‘s Enterprise NCC1701-D. For those of us engineers who lie in the second camp, we can at least feel a little closer to the action thanks to a project from [Darian Johnson], a Star Trek TNG mini-computer which functions as a desktop information display.

Inside the 3D-printed case is an ESP32 version of the Adafruit Feather, talking to cloud services to pull in and aggregate the information on the TFT screen. It combines weather data, environmental sensor readings, his fitness tracker readings, and his schedule, with two useful applications. There’s a resistor colour code chart, and an LED series resistor calculator. He’s made a video showing it in operation which we’ve placed below the break, and in it, he’s captured the aesthetic of the LCARS interface perfectly. We can’t speak for a fictional future spacecraft officer, but we suspect that Geordi would be right at home with it.

We may not be able to bring you Geordi LaForge, but we can bring you a real Starfleet officer. She even shares something with LeVar Burton, in that she’s (much more) famous for something else.

Continue reading “Mini Computer Brings Starfleet To Your Desk”

64-bit And A Display: Minecraft Computers 10 Years Later

Some people build their own computer to play games, while others play games to build their own computer. Minecraft is the prime candidate for the latter, and while you can certainly arrange the blocks to make them look like a computer, we’re of course talking about replicating the actual functionality of a CPU or parts thereof, and/or external components within the game. Many such creations have spawned in the decade since the first Minecraft-built ALU surfaced, and [Rockfarmor] built a 64-bit specimen to add to that list — and made a video to showcase it.

Instead of emulating a common architecture, [Rockfarmor] went for a more home-made approach, and re-used the architecture from an old school assignment (in Swedish) as basis. The result is a simple yet fully functional 64-bit CPU with 32 registers, 32kB main memory and a separate 16kB stack. The instruction set mostly contains ALU and branching operations, but also a few special opcodes to control an additional 64×64 pixel blocks, 64-color display — including drawing circles, lines, and color fills.

More details on the architecture can be found in its documentation and in an older video (with subpar audio circumstances unfortunately). An additional time-lapse video of the initial build is also available, and you will find all of them after break. To simplify development, [Rockfarmor] also wrote a desktop app to program the computer in assembly and upload it straight to the Minecraft version.

As with all computers built in Minecraft, the driving force is redstone, which essentially allows circuit design within the game, and [Rockfarmor]’s is no difference here. He also uses command blocks to avoid the laboriously and slow “wiring” required otherwise, turning it more into a “wireless redstone” circuit.

No doubt, purists will consider this cheating, but another angle would be to see it as Moore’s Law applied to Minecraft computers, considering the computer’s size and speed compared to the first Minecraft ALU. Or maybe as the equivalent of microcode in real-world CPUs? Or then, maybe we should just accept and embrace different options and preferences.

Continue reading “64-bit And A Display: Minecraft Computers 10 Years Later”