In this issue of Hackaday Dictionary, we cover the multiplexer and demultiplexer (also called mux and demux). They are essentially opposites but they work on the same principle. There are three parts: the input, the output, and the selector.

In this issue of Hackaday Dictionary, we cover the multiplexer and demultiplexer (also called mux and demux). They are essentially opposites but they work on the same principle. There are three parts: the input, the output, and the selector.

Resistor: A passive chunk of material that resists the flow of electrical current. A terminal is connected to each end you’re done. What could be simpler?
It turns out it’s not so simple at all. Temperature, capacitance, inductance and other factors all play a part in making the resistor a rather complex component after all. Even its uses in circuits are many, but here we’ll just focus on the different types of fixed-value resistors, how they’re made, and what makes them desirable for different applications.
Let’s start with a simple one, and one of the oldest.

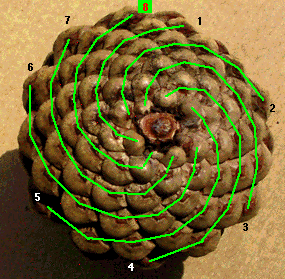
Evolution is one clever fellow. Next time you’re strolling about outdoors, pick up a pine cone and take a look at the layout of the bract scales. You’ll find an unmistakable geometric structure. In fact, this same structure can be seen in the petals of a rose, the seeds of a sunflower and even the cochlea bone in your inner ear. Look closely enough, and you’ll find this spiraling structure everywhere. It’s based on a series of integers called the Fibonacci sequence. Leonardo Bonacci discovered the sequence while trying to figure out how many rabbits he could make starting with just two. It’s quite simple — add the right most integer to the previous one to get the next one in the sequence. Starting from zero, this would give you 0-1-1-2-3-5-8-13-21 and so on. If one was to look at this sequence in the form of geometric shapes, they can create square tiles whose sides are the length of the value in the sequence. If you connect the diagonal corners of these tiles with an infinite curve, you end up with the spiral that you saw in the pine cone and other natural objects.
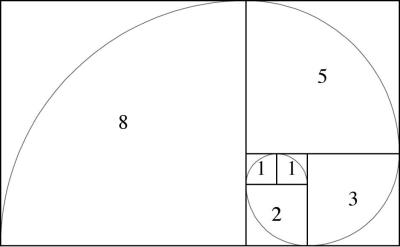
So how did mother nature discover this geometric structure? Surely it does not know math. How then can it come up with intricate and sophisticated structures? It turns out that this Fibonacci spiral is the most efficient way of squeezing the most amount of stuff in the least amount of space. And if one takes natural selection seriously, this makes perfect sense. Eons of trial and error to make the most copies of itself has stumbled upon a mathematical principle that permeates life on earth.
The homo sapiens brain is the product of this same evolutionary process, and has been evolving for an estimated 7 million years. It would be foolish to think that this same type of efficiency natural selection has stumbled across would not be present in the current homo sapiens brain. I want to impress upon you this idea of efficiency. Natural selection discovered the Fibonacci sequence solely because it is the most efficient way to do a particular task. If the brain has a task of storing information, it is perfectly reasonable that millions of years of evolution has honed it so that it does this in the most efficient way possible as well. In this article, we shall explore this idea of efficiency in data storage, and leave you to ponder its applications in the computer sciences.
Of all the things evolution has stumbled across, the eye is one of the most remarkable. Acting as sort of a ‘biological electromagnetic transducer’, the eye converts incoming photons into electrical and chemical spikes, known as action potentials. These spikes then drive the brain of the host life form. Billions of years of natural selection has produced several types of eyes, with some better than others. It would be an honest mistake to think that the human eye is at the top of the food chain, as this is not the case. Mammals underwent a long stint scurrying around in dark caves and crevasses, causing our eyes to take a back seat to other more important functions, such as the development of a cortex.
There are color sensitive cones in all eyes. Mammals have three types of cones, which are…wait for it…Red, Blue and Green. Our red and green cones are relatively recent on the evolutionary timescale – appearing about 30 million years ago.

The way these cones are distributed around our eyes is not perfect. They’re scattered around in lumpy, uneven patterns, and thus give us an uneven light sampling of our world. Evolution simply has not had enough time to optimize our eyes.
There is another animal on this planet, however, that never went through “the dark ages” as mammals did. This animal has been soaring high above its predators for over 60 million years, allowing its eyes to reach the pinnacle of the natural selection process. A bald eagle can spot a mouse from over a mile away. Birds eyes have 5 types of light sensitive cones – red, blue and green like our own. But add in violet and a type of cone that can detect no light, or black. But it is the way these cones are distributed around the bird’s eye that is most fascinating, and the subject of today’s article.
Continue reading “Hyperuniformity — A Hidden Order Found In The Greatest Set Of Eyes”

If there was one book that describes what it means to be in the trenches of a cutting edge design, that book is The Soul Of a New Machine. Tracy Kidder’s Pulitzer prize-winning book has been an inspiration to thousands over the years.
Soul is the story of the creation of the Data General Eclipse MV/8000, code-named Eagle. Eagle was Data General’s first 32-bit minicomputer. If you’re not a retrocomputing aficionado, minicomputers were a major industry back in the 70’s and 80’s. Starting in 1964 with the Digital Equipment Corporation (DEC) PDP-8, minis provided a low-cost means for companies to get a computer. The only other option was a huge mainframe from companies like IBM. Minicomputers chugged along until the 1990s when microprocessor-based PCs and workstations passed them by. The market, and the industry evaporated.
Today, more than 30 years later, minicomputers are all but forgotten. Data General itself is long gone, purchased by EMC in 1999. DG’s mark on the landscape has all but been erased by the swiftly moving sands of technical progress. All except for the snapshot Kidder set down in Soul.
The technical side of designing a new computer is just one part of this book. The Soul of a New Machine is three stories: the story of the engineers, the story of the managers, and the story of the machine they built. For this reason, the book has found itself on the reading list of engineering schools and management institutes alike.
The thing that makes this book appeal to the masses is Kidder’s uncanny ability to explain incredibly complex topics in layman’s terms. He manages to explain the inner workings of a 32-bit CPU, all the way down to the level of microcode. He delves into Programmable Array Logic (PALs), forerunners of the CPLD and FPGA devices you read about on our pages today. PALs were a hot new technology back in the late 70’s. They allowed the Eagle team to make changes quickly — without pulling out their wire wrapping tools.
Kidder manages to explain these things in a way that doesn’t leave the average Joe scratching their head, yet doesn’t bore the technically savvy. If he ever decides to stop writing non-fiction, Tracy Kidder would have a career writing user manuals.
The Soul of a New Machine starts in a very unlikely place – on the deck of a sailing ship during a rough storm. The scene is our introduction to the star of the book – Tom West, a manager at Data General. West is multifaceted and enigmatic to say the least. A folk guitarist who was inspired to work on electronics by the Apollo program. He was a few years too late for NASA though. Eventually he found himself travelling the world building and adjusting incredibly accurate clocks at astronomical observatories for the Smithsonian. This meandering path eventually led him to DG, where he was hired as a computer engineer and quickly worked his way up the ranks.
Continue reading “Books You Should Read: The Soul Of A New Machine”

Summer is the season for family road trips here in the US, and my family took to the open road in a big way this year. We pulled off a cross-country relocation, from Connecticut to Idaho. Five days on the road means a lot of pit stops, and we got to see a lot of truck stops and consequently, a lot of long-haul truckers. I got to thinking about their unique lifestyle and tried to imagine myself doing that job. I wondered what I’d do hour after long hour, alone in the cab of my truck. I figured that I’d probably just end up listening to a lot of audio books, but then I realized that there’s a perfect hobby for the road — ham radio. So I decided to see how ham radio is used by truckers, and mull over how a truck driver version of me might practice The World’s Best Hobby.
Continue reading “Fine Business, Good Buddy: Amateur Radio For Truckers”
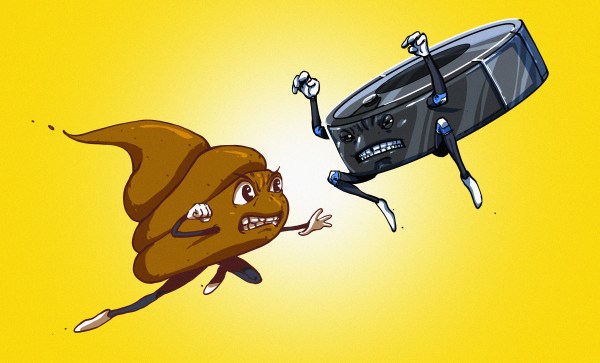
Imagine this: you come home after a day at work. As you open the door, your nose is the first alert that something is very, very wrong. Instead of the usual house smell, your nose is assaulted with the distinctive aroma that means your dog had an accident. The smell is stronger though — as if Fido brought over a few friends and they all had a party. Flipping the lights on, the true horror is revealed to you. This was a team effort, but only one dog was involved.
At some point after the dog’s deed, Roomba, your robot vacuum, took off on its scheduled daily run around the house. The plucky little robot performed its assigned duties until it found the mess. The cleaning robot then became an agent of destruction, smearing a foul smelling mess throughout the space it was assigned to clean. Technology sometimes has unintended consequences. This time, your technology has turned against you.
This scene isn’t a work of fiction. For a select few families, it has become an all too odoriferous reality just begging for a clever fix.
Continue reading “Roomba Vs Poop: Teaching Robots To Detect Pet Mess”


