Printed PC Speakers Are Way Cooler Than Yours

On the off chance you’re reading these words on an actual desktop computer (rather than a phone, tablet, smart mirror, game console…), stop and look at the speakers you have on either side of your monitor. Are you back now? OK, now look at the PC speakers and amplifier [Kris Slyka] recently built and realize you’ve been bested. Don’t feel bad, she’s got us beat as well.

The speaker and amplifier enclosures were painstakingly printed and assembled over the course of three months, and each piece was designed to be small enough to fit onto the roughly 4 in x 4 in bed of her PrintrBot Play. While limited print volume made the design considerably trickier, it did force [Kris] to adopt a modular design approach with arguably made assembly (and potential future repairs or improvements) easier.

The amplifier is made up of rectangular “cells” which are connected to each other via 3 mm threaded rods. For now the amplifier only has 4 cells, but this could easily be expanded in the future without having to design and print a whole new case. Internally the amplifier is using two TDA8932 digital amplifier modules, and some VU meters scored off of eBay.

Each speaker enclosure is made up of 10 individual printed parts that are then glued and screwed together to make the final shape, which [Kris] mentions was inspired by an audio installation at the Los Angeles County Museum of Art. They house 4″ Visaton FR 10 HM drivers, and are stuffed with insulation.

It’s a bit difficult to nail down the style that [Kris] has gone for here. You see the chunky controls and analog VU meters and want to call it retro, but it’s also a brass cog and sprocket away from being Steampunk. On the other hand, the shape of the speakers combined with the bamboo-filled PLA used to print them almost gives it an organic look: as if there’s a tree somewhere that grows these things. That’s actually a kind of terrifying thought, but you get the idea.

If your computer speakers were assembled by mere mortals, never fear. We’ve covered a number of interesting hacks and mods for more run-of-the-mill desktop audio setups which should hold you over until it’s time to harvest the speaker trees.

[via /r/3Dprinting]

Making A Headphone Amp Perform New Tricks

Hands up if you’ve had the misfortune to work in an office with a fondness for following the latest fads. Paperless office, how long did that last? Or moving from physical telephones to a flaky VOIP application on your Windows computer, that’s sure to be a resounding success! We’ve all been there at some point, haven’t we?

[Joshua Wise] found himself in that unenviable situation of the VOIP app move, and since he is a habitual headphone music listener the prospect of wearing his company-supplied headset was not appealing. His solution was to take his HeadRoom BitHead amplifier and plumb into it a microphone channel, and though he went through quite some work to reach that point the quality of his final work is very high.

He was in luck with the headphone amplifier, because the USB audio codec turns out to have an unused audio-in function as well as some HID input lines. His headset has a set of buttons as well as the microphone, which switch in and out a set of resistors to indicate which of them is pressed. Some work with a microcontroller to detect this resulted in a working interface, which he put along with the microphone circuitry on a beautifully done piece of protoboard.

Most constructors would have been happy at this point, but not [Joshua]. He proceeded to design a PCB to fit into the space around the headset socket, to contain the circuitry and better fit within the case. The result is an exceptionally high quality piece of work which he admits consumed a huge amount of resources but for which we applaud him.

So [Joshua] has a cool headset. But is it solar powered?

Eight SEGAs Singing

Way back in the dark ages, before the average computer could play back high quality recorded audio, things were done differently. Music and sounds were stored as instructions to be played back on audio synthesis chips, built into the computers and consoles of the 80s and 90s. These chips and their unique voices hold a special nostalgia that’s key to this era, making them popular to experiment with today. To that end, [little-scale] decided to wire up eight chips from the SEGA Master System to please your ears.

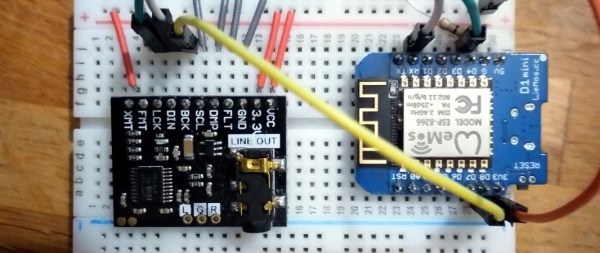
The chips, laid out on a breadboard with a Teensy LC running the show.

The chip in question is the SN76489, which we’ve also noted is used in the Sega Genesis as well. It packs 3 square wave tone generators, and a noise channel as well. With eight of these to play with, that’s 32 total channels. To drive these, [little-scale] decided to go the MIDI route. To get around the MIDI limit of 16 channels, he decided to split the frequency range in half. Each MIDI channel addresses two SN76489 channels, the top pitches being used for one, the lower pitches being used for the other. All this MIDI data is passed to a Teensy LC, which handles transposition of the note data to get everything back in tune, and addresses the eight chips to create a beautiful square wave symphony.

It’s a great way to create a cacophony of sound in a delightful vintage way, and code is available if you’d like to recreate the feat. What we’d like to know is this – what’s your favourite sound chip from yesteryear, and how badly do you want eight of them to sing in glorious harmony? Continue reading “Eight SEGAs Singing”

Raspberry Pi Media Streamer Is Combat Ready

We are truly living in the golden age of media streaming. From the Roku to the Chromecast, there is no shortage of cheap devices to fling your audio and video anywhere you please. Some services and devices may try to get you locked in a bit more than we’d like (Amazon, we’re looking at you), but on the whole if you’ve got media files on your network that you want to enjoy throughout the whole house, there’s a product out there to get it done.

But why buy an easy to use and polished commercial product when you can hack together your own for twice the price and labor over it for hours? While you’re at it, why not build the whole thing into a surplus ammo can? This the line of logic that brought [Zwaffel] to his latest project, and it makes perfect sense to us.

It should come as no surprise that a military ammo can has quite a bit more space inside than is strictly required for the Raspberry Pi 3 [Zwaffel] based his project on. But it does make for a very comfortable wiring arrangement, and offers plenty of breathing room for the monstrous 60 watt power supply he has pumping into his HiFiBerry AMP+ and speakers.

On the software side the Pi is running Max2Play, a Linux distro designed specifically for streaming audio and video remotely. [Zwaffel] says that with this setup he is able to listen to music on his Squeezebox server as well as watch movies via Kodi.

While none are quite as battle-hardened as this, we have seen several other Raspberry Pi Squeezebox clients over the years if you’re looking for more inspiration.

The Grafofon: An Optomechanical Sequencer

There are quick hacks, there are weekend projects and then there are years long journeys towards completion.  [Boris Vitazek]’s grafofon falls into the latter category. His creation can best be described as electromechanical sequencer synthesizer with a multiplayer mode.
The storage medium and interface for this sequencer is a thirteen-meter loop of paper that is mounted like a conveyor belt. Music is composed by drawing on the paper or placing objects on it. This is usually done by the audience and the fact that the marker isn’t erased make the result collaborative and incremental.
 These ‘scores’ are read by a camera and interpreted by software.This is a very vague description of this device, for a reason: the build went on over six years and both hard- and software went through several revisions in that time. It started as a trigger for MIDI notes and evolved from there.
In his write up [Boris] explains the technical aspects of each iteration. He also tells the stories of the people he met while working on the grafofon and how they influenced the build. If this look into the art world reminds you of your local hackerspace, it is because these worlds aren’t that far apart.

Continue reading “The Grafofon: An Optomechanical Sequencer”

Hackaday Prize Entry: SNAP Is Almost Geordi La Forge’s Visor

Echolocation projects typically rely on inexpensive distance sensors and the human brain to do most of the processing. The team creating SNAP: Augmented Echolocation are using much stronger computational power to translate robotic vision into a 3D soundscape.

The SNAP team starts with an Intel RealSense R200. The first part of the processing happens here because it outputs a depth map which takes the heavy lifting out of robotic vision. From here, an AAEON Up board, packaged with the RealSense, takes the depth map and associates sound with the objects in the field of view.

Binaural sound generation is a feat in itself and works on the principle that our brains process incoming sound from both ears to understand where a sound originates. Our eyes do the same thing. We are bilateral creatures so using two ears or two eyes to understand our environment is already part of the human operating system.

In the video after the break, we see a demonstration where the wearer doesn’t need to move his head to realize what is happening in front of him. Instead of a single distance reading, where the wearer must systematically scan the area, the wearer simply has to be pointed the right way.

Another Assistive Technology entry used the traditional ultrasonic distance sensor instead of robotic vision. There is even a version out there for augmented humans with magnet implants covered in Cyberpunk Yourself called Bottlenose.

Continue reading “Hackaday Prize Entry: SNAP Is Almost Geordi La Forge’s Visor”

Turning On Your Amplifier With A Raspberry Pi

Life is good if you are a couch potato music enthusiast. Bluetooth audio allows the playing of all your music from your smartphone, and apps to control your hi-fi give you complete control over your listening experience.

Not quite so for [Daniel Landau] though. His Cambridge Audio amplifier isn’t quite the latest generation, and he didn’t possess a handy way to turn it on and off without resorting to its infrared remote control. It has a proprietary interface of some kind, but nothing wireless to which he could talk from his mobile device.

His solution is fairly straightforward, which in itself says something about the technology available to us in the hardware world these days. He took a Raspberry Pi with the Home Assistant home automation package and the LIRC infrared subsystem installed, and had it drive an infrared LED within range of the amplifier’s receiver. Coupled with the Home Assistant app, he was then able to turn the amplifier on and off as desired. It’s a fairly simple use of the software in question, but this is the type of project upon which so much more can later be built.

Not so many years ago this comparatively easy project would have required a significant amount more hardware and effort. A few weeks ago [John Baichtal] took a look at the evolution of home automation technology, through the lens of the language surrounding the term itself.

Via Hacker News.