An Optical Mouse Sensor For Robotic Vision

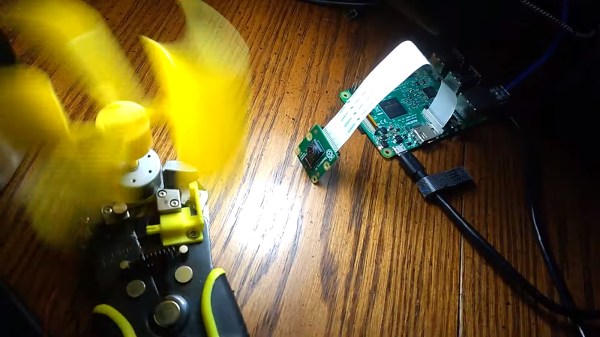
Readers with long memories will remember the days when mice and other similar pointing devices relied upon a hard rubber ball in contact with your desk or other surface, that transmitted any motion to a pair of toothed-wheel rotation sensors. Since the later half of the 1990s though, your rodent has been ever significantly more likely to rely upon an optical sensor taking the form of a small CCD camera connected to motion sensing electronics. These cameras are intriguing components with applications outside pointing devices, as is shown by [FoxIS] who has used one for robot vision.

The robot in question is a skid-steer 4-wheeled toy, to which he has added an ADNS3080 mouse sensor fitted with a lens, an H-bridge motor driver board, and a Wemos D1 Mini single board computer. The D1 serves a web page showing both the image from the ADNS3080 and an interface that allows the robot to be directed over a network connection. A pair of LiPo batteries complete the picture, with voltage monitoring via one of the Wemos analogue pins.

The ADNS3080 is an interesting component and we’d love see more of it. This laser distance sensor or perhaps this car movement tracker should give you some more info. We’ve heard rumors of them being useful for drones. Anyone?

Simple Camera Slider Adds A Dimension Or Two To Your Shots

Camera sliders are a popular build, and properly executed they can make for impressive shots for both time-lapse sequences or real-time action. But they seem best suited for long shots, as dollying a camera in a straight line just moves subjects close to the camera through the frame.

This slider with both pan and tilt axes can make moving close-ups a lot easier. With his extremely detailed build log, [Dejan Nedalkovski] shows how he went about building his with only the simplest of materials and tools. The linear rail is simply a couple of pieces of copper pipe supported by an MDF frame. The camera trolley rides the rails on common skateboard bearings and is driven by a NEMA-17 stepper, as are the pan and tilt axes. [Dejan] also provided a barn-door style pivot to tilt the camera relative to the rails, allowing the camera to slide up and down an inclined plane for really interesting shots. The controller uses an Arduino and a joystick to drive the camera manually, or the rig can be programmed to move smoothly between preset points.

This is a step beyond a simple slider and feels a little more like full-blown motion control. We’ve got a feeling some pretty dramatic shots would be possible with such a rig, and the fact that it’s a simple build is just icing on the cake.

Continue reading “Simple Camera Slider Adds A Dimension Or Two To Your Shots”

Who Said Thermal Cameras Weren’t Accessible To The Masses?

Thermal cameras hold an enduring fascination as well as being a useful tool for the engineer. After all, who wouldn’t want to point one at random things around the bench, laughing with glee at finding things warmer or colder than expected? But they’ve always been so expensive, and a lot of the efforts that have sought to provide one for little outlay have been rather disappointing.

This has not deterred [Offer] though, who has made an extremely professional-looking thermal camera using an M5Stack ESP32-based computer module and an AMG8833 thermal sensor array module in a 3D-printed case that copies those you’d find on a commercial unit. The modular approach makes it a simple prospect for the constructor, the software can be found on GitHub, and the case files are hosted on Thingiverse. You’ll be finding warm and cold things on your bench in no time, as the video below shows.

Most of the thermal cameras we’ve seen have centred upon the FLIR Lepton module, but that’s a component that remains expensive. This project shows us that thermal cameras are a technology that is slowly becoming affordable, and that greater things are to come.

Continue reading “Who Said Thermal Cameras Weren’t Accessible To The Masses?”

Stars Looking A Bit Dim? Throw Some Math At Them.

As the cost of high-resolution images sensors gets lower, and the availability of small and cheap single board computers skyrockets, we are starting to see more astrophotography projects than ever before. When you can put a $5 Raspberry Pi Zero and a decent webcam outside in a box to take autonomous pictures of the sky all night, why not give it a shot? But in doing so, many hackers are recognizing a fact well-known to traditional telescope jockeys: seeing a few stars is easy, seeing a lot of stars is another story entirely.

The problem is that stars are fairly dim; a problem compounded by the light pollution you get unless you’re out in a rural area. You can’t just brighten up the images either, as that only increases the noise in the image. A programmer always in search of a challenge, [Benedikt Bitterli] decided to take a shot at using software to improve astrophotography images. He documented the entire process, failures and all, on his blog for anyone else who might be curious about what it really takes to create the incredible images of the night sky we see in textbooks.

In principle it’s simple: just take a lot of pictures of the sky, stack them on top of each other, and identify which points of light are stars and which ones are noise artifacts. But of course the execution is considerably more difficult. For one thing, unless the camera was on a mount that was automatically tracking the sky, the stars will have slightly moved in each image. To help with this process, [Benedikt] used a navigational trick that humanity has relied on for millennia: mapping constellations. By comparing groupings of stars in each image, his software is able to accurately overlay each image.

But that’s only one part of the equation. In his post, [Benedikt] goes over the incredible amount of math that goes into identifying individual stars in the sea of noise you get when a digital image sensor looks into the black. You certainly don’t need to understand all the math to appreciate the final results, but it’s a fascinating read for those with an interest in computer vision concepts.

This kind of software is precisely what you want to pair with your 3D printed star tracker, or even better a Raspberry Pi sky monitoring station.

[Thanks to Helio Machado for the tip.]

3D Printed Clockwork Star Tracker

Astrophotography is one of those things you naturally assume must be pretty difficult; surely something so awesome requires years of practice and specialized equipment which costs as much as your car. You shake your fist at the sky (since you have given up on taking pictures of it), and move on with your life. Another experience you’ll miss out on.

But in reality, dramatic results don’t necessarily require sticker shock. We’ve covered cheap DIY star trackers before on Hackaday, but this design posted on Thingiverse by [Tinfoil_Haberdashery] is perhaps the easiest we’ve ever seen. It keeps things simple by using a cheap 24 hour clock movement to rotate a GoPro as the Earth spins. The result is a time-lapse where the stars appear to be stationary while the horizon rotates.

Using a 24 hour clock movement is an absolutely brilliant way to synchronize the camera with the Earth’s rotation without the hoops one usually has to jump through. Sure you could do with a microcontroller, a stepper motor, and some math. But a clock is a device that’s essentially been designed from the ground up for keeping track of the planet’s rotation, so why not use it?

If there’s a downside to the clock movement, it’s the fact that it doesn’t have much torque. It was intended to move an hour hand, not your camera, so it doesn’t take much to stall out. The GoPro (and other “action” cameras) should be light enough that it’s not a big deal; but don’t expect to mount your DSLR up to one. Even in the video after the break, it looks like the clock may skip a few steps on the way down as the weight of the camera starts pushing on the gears.

If you want something with a bit more muscle, we’ve recently covered a very slick Arduino powered “barn door” star tracker. But there’re simpler options if you’re looking to get some shots tonight.

Continue reading “3D Printed Clockwork Star Tracker”

People With Dementia Can DRESS Smarter

People with dementia have trouble with some of the things we take for granted, including dressing themselves. It can be a remarkably difficult task involving skills like balance, pattern recognition inside of other patterns, ordering, gross motor skill, and dexterity to name a few. Just because something is common, doesn’t mean it is easy. The good folks at NYU Rory Meyers College of Nursing, Arizona State University, and MGH Institute of Health Professions talked with a caregiver focus group to find a way for patients to regain their privacy and replace frustration with independence.

Although this is in the context of medical assistance, this represents one of the ways we can offload cognition or judgment to computers. The system works by detecting movement when someone approaches the dresser with five drawers. Vocal directions and green lights on the top drawer light up when it is time to open the drawer and don the clothing inside. Once the system detects the article is being worn appropriately, the next drawer’s light comes one. A camera seeks a matrix code on each piece of clothing, and if it times out, a caregiver is notified. There is no need for an internet connection, nor should one be given.

Currently, the system has a good track record with identifying the clothing, but it is not proficient at detecting when it is worn correctly, which could lead to frustrating false alarms. Matrix codes seemed like a logical choice since they could adhere to any article of clothing and get washed repeatedly but there has to be a more reliable way. Perhaps IR reflective threads could be sewn into clothing with varying stitch lengths, so the inside and outside patterns are inverted to detect when clothing is inside-out. Perhaps a combination of IR reflective and absorbing material could make large codes without being visible to the human eye. How would you make a machine-washable, machine-readable visual code?

Helping people with dementia is not easy but we are not afraid to start, like this music player. If matrix codes and barcodes get you moving, check out this hacked scrap-store barcode scanner.

Thank you, [Qes] for the tip.

Arduino Star Tracker Raises The Bar

Proving that astrophotography doesn’t have to break the bank, [Gerald Gattringer] has recently documented his DIY “barn door” style star tracker which is built almost entirely from scratch. Short of the Arduino and stepper motor, all the components were either made by hand or are standard hardware store finds.

The build starts with three aluminum plates which [Gerald] cut by hand with an angle grinder. He then drilled all the necessary screw holes and a rectangular opening for the threaded rod to pass through. He even used epoxy to mount a nut to the bottom plate which would eventually attach it to the tripod.

The plates were then roughed up and spray painted black so they wouldn’t reflect light. The addition of a couple of screws, nuts, and a standard hinge.

Motion is provided by a 28BYJ-48 stepper which is connected to the drive nut by way of a belt. The spinning nut is used to raise and lower the threaded rod which opens and closes the “door”. To control the motor, [Gerald] is using an Arduino Nano coupled with a ULN2003 Darlington array which live on a routed PCB he made with his school’s Qbot MINImill. While some might say the Arduino is unnecessary for this project, it does make the final calibration of the device much easier.

We’ve covered a number of similar star trackers here on Hackaday, including one that you crank by hand. But the professional looking final result really makes this build stand out.