Last week we covered the Symbiote Rootkit, based on the excellent work by Blackberry, Intezer, and Cyber Geeks. This particular piece of malware takes some particularly clever and devious steps to hide. It uses an LD_PRELOAD to interfere with system libraries on-the-fly, hiding certain files, processes, ports, and even traffic from users and detection tools. Read last week’s column and the source articles linked there for the details.
There is a general technique for detecting rootkits, where a tool creates a file or process that mimics the elements of the rootkit, and then checks whether any of the fakes mysteriously disappear. In reading about Symbiote, I looked for tooling that we could recommend, that uses this technique to check for infections. Coming up short, I dusted my security researcher hat off, and got to work. A very helpful pointer from Intezer led me to MalwareBazaar’s page on Symbiote. Do note, that page hosts live malware samples. Don’t download lightly.
This brings us to the first big problem we need to address. How do you handle malware without getting your machine and wider network infected? Virtualization can be a big part of the answer here. It’s a really big leap for malware to infect a virtual machine, and then jump the gap to infect the host. A bit of careful setup can make that even safer. First, use a different OS or distro for your VM host and research client. Sophisticated malware tends to be very targeted, and it’s unlikely that a given sample will have support for two different distros baked in. The bare-metal host is an up-to-date install for best security, but what about the victim?
While we want a bulletproof foundation, our research VM needs to be vulnerable. If the malware is targeted at a specific kernel version or library, we need that exact version to even get started. Unfortunately the samples at MalwareBazaar don’t include details on the machine where they were found, but they do come with links off to other analysis tools, like Intezer Analyze. One particular embedded string caught my eye: GCC: (GNU) 4.4.7 20120313 (Red Hat 4.4.7-17) That’s likely from the machine where this particular Symbiote sample was compiled, and it seems like a good starting point. GCC 4.4.7-17 shipped with Red Hat Enterprise Linux version 6.8. So we grab a CentOS 6.8 live DVD ISO, and get it booting on our VM host.
The next step is to download the malware samples directly from MalwareBazaar. They come in encrypted zips, just to make it harder to accidentally infect yourself. We don’t want those to land anywhere but the intended target. I went a step further and disconnected both the virtual network adapter and physical network cable, to truly air gap my research environment. I had my malware and likely target, and it was time to test my theory that Symbiote was trying too hard to be sneaky, and would sound the alarm on itself if I poked it just right.
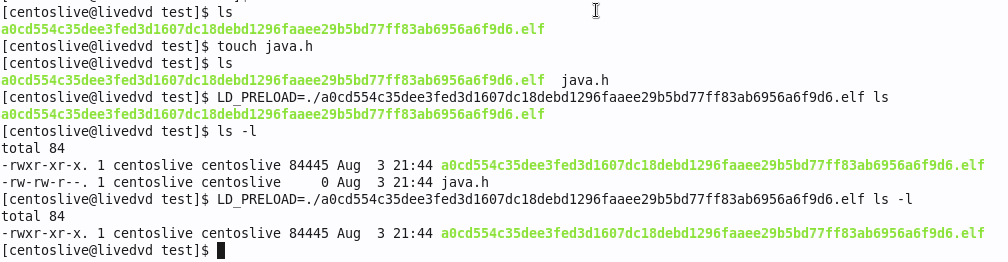
Success! We’re using touch to create a file named java.h, and using ls to verify that it’s really there. Then, add the LD_PRELOAD and run ls again, and java.h is mysteriously missing. A similar trick works for detecting process hiding. We turn java.h into a script by writing while true; do sleep 1; done into it. Run the script in the background, and see if it’s listed in ps -A -caf. For a filename on Symbiote’s hide list, it too disappears. The best part is that we can script this detection. I give you, sym-test.sh. It creates and runs a simple script for each of the known Symbiote files, then uses ls and ps to look for the scripts. A Symbiote variant that works like the samples we’ve seen in the wild will give away its presence and be detected. If you find Symbiote on your machine via this script, be sure to let us know!
BGP Hijack — Maybe
There was a bit of BGP weirdness last week, where the Russian telecom company, Rostelecom, announced routing for 17.70.96.0/19. This block of IPs is owned by Apple, and all signs point to this being an unauthorized announce. BGP, the Border Gateway Protocol, is one of the most important network protocols you may not have heard of, and essentially carries the instructions on how to route internet traffic around the world. It’s also historically not had any security protocols baked-in, simply relying on good behavior from all the players. There is RPKI, a new standard for cryptographic signatures for routing updates, but it’s not a hard requirement and not widely deployed yet.
BGP, without any of the security enhancement schemes, works by honoring the most specific route available. Apple announces routes for 17.0.0.0/9, a network of over 8,000,000 IPs. Rostelecom started announcing 17.70.96.0/19, a much smaller subnet containing just over 8,000 IPs. The more specific route wins, and Rostelecom has a valid ASN, so the Internet made the routing shift. Someone at Apple was paying attention, and pushed a routing update for 17.70.96.0/21, moving what is presumably the most important 2,046 IPs back to their proper destination. After about 12 hours, Rostelecom dropped the bogus routes. Neither Apple nor Rostelecom have released statements about the incident.
Were this the first incident involving Rostelecom, it would be natural to conclude this was an honest mistake. Rostelecom has demonstrated bad behavior in the past, so the element of plausible deniability is waning. Could this have been part of a targeted operation against someone’s iPhone or Apple account? It’s hard to say whether we’ll be privy to the details any time soon. At the very least, you can watch a replay of the network carnage.
Email Routing Hijack
Cloudflare is expanding into email routing, and researcher [Albert Pedersen] was a bit miffed not to get invited into the closed Beta. (The Beta is open now, if you need virtual email addresses for your domains.) Turns out, you can use something like the Burp Suite to “opt in” to the beta on the sly — just intercept the Cloudflare API response on loading the dashboard, and set "beta": true. The backend doesn’t check after the initial dashboard load. While access to a temporarily closed beta isn’t a huge security issue, it suggests that there might be some similar bugs to find. Spoilers: there were.
When setting up a domain on your Cloudflare account, you first add the domain, and then go through the steps to verify ownership. Until that is completed, it is an unverified domain, a limbo state where you shouldn’t be able to do anything other than complete verification or drop the domain. Even if a domain is fully active in an account, you can attempt to add it to a different account, and it will show up as one of these pending domains. Our intrepid hacker had to check, was there a similar missing check here? What happens if you add email routing to an unverified domain? Turns out, at the time, it worked without complaint. A domain had to already be using Cloudflare for email, but this trick allowed intercepting all emails going to such a domain. [Albert] informed Cloudflare via HackerOne, and scored a handy $6,000 for the find. Nice!
Post-Quantum, But Still Busted
The National Institute of Standards and Technology, NIST, is running an ongoing competition to select the next generation of cryptography algorithms, with the goal of a set of standards that are immune to quantum computers. There was recently a rather stark reminder that in addition to resistance to quantum algorithms, a cryptographic scheme needs to be secure against classical attacks as well.
SIKE was one of the algorithms making its way through the selection process, and a paper was just recently published that demonstrated a technique to crack the algorithm in about an hour. The technique used has been known for a while, but is extremely high-level mathematics, which is why it took so long for the exact attack to be demonstrated. While cryptographers are mathematicians, they don’t generally work in the realm of bleeding-edge math, so these unanticipated interactions do show up from time to time. If nothing else, it’s great that the flaw was discovered now, and not after ratification and widespread use of the new technique.
Bits and Bruggling Bytes
A portmanteau of Browser and Smuggling, Bruggling is a new data exfiltration technique that is just silly enough to work. Some corporate networks try very hard to limit the ways users and malicious applications can get data off the network and out to a bad actor over the Internet. This is something of a hopeless quest, and Bruggling is yet another example. So what is it? Bruggling is stuffing data into the names and contents of bookmarks, and letting the browser sync those bookmarks. As this looks like normal traffic, albeit potentially a *lot* of traffic, it generally won’t trigger any IDS systems the way odd DNS requests might. So far Bruggling is just an academic idea, and hasn’t been observed in the wild, but just may be coming to malware near you.
LibreOffice just patched a handful of issues, and two of them are particularly noteworthy. First is CVE-2022-26305, a flaw in how macros are signed and verified. The signature of the macro itself wasn’t properly checked, and by cloning the serial number and issuer string of a trusted macro, a malicious one could bypass the normal filter. And CVE-2022-26306 is a cryptographic weakness in how LibreOffice stores passwords. The Initialization Vector used for encryption was a static value rather than randomly created for each install. This sort of flaw usually allows a pre-computation attack, where a lookup table can be compiled that enables quickly cracking an arbitrary encrypted data set. In up-to-date versions of LibreOffice, if using this feature, the user will be prompted for a new password to re-encrypt their configuration more securely.
Samba has also fixed a handful of problems, one of which sounds like a great plot point for a Hollywood hacking movie. First is CVE-2022-32744, a logic flaw where any valid password is accepted for a password change request, rather than only accepting the valid password for the account being changed. And CVE-2022-32742 is the fun one, where an SMB1 connection can trigger a buffer underflow. Essentially a client tells the server it wants to print 10 megabytes, and sends along the 15 bytes to print (numbers are fabricated for making the point). The server copies the data from the way-too-small buffer, and uses the size value set by the attacker, a la Heartbleed. I want to see the caper movie where data is stolen by using this sort of bug to print it out to the long-forgotten line-feed printer.
And finally, Atlassian Confluence installs are under active attack, as a result of a handful of exploits. There were hard-coded credentials left behind in the on-premise Confluence solution, and those credentials were released online. A pair of critical vulnerabilities in Servlet Filters are exploitable without valid credentials. If you’re still running unpatched, unmitigated Confluence installs, it may be time to jump straight to containment and cleanup. Ouch!