Fail Of The Week: Leaf Blowers Can’t Fly

Leaf blowers, the main instrument of the suburban Saturday symphony, are one of the most useful nuisances. It doesn’t take much work with a rake to convince even the most noise-averse homeowner to head to the Big Box Store to pick one up to speed lawn chores. Once you do buy one, and feel the thrust produced by these handheld banshees, you might wonder, If I let go of this thing, would it fly? 

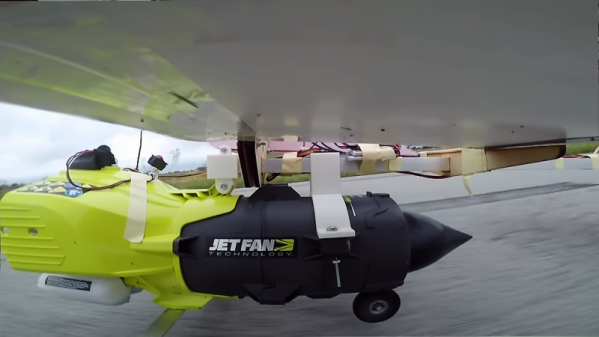
[Peter Sripol] had that very thought and set about building a couple of leaf blower powered planes to answer the question. It’s probably not a spoiler alert to report that the answer is no, but the video below is a fun watch anyway. The surprising thing is just how close both planes came to succeeding. The first plane was a stripped-down Ryobi two-stroke leaf blower suspended from a giant wing and tail section that very nearly got off the ground. Version 1.1 gained a retractable electric boost propeller – strictly for take-offs – and lost a lot of excess weight. That plane practically leaped into the air, but alas, servo problems prevented [Peter] from shutting down the electric and flying on Ryobi alone. Even a servo fix couldn’t save the next flight, which cratered right after takeoff. A version 2.0, this time using a brutally modified electric leaf blower, was slightly more airworthy but augured in several times before becoming unflyable.

What can we learn from all this? Not much other than it would take a lot of effort to make a leaf blower fly. We appreciate all of [Peter]’s hard work here, but we think he’s better off concentrating on his beautiful homebrew ultralight instead.

Continue reading “Fail Of The Week: Leaf Blowers Can’t Fly”

New Part Day: A $6 Linux Computer You Might Be Able To Write Code For

The latest news from the world of cheap electronics is a single board computer running Linux. It costs six dollars, and you can buy it right now. You might even be able to compile code for it, too.

The C-Sky Linux development board is listed on Taobao as an ‘OrangePi NanoPi Raspberry Pi Linux Development Board” and despite some flagrant misappropriation of trademarks, this is indeed a computer running Linux, available for seven American dollars.

This board is based on a NationalChip GX6605S SoC, a unique chip with an ISA that isn’t ARM, x86, RISC-V, MIPS, or anything else that would be considered normal. The chip itself was designed for set-top boxes, but there are a surprising number of build tools that include buildroot, GCC and support for qemu. The company behind this chip is maintaining a kernel, and support for this chip has been added to the mainline kernel. Yes, unlike many other single board computers out there, you might actually be able to compile something for this chip.

The features for this board include 64 MB of DDR2 RAM, HDMI out (with a 1280 x 720 framebuffer, upscaled to 1080p, most likely), and a CPU running at just about 600 MHz. There are a few buttons connected to the GPIO pins, two USB host ports, a USB-TTL port for a serial console, and a few more pins for additional GPIOs. There does not appear to be any networking, and we have no idea what the onboard storage is.

If you want a challenge to get something compiled, this is the chip for you.

Hackaday Links Column Banner

Hackaday Links: The Eleventh Day Of The Eleventh Month, 2018

For the better part of the last five years, the Great War Channel on YouTube has been covering the events of the Great War, week by week, exactly 100 years later. It’s hundreds of episodes designed for history buffs, and quite literally one of the most educational channels on YouTube. It’s the eleventh day of the eleventh month of the eighteenth year, which means the folks behind the Great War Channel are probably taking a well-deserved vacation. If you haven’t heard of this channel, it might be a good time to check it out.

Ikea is now selling NFC locks. [Mike] wrote in to tell us he found the new ROTHULT drawer deadbolts for $18 at Ikea. No, these aren’t meant for your front door, they’re meant for file cabinets. That’s a different threat model, and no lock is ever completely secure. However, there are some interesting electronics. You get a lock powered by three AAA batteries and two NFC cards for $18. Can’t wait for the teardown.

The biggest news from the United States this week is big. People gathered in the streets. Millions made sure their voices were heard. Journalists were cut down for asking questions. This is a week that will go down in history. The McRib is back for a limited time. It’s just a reconstituted pork patty, pickles, onions, and sauce on a hoagie roll, but there’s more to the McRib than you would think. McDonalds only releases the McRib when the price of pork is low, and in late October, pork belly futures hit their lowest price since the last time the McRib came to town. This has led some to claim the McRib is just a second lever for McDonalds in an arbitrage play on the price of pork. McDonalds is always buying pork futures, the theory goes, and when it looks like they’re going to lose money, McDonalds simply turns on the McRib production line, pushing pork consumption up, and netting McDonalds a tidy profit. With the volume you’re looking at, McDonalds will never lose money by betting on pork.

You can turn anything into a quadcopter. A dead cat? Yes, it’s been done. How about a quartet of box fans? That’s what the folks at Flite Test did, and while the completed article was wobbly and didn’t survive its first crash, it was a quadcopter made out of box fans.

X-Ray Vision For FPGAs: Using Verifla

Last time I talked about how I took the open source Verifla logic analyzer and modified it to have some extra features. As promised, this time I want to show it in action, so you can incorporate it into your own designs. The original code didn’t actually capture your data. Instead, it created a Verilog simulation that would produce identical outputs to your FPGA. If you were trying to do some black box simulation, that probably makes sense. I just wanted to view data, so I created a simple C program that generates a VCD file you can read with common tools like gtkwave. It is all on GitHub along with the original files, even though some of those are not updated to match the new code (notably, the PDF document and the examples).

If you have enough pins, of course, you can use an external logic analyzer. If you have enough free space on the FPGA, you could put something like SUMP or SUMP2 in your design which would be very flexible. However, since these analyzers are made to be configurable from the host computer, they probably have a lot of circuitry that will compete with yours for FPGA space. You configure Verifla at compile time which is not as convenient but lets it have a smaller footprint.

Continue reading “X-Ray Vision For FPGAs: Using Verifla”

Linux Fu: Pimp Your Pipes

One of the best things about working at the Linux (or similar OS) command line is the use of pipes. In simple terms, a pipe takes the output of one command and sends it to the input of another command. You can do a lot with a pipe, but sometimes it is hard to work out the right order for a set of pipes. A common trick is to attack it incrementally. That is, do one command and get it working with the right options and inputs. Then add another command until that works. Keep adding commands and tweaking until you get the final results.

That’s fine, but [akavel] wanted better and used Go to create “up” — an interactive viewer for pipelines.

Pipe Philosophy

Pipes can do a lot. They match in with the original Unix philosophy of making each tool do one thing really well. Pipe is really good at allowing Linux commands to talk to each other. If you want to learn all about pipes, have a look at the Linux Info project’s guide. They even talk about why MSDOS pipes were not really pipes at all. (One thing that write up doesn’t touch on is the named pipe. Do a “man fifo” if you want to learn more for now and perhaps that will be the subject of a future Linux Fu.)

This program — called up — continuously runs and reruns your pipeline as you make changes to the pipe. This way, every change you make is instantly reflected in the output. Here’s the video, here’s a quick video which shows off the interactive nature of up.

Installing

The GitHub page assumes you know how to install a go program. I tried doing a build but I didn’t have a few dependencies. Turns out the easy way to do it was to run this line:

go get -u github.com/akavel/up

This put the executable in ~/go/bin — which isn’t on my path. You can, of course, copy or link it to some directory that’s on your path or add that directory to your path. You could also set an alias, for example. Or, like I did in the video, just specify it every time.

Perfect?

This seems like a neat simple tool. What could be better? Well, I was a little sad that you can’t use emacs or vi edit keys on the pipeline, at least not as far as I could tell. This is exactly the kind of thing where you want to back up into the middle and change something. You can use the arrow keys, though, so that’s something. I also wished the scrollable window had a search feature like less.

Otherwise, though, there’s not much to dislike about the little tool. If writing a pipeline is like using a C compiler, up makes it more like writing an interactive Basic program.

Better 3D Printing Through Magnets

Just like Goldilocks found some porridge too hot and some too cold, 3D printers often have beds that don’t stick well enough or stick too well. A few weeks ago I switched two of my three printers to use magnetic beds and thought I’d share with you how that worked out. Spoiler alert: like most things it has its plusses and minuses.

It isn’t a secret that 3D printing is not a plug-and-play operation, especially at the price most of us are willing to pay for printers. There are lots of variables to get right: temperature, speeds, bed leveling, and a bunch of other things. However, one of the things that vexes many people is the relationship between getting that first layer to stick and being able to get the print off the bed when you are done. It is hard to find a happy medium. If the first layer won’t stick, you print is doomed. If the first layer sticks too well, you are likely to damage the part or your fingers getting it removed. I switched to BuildTak surfaces long ago, and many people like PEI. But it is sometimes hard to get a big part removed. A few weeks ago, I took the plunge and bought some magnetic build surfaces for two of my printers. These were “no name” inexpensive affairs from Ali Express.

The idea is simple. There are two sheets that look like a rubberized plastic and have magnetic properties. One piece has some 3M adhesive on the back. The other has one surface that resembles BuildTak. Once you glue down the one sheet you leave it alone. Then you put the other sheet on top and print on it. When you are done, you can pull the sheet out and flex it to pop the print off. That’s the theory, anyway. Continue reading “Better 3D Printing Through Magnets”

Video Quick Bit: The Best DIY Musical Instruments

The Hackaday Prize is almost over, and soon we’ll know the winners of the greatest hardware competition on the planet. A few weeks ago, we wrapped up the last challenge in the Hackaday Prize, the Musical Instrument Challenge. This is our challenge to build something that goes beyond traditional music instrumentation. Majenta’s back again looking at the coolest projects in the Musical Instrument Challenge in the Hackaday Prize.

We’re old-school hardware hackers here, and when you think about building your own drum machine, there’s really nothing more impressive than building one out of an Atari 2600. That’s what [John Sutley] did with his Syndrum project. It’s a custom cartridge for an Atari with a fancy ZIF socket. Of course, you need some way to trigger those drum sounds, so [John] is using an Arduino connected to the controller port as a sort-of MIDI-to-Joystick bridge.

If you want more retro consoles turned into musical instruments, look no further than [Aristides]’ DMG-01 Ukulele. It’s a ukulele with a 3D printed neck, bolted onto the original ‘brick’ Game Boy. Yes, it works as a ukulele, but that’s not the cool part. There are electronics inside that sense each individual string and turn it into a distorted chiptune assault on the ears. Just awesome.

How about a unique, new musical instrument? That’s what [Tim] is doing with Stylish!, a wearable music synthesizer. It’s based heavily on a stylophone, but with a few interesting twists. It’s built around an STM32, so there are a lot of options for what this instrument sounds like, and it’s all wrapped up in a beautiful enclosure. It’s some of the best work we’ve seen in this year’s Musical Instrument Challenge.

The Hackaday Prize is almost over, and on Saturday we’ll be announcing the winners at this year’s Hackaday Superconference. Tune in to the live stream to see which project will walk away with the grand prize of $50,000!