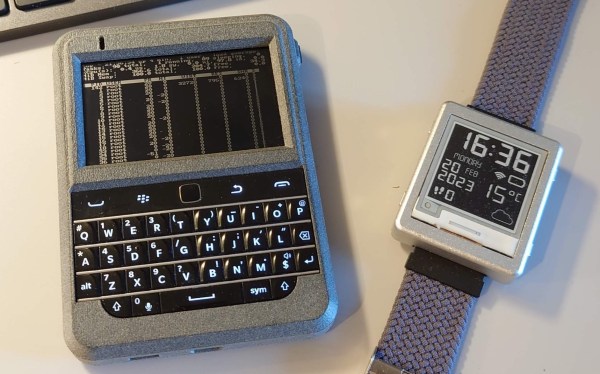
Improving An Already Phenomenal Star Trek Prop

When Star Trek: Voyager was in the development phase, concept art was created for a new style of tricorder to be used by the crew of the titular starship. But as it often the case with a younger sibling, the show ended up having to largely make do with the hand-me-down props from Star Trek: The Next Generation, which had recently finished its TV run.

Trek aficionado [Mangy_Dog] completed a jaw-dropping recreation of this unused tricorder design back in 2019, but unable to leave well enough alone, he’s recently completed a second version that truly raises the bar for fan replicas. It’s not hyperbole to say that the prop he’s created is of a far higher quality and fidelity than anything they would have had during the actual filming of the show.

Now you might be thinking that building the second version of the tricorder was easier than the first, and indeed, [Mangy_Dog] learned some important lessons from the earlier build. But that’s not to say that construction of this new replica, which was actually done on commission, went off without a hitch. In fact, he almost immediately ran into a serious problem. When he attempted to order a new display from Nextion, he found the quality had dropped significantly from the ones he’d used previously. The viewing angles and color reproduction were abysmal, so he was forced to go back to the drawing board and not only find a new display, but a completely new graphics chip to talk to it. Continue reading “Improving An Already Phenomenal Star Trek Prop”

Portable PI Powered Music Player

There was a brief time in the early 2000s when we carried cellphones, wallets, keys, and a bespoke digital media player loaded with a small selection of our music libraries. Devices like iPods, Zunes, Sandisk Sansa, and iRiver. Then as cell phones gained more storage and processing power, the two devices became one, and audio players slipped to obscurity as sports accessories. Perhaps in that vein, [BalderDragonSlayer] made his own Raspberry Pi-powered media player.

The device was cobbled together using a Raspberry Pi Zero, an Adafruit OLED bonnet, a LiPo charger, and a cheap USB DAC. The interface software is written in python, which has all your usual player controls, using the directional joystick and two pushbuttons on the bonnet. DietPi is a slimmed-down Linux that offers an impressively fast boot time, which is why it was picked for this project. The case was a simple project case with some holes dremeled into the face for the screen and buttons.

It is a wonderful little project that seems wonderful for walks in the park. This isn’t the first Pi-powered media player we’ve seen before. But we’re hoping we see more in the future.

DIY Infrared Calculator Printer

[Ziggurat29] had been playing around with infrared protocols, and realized he had a spare point-of-sale printer kicking around in his junk box. So he decided to whip up his own calculator infrared printer by bolting on an STM32 Blue Pill module and an IR receiver. [Ziggurat29] initially thought such a homemade printer would be cheaper than a commercial HP 82240 IR printer, even a used one. In hindsight, these point-of-sale printers can be pricey. If you don’t have one laying around, it may be cheaper to buy one, but not as fun as building it yourself.

It used to be commonplace for calculators to have a printing mechanism — even entirely mechanical adding machines often had them. As electronic calculators became the norm, the printer began to fade away. Back in 1987, HP introduced a portable calculator printer, the HP 82240A (see HP Journal Oct 1987). The calculator could print using a one-way infrared protocol which came to be known as Redeye. This made good sense, since not every one needs a printing calculator. As well, if you had one of these printers, it could be used with multiple calculators. Later in 1991, HP added a bi-directional infrared link called SIR beginning with the HP 48SX calculator (see HP Journal Jun 1991), allowing calculators to communicate with each other or with an IR-equipped PC. Finally HP and other companies teamed up in 1995 to create the IrDA standards you are probably more familiar with. But a bunch of Redeye and SIR devices are still floating around, and even some modern calculators like SwissMicros offerings can still output to these printers.

If you want to make your own IR printer, be sure to check out [ziggurat29]’s Hackaday.io project. Also [Martin Hepperle] has an excellent writeup on an Arduino-based project on his site. We also covered a reverse project way back in 2011, an adaptor that prints over IR from wired serial signals. Have you found a printing calculator, or a standalone printer like this, to be useful in your workflow? Let us know in the comments below.

An Open Source Detector For Identifying Plastics

One of the challenges involved in recycling plastic is determining the specific type of plastic a given item is actually made of. To keep up with demand, large scale recycling centers rely on various automated systems to separate different types of plastic from a stream of incoming material. But in less technologically advanced parts of the world, workers can find themselves having to manually identify plastic objects; a time consuming and error-prone process.

To try and improve on the situation, [Jerry de Vos], [Armin Straller], and [Jure Vidmar] have been working on a handheld open hardware device that they refer to simply enough as the Plastic Scanner. The hope is that their pocket-sized unit could be used in the field to positively identify various types of plastic by measuring its reflectivity to infrared light. The device promises to be very easy to operate, as users simply need to bring the device close to a piece of plastic, push the button, and wait for the information to pop up on the OLED display.

Or at least, that’s the idea. While the team eventually hopes to release a kit to build your own handheld Plastic Scanner, it seems that the hardware isn’t quite ready for production. The most recent work appears to have been put in, not unexpectedly, the development board that lets the team refine their process. The development unit combines an array of IR LEDs with wavelengths ranging from 850 to 1650 nanometers, a InGaAs photodiode connected to an ADS1256 24-bit analog-to-digital converter (ADC), and an Arduino Uno. In comparison, the final hardware uses a Raspberry Pi Zero and a smaller “breakout board” that contains the sensor and IR LEDs.

Browsing through the software repository for the project, we can see the device uses Python, TensorFlow Lite, and a database of IR reflectivity values for known plastics to try and determine the closest match. Obviously the accuracy of such a system is going to be highly dependent on the quantity of known-good data, but at least for now, it appears the user is responsible for building up their own collection or IR values.

As interesting as this project is, we’re a bit skeptical about its purely optical approach to identifying plastics. Automated recycling centers do use infrared spectroscopy, but it’s only one tool of many that are employed. Without additional data points, such as the density or electrostatic properties of the plastic being tested, it seems like the Plastic Scanner would have a fairly high margin of error. Just taking into account the wide array of textures and colors the user is likely to encounter while using the device will be a considerable challenge.

Continue reading “An Open Source Detector For Identifying Plastics”

Play Doom Or GTA V With Your Own Custom Controller And Xbox Emulator

[Arnov] is bringing his own custom-made controller to the party and it is sure to impress. The design appears to have been inspired by the Xbox controller layout. Two joysticks for fine control of game characters, 4 face buttons, and two shoulder buttons. He opted for all through-hole components to make the assembly easier. No messing with tiny surface mount components here. We really appreciate the detail given to the silkscreen and the homage paid to a staple of retro gaming.

We were pretty impressed with how smoothly the controller translated to the game. He mentioned that was a huge improvement over his previous design. His original design had buttons instead of joysticks, but switching to joysticks gave him much better in-game control. That could also have a lot to do with the Xbox controller emulator running the background, but still.

Given that gift-giving season is upon us, you could really impress the video game enthusiast in your life with this as a custom gift. You could even run Retro games like Doom if you hook it up to a RetroPie. That ought to get a few people’s attention.

Continue reading “Play Doom Or GTA V With Your Own Custom Controller And Xbox Emulator”

HPi95LX Puts Linux In Your Palm

A few decades ago, palmtop computers were mostly based on MS-DOS, and while many users tried to mimic the UNIX experience, the results were mixed. Fast forward to the present and business-card-sized Linux computers modules abound. Canadian tinkerer [Rune Kyndal] decided to make his own Linux palmtop by sacrificing an old HP-95LX and replacing the guts with a Raspberry Pi Zero and a color LCD screen. We’re impressed with the rich set of features he has crammed into the limited volume of the case:

Inside View: Everything fits, barely
  • Raspberry Pi Zero W
  • Color LCD, 4.3 inch, 800×480 w/Backlight
  • Capacitive touch screen (not connected yet)
  • Stereo speakers + microphone
  • Ethernet 10/100
  • USB 2.0, 2 each
  • RS-232, DE-9 connector
  • microSD card
  • HDMI
  • IR dataport
  • Webcam (TBD)
  • LiPo Battery w/Charger

One problem that any palmtop faces is how to make a usable keyboard, and HP had one of the better designs. The keys are the same famous style as used in HP calculators. And while no human with normal hands could touch-type on it, the keyboard’s layout and tactile feel was well-suited to “thumb typing”. [Rune] made a good decision by keeping the original keyboard.

While fully functional, this is more of a proof of concept than a polished project. [Rune] primarily used bits and pieces that he had laying around. [Rune] says if he did it again, he would replace all the hot-glued accessory parts with a custom PCB, which is probably good advice. If you want to make your own, check out the project comments for some suggestions.

GBA Remote Play Upgrade Lets You Play PlayStation On The Bus

The Nintendo Game Boy Advance was basically the handheld gaming situation of its era, by virtue of the fact that it had no serious competitors in the market. The system was largely known for 2D games due to hardware limitations.

However, [Rodrigo Alfonso] has recently upgraded his GBA Remote Play system that lets him play PlayStation games and others on his classic Game Boy Advance. We first featured this project back in July, which uses a Raspberry Pi 3 to emulate games and pipe video data to the handheld for display, receiving button presses in return.

Since then, [Rodrigo] has given the project some upgrades, in the form of a 3D-printed case that mounts a battery-powered Pi directly to the back of the console for portable play. Additionally, overclocking the GBA allows for faster transfer rates over the handheld’s Link Port, which means more pixels of video data can be clocked in. This allows for more playable frame rates when running at 240×160, the maximum resolution of the GBA screen.

The result is a Game Boy Advance which you can use to play Crash Bandicoot on the bus just to confuse the normies. Of course, one could simply build a Raspberry Pi handheld from scratch to play emulated games. However, this route takes advantage of the GBA form factor and is pretty amusing to boot. Video after the break.

Continue reading “GBA Remote Play Upgrade Lets You Play PlayStation On The Bus”