Two e-readers side to side. On the left, you can see the frontal view, showing text on the e-ink screen. On the right, you can see the backside with a semi-transparent 3D-printed cover over it, and two AAA batteries inside a holder in the center.

Open Book Abridged: OSHW E-Reader Now Simplified, Pico-Driven

If you ever looked for open-source e-readers, you’ve no doubt seen [Joey Castillo]’s Open Book reader, but you might not yet have seen the Abridged version he’s building around a Raspberry Pi Pico.

The Open Book project pairs a 4.2″ E-Ink screen with microprocessors we all know and love, building a hacker-friendly e-reader platform. Two years ago, this project won first place in our Adafruit Feather contest — the Feather footprint making the Open Book compatible with a wide range of MCUs, giving hackers choice on which CPU their hackable e-reader would run. Now, it’s time for a RP2040-based reboot.

three PCBs being shown - one soldered-together version with a Pico on it, and two upopulated PCBs, showing front and back, on the populated PCB, you can see the Raspberry Pi Pico and other components soldered on. On the unpopulated PCBs, you can see there's a lot of text helping you understand and assemble this e-reader.This project is designed so that you can assemble it on your own after sourcing parts and PCBs. To help you in the process, the PCB itself resembles a book page – on the silkscreen, there is explanations of what each component is for, as well as information that would be useful for you while hacking on it, conveying the hardware backstory to the hacker about to dive into assembly with a soldering iron in hand. There’s simple but quite functional software to accompany this hardware, too – and, as fully open-source devices go, any missing features can be added.

Joey has recorded a 30-minute video of the Pi Pico version for us, assembling and testing the newly ordered boards, then showing the software successfully booting and operational. The Pi Pico-based revision has been greatly simplified, with a number of self-assembly aspects improved compared to previous versions – the whole process really does take less than half an hour, and he gets it done with a pretty basic soldering iron, too!

If you’re looking for updates on this revision as development goes on, following [Joey] on Twitter is your best bet. He’s no stranger to making devices around us more free and then sharing the secret sauce with all of us! During the 2021 Remoticon he showed off a drop-in replacement mainboard for the Casio F-91W wristwatch, and told us all about reverse-engineering its controller-less segment LCD — worth a listen for any hacker who’s ever wanted to bend these LCDs to their will.

Continue reading “Open Book Abridged: OSHW E-Reader Now Simplified, Pico-Driven”

A graphing calculator with a 3D-printed enclosure, with a circuit board next to it

2022 Cyberdeck Contest: The Galdeano Is More Than A Graphing Calculator

Graphing calculators have evolved from expensive playthings for rich nerds to everyday tools for high schoolers worldwide. Even though teenagers nowadays carry powerful internet-connected computers in their pockets, math teachers often prefer them to use a clunky Z80-powered calculator in class, if only because their limited performance reduces the potential for distraction. The worst thing a lazy student can do is play a simple game like Snake or Tetris.

But what if you’re not a student anymore and you want a graphing calculator that has up-to-date hardware and infinite customizability in software? Look no further than [Angel Cabello]’s Galdeano, a handheld that has all the features of a modern graphing calculator plus a lot more. The heart of the device is an ESP32, which sits on a custom PCB that also holds a 6×7 array of push-buttons and a 320×240 touch-sensitive color display. It can be powered through a lithium-polymer battery or, like a classic calculator, through four AAA cells. The entire thing is housed in a 3D printed enclosure with color-coded buttons indicating various built-in functions.

The ESP32 runs MicroPython along with a symbolic math engine called Eigenmath. This enables the Galdeano to  manipulate expressions, perform integration and differentiation, and plot functions. Porting Eigenmath to a memory-constrained platform like the ESP32 was quite a challenge and required a few workarounds, including a memory partition scheme and even a custom compact font with mathematical symbols.

Thanks to the flexibility of MicroPython and the ESP’s WiFi system, the Galdeano is not limited to implementing a calculator: it can also perform various general-purpose tasks ranging from file editing to controlling a set of smart light bulbs. The project page doesn’t mention any games yet, but we’re sure it won’t take long before someone ports Tetris to this system as well.

Of course, even classroom-grade calculators can be pushed to do much more than their designers intended: they can receive GPS signals, run Debian or even perform ray tracing. If you’re looking for a powerful open-source calculator, this BeagleBoard-based machine runs the R statistical computing environment.

Continue reading “2022 Cyberdeck Contest: The Galdeano Is More Than A Graphing Calculator”

Front and back of a handheld 6502 computer with bubble LED displays

The Pocket265 Is A Pocket-Sized 6502 Single-Board Computer

Single-board computers have been around ever since microprocessors became affordable in the 1970s and never went away. Today we have Raspberry Pis and LattePandas, while back in the ’70s and ’80s there were the Ferguson Big Board, the KIM-1 and a whole array of Intel SDK boards. Although functionally similar to their modern counterparts with a CPU, RAM, ROM and some basic peripherals, the old boards were huge compared to today’s tiny platforms and typically required a rather beefy power supply to operate.

It doesn’t have to be that way though, as [Aleksander] shows with the Pocket265: a handheld 6502 single-board computer somewhat reminiscent of the famous KIM-1. Like that classic machine, it’s got a hexadecimal keypad to enter programs using machine code and a row of LED displays to show the programs’ output. Unlike the KIM, the Pocket265 is small enough to hold in one hand and uses bubble LED displays, which make it look more like a programmable calculator from the 1970s. It comes with a lithium battery that makes it truly portable, as well as a sleek 3D printed case to make it more comfortable to hold than a bare circuit board.

The single ROM chip contains a monitor program that runs the basic user interface. It also makes programming a bit less tedious by implementing a number of system calls to handle things like user input and display output. A serial EEPROM enables local data storage, while a UART with a USB interface enables data transfer to other computers. If you’re interested in building and programming such a machine yourself, [Aleksander] helpfully provides code examples as well as full hardware documentation on his GitHub page.

The 6502 remains a firm favorite among hardware hackers: some projects we recently featured with this CPU include one beautifully made machine, this easy-to-build single-board computer and this huge breadboard-based contraption. Looking for something smaller? Try this tidy little board or this 6502 coupled to an FPGA.

A Raspberry Pi Handheld Computer You Might Want To Use

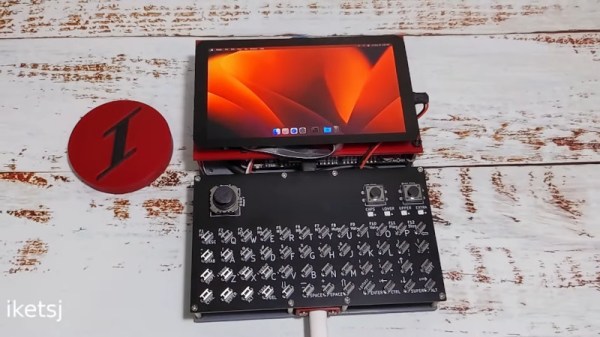
Amid the many wonderful form factors being explored by the makers of cyberdecks, there’s one that’s emerged which harks back to an earlier generation of portable computers: the handheld pad with a keyboard. These units are typically around the size of a hardback book, with the upper half being a screen and the lower a keyboard. The latest to come our way is from [Richard Sutherland], and it’s a very tidy pad computer indeed.

Inside the well-designed layered 3D printed case is the frequently-chosen Raspberry Pi 4, along with a PiSugar power supply board and 5,000 mAH battery and a 4.3″ touchscreen display. The keyboard has seen a lot of care and attention, featuring high-quality tactile switches that follow the Miryoku keyboard layout. He says it’s a thumb-typing keyboard, but anyone looking for more can either adapt the design to their liking or simply plug in an external board when faster typing is needed.

We like the pad computer trend as it offers useful computing power in a far more convenient format than a laptop, and we think this is a particularly nice one. It would be nice to see where people take this design, and who knows, we might give one a try for writing some Hackaday articles. If you’d like to see more pad computer goodness, we recently showed you one built in the shell of a classic Amstrad.

Here’s How The Precursor Protects Your Privacy

At some point, you will find yourself asking – is my device actually running the code I expect it to? [bunnie] aka [Andrew Huang] is passionate about making devices you can fundamentally, deeply trust, and his latest passion project is the Precursor communicator.

At the heart of it is an FPGA, and Precursor’s CPU is created out of the gates of that FPGA. This and a myriad of other design decisions make the Precursor fundamentally hard to backdoor, and you don’t have to take [bunnie]’s word for it — he’s made an entire video going through the architecture, boot protections and guarantees of the Precursor, teaching us what goes into a secure device that’s also practical to use.

Screenshot from the video, showing a diagram of how precursor's software and hardware components relate to each other If you can’t understand how your device works, your trust in it might be misplaced. In the hour long video, [bunnie] explains the entire stack, from the lower levels of hardware to root keys used to sign and verify the integrity of your OS, along the way demonstrating how you can verify that things haven’t gone wrong.

He makes sure to point out aspects you’d want to be cautious of, from physical security limitations to toolchain nuances. If you’re not up for a video, you can always check out the Precursor wiki, which has a treasure trove of information on the device’s security model.

As you might’ve already learned, it’s not enough for hardware to be open-source in order to be trustworthy. While open-source silicon designs are undoubtedly the future, their security guarantees only go so far.

Whether it’s esoteric hard drive firmware backdoors, weekend projects turning your WiFi card into a keylogger, or rootkits you can get on store-bought Lenovo laptops, hell, even our latest This Week In Security installment has two fun malware examples – there’s never a shortage of parties interested in collecting as much data as possible.

A Game Boy built out of copper wires

The Wonderfully Weird Wireframe Game Boy That Actually Works

We see lots of great hardware projects here at Hackaday: some are extremely clever, some are beautifully made, and some show off their maker’s extraordinary skills. Others are just plain weird, but still manage to include some or even all of the above categories. Case in point: [kgsws]’s Wireframe Game Boy project. It’s probably the weirdest Game Boy mod we’ve seen so far, but also extremely impressive from a technical point of view.

The basic idea was to take a Game Boy Pocket and remove its outer shell, replacing it with a cage-like structure made from thick copper wire. That sounds kind of reasonable; think of those transparent Game Boys, only without the transparent plastic. [kgsws]’s video (embedded below) shows him bending a few pieces of copper wire to match the Game Boy’s overall shape, then adding mounts for the cartridge socket, the display, the D-pad and the four buttons. After that you’d simply slide in the PCB, insert some batteries and off you go, right?

Well, this wouldn’t do for [kgsws]. What he did instead, was use a hot air desoldering station to remove all chips from the motherboard and proceed to mount them directly inside the wireframe without a PCB. He then used dozens of thin copper wires to hook up the cartridge slot, the CPU, RAM, buttons, and everything else to reconstruct the motherboard’s functionality. We cringed a bit when we saw him brutally cut the display’s flat cable with scissors, and that too was connected to the rest of the system through flying wires, soldered directly onto the screen’s contacts.

Amazingly, the system managed to boot up and run its software after it got a pair of fresh batteries. Despite a slightly dodgy D-pad, the naked Game Boy actually turned out to be fully usable, although it probably requires somewhat more delicate handling than Nintendo’s famously bullet-proof hardware. We’ve seen Game Boys modded into all kinds of different shapes and sizes, but none quite as unusual as today’s. If it’s wireframe construction you like, check out this eerie sound generator or this beautiful circuit sculpture clock. Continue reading “The Wonderfully Weird Wireframe Game Boy That Actually Works”

A pair of purple PCB-based game controllers on a solderless breadboard

Odd Inputs And Peculiar Peripherals: The GameBug Turns Your Breadboard Into A Game Console

What’s more fun than playing video games? Designing your own video game hardware, of course! If you’ve followed these pages long enough you’ll have seen dozens of great examples of homebrew hardware, and perhaps been inspired to try such a project yourself. This often starts with assembling the basic bits onto a solderless breadboard, which is fine for programming but not so great for testing: squeezing pushbuttons into your breadboard works for basic debugging, but is not very user-friendly or reliable. A better solution can be found in [Dimitar]’s GameBug: a set of breadboard-compatible joypad-like controllers.

The GameBug’s design excels in its simplicity: a miniature analog joystick, four buttons arranged in a diamond pattern, a shoulder button and two sliding switches are sitting on a neat purple PCB. On the bottom are two rows of pin headers to ensure a snug fit on your solderless breadboard. There’s even a little vibrating motor for haptic feedback.

Interfacing with the GameBug is simplified by the integrated readout electronics. A Schmitt trigger-based debounce circuit ensures clean signals from all the pushbuttons, while a motor driver chip provides stable current to the haptic feedback system. An RGB LED can be used as yet another user feedback device, or simply for decorative lighting.

All design files are available on [Dimitar]’s GitHub page, along with an Arduino sketch to help you try out the GameBug’s functionality. Having a proper gamepad might come in handy with breadboard-based game systems like Tiny Duck Hunt or this impressive mess of wires that makes up a Colecovision.

A pair of purple PCB-based game controllers