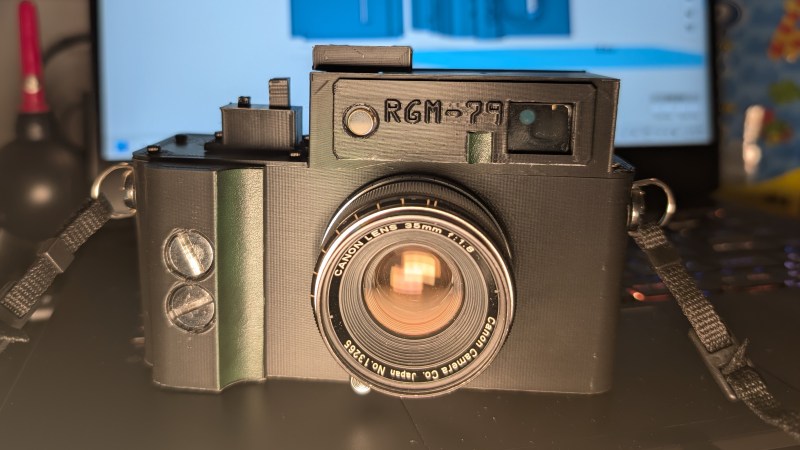
Fusing Cheap EBay Find Into A Digital Rangefinder

One of the earliest commercially-successful camera technologies was the rangefinder — a rather mechanically-complex system that allows a photographer to focus by triangulating a subject, often in a dedicated focusing window, and and frame the shot with another window, all without ever actually looking through the lens. Rangefinder photographers will give you any number of reasons why their camera is just better than the others — it’s faster to use, the focusing is more accurate, the camera is lighter — but in today’s era of lightweight mirrorless digitals, all of these arguments sound like vinyl aficionados saying “The sound is just more round, man. Digital recordings are all square.” (This is being written by somebody who shoots with a rangefinder and listens to vinyl).

While there are loads of analog rangefinders floating around eBay, the trouble nowadays is that digital rangefinders are rare, and all but impossible to find for a reasonable price. Rather than complaining on Reddit after getting fed up with the lack of affordable options, [Mr.50mm] decided to do something about it, and build his own digital rangefinder for less than $250.

Part of the problem is that, aside from a few exceptions, the only digital rangefinders have been manufactured by Leica, a German company often touted as the Holy Grail of photography. Whether you agree with the hype or consider them overrated toys, they’re sure expensive. Even in the used market, you’d be hard-pressed to find an older model for less than $2,000, and the newest models can be upwards of $10,000.

Rather than start from scratch, he fused two low-cost and commonly-available cameras into one with some careful surgery and 3D printing. The digital bits came from a Panasonic GF3, a 12 MP camera that can be had for around $120, and the rangefinder system from an old Soviet camera called the Fed 5, which you can get for less than $50 if you’re lucky. The Fed 5 also conveniently worked with Leica Thread Mount (LTM) lenses, a precursor to the modern bayonet-mount lenses, so [Mr.50mm] lifted the lens mounting hardware from it as well.

Even LTM lenses are relatively cheap, as they’re not compatible with modern Leicas. Anyone who’s dabbled in building or repairing cameras will tell you that there’s loads of precision involved. If the image sensor, or film plane, offset is off by the slightest bit, you’ll never achieve a sharp focus — and that’s just one of many aspects that need to be just right. [Mr.50mm]’s attention to detail really paid off, as the sample images (which you can see in the video below) look fantastic. Continue reading “Fusing Cheap EBay Find Into A Digital Rangefinder”

One ROM to rule them all.

Software Defined Retro ROMs

Here’s something fun from our hacker [Piers]: Software Defined ROMs.

In this series of three videos, [Piers] runs us through what a software defined ROM is, how to make them, and then how to use them.

As [Piers] explains, one frustration a retro technician will face is a failed ROM chip. In the era he’s interested in, there are basically three relevant kinds of ROM chip, all 24-pin Dual Inline Package (DIP):

  • 2364 ROM chip: 8KB; 1x chip-select line
  • 2332 ROM chip: 4KB; 2x chip-select lines
  • 2316 ROM chip: 2KB; 3x chip-select lines

Continue reading “Software Defined Retro ROMs”

Before Macintosh banner with stylized pixelated picture of one

Before Macintosh: The Story Of The Apple Lisa

Film maker [David Greelish] wrote in to let us know about his recent documentary: Before Macintosh: The Apple Lisa.

The documentary covers the life of the Apple Lisa. It starts with the genesis of the Lisa Project at Apple, covering its creation, then its marketing, and finally its cancellation. It then discusses the Apple Lisa after Apple, when it became a collectible. Finally the film examines the legacy of the Apple Lisa, today.

The Apple Lisa was an important step on the journey to graphical user interfaces which was a paradigm that was shifting in the early 1980s, contemporary with the Macintosh and the work at Palo Alto. The mouse. Bitmapped graphics. Friendly error messages. These were the innovations of the day.

Continue reading “Before Macintosh: The Story Of The Apple Lisa”

A photo of a fully assembled PVCSub.

PVCSub: A Submarine From The Plumbing Aisle

Today in the submersibles department our hacker [Rupin Chheda] wrote in to tell us about their submarine project.

This sub is made from a few lengths of PVC piping of various diameters. There is an inflation system comprised of a solenoid and a pump, and a deflation system, also comprised of a solenoid and a pump. The inflation and deflation systems are used to flood or evacuate the ballast which controls depth. There are three pumps for propulsion and steering, one central pump for propulsion and two side pumps for directional control, allowing for steering through differential thrust. Power and control is external and provided via CAT6 cable.

Continue reading “PVCSub: A Submarine From The Plumbing Aisle”

A photo of a Stirling Engine attached to a bike

Building A Stirling Engine Bike

Over on his YouTube channel [Tom Stanton] shows us how to build a Stirling Engine for a bike.

A Stirling Engine is a heat engine, powered by the expansion and contraction of a working fluid (such as air) which is heated and cooled in a cycle. In the video [Tom] begins by demonstrating the Stirling Engine with some model engines and explains the role of the displacer piston. His target power output for his bike engine is 150 watts (about 0.2 horsepower) which is enough power to cycle at about 15 mph (about 24 km/h). After considering a CPU heatsink as the cooling system he decided on water cooling instead.

Continue reading “Building A Stirling Engine Bike”

USB VSense

USB-C Rainbow Ranger: Sensing Volts With Style

USB-C has enabled a lot of great things, most notably removing the no less than three attempts to plug in the cable correctly, but gone are the days of just 5V over those lines. [Meticulous Technologies] sent in their project to help easily identify what voltage your USB-C line is running at, the USB VSense.

The USB VSense is an inline board that has USB-C connectors on either end, and supporting up to 240W you don’t have to worry about it throttling your device. One of the coolest design aspects of this board is that it uses stacked PCB construction as the enclosure, the display, and the PCB doing all the sensing and displaying. And for sensing this small device has a good number of cool tricks, it will sense all the eight common USB-C voltages, but it will also measure and alert you to variations of the voltage outside the normal range by blinking the various colored LEDs in specific patterns. For instance should you have it plugged into a line that’s sitting over 48V the VSense white 48V LED will be rapidly blinking, warning you that something in your setup has gone horribly wrong.

Having dedicated uniquely colored LEDs for each common level allows you to at a glance know what the voltage is at without the need to read anything. With a max current draw of less than 6mA you won’t feel bad about using it on a USB battery pack for many applications.

The USB VSense has completed a small production run and has stated their intention to open source their design as soon as possible after their Crowd Supply campaign. We’ve featured other USB-C PD projects and no doubt we’ll be seeing more as this standard continues to gain traction with more and more devices relying on it for their DC power.

Quasi-Quantifying Qubits For 100 Quid

As part of his multi-year project to build a quantum computer, hacakday.io poster [skywo1f] has shared with us his most recent accomplishment — a Nuclear Magnetic Resonance Spectrometer, which he built for less than $100.

The NMR spectrometer is designed to disturb protons, which naturally line up according to the Earth’s magnetic field, using an electric coil. Once disturbed, the protons nutate (a fancy physics word for wobble), and flip quantum spin states. [skywo1f]’s NMR device can detect these spin state changes, as he demonstrates with a series of control experiments designed to eliminate sources of false positives (which can be annoyingly prevalent in experimental physics). His newest experimental device includes a number of improvements over previous iterations, including proper shielding, quieter power topology, and better coil winding in the core of the device. Everything was assembled with cost in mind, while remaining sensitive enough to conduct experiments — the whole thing is even driven by a Raspberry Pi Pico.

Here at Hackaday, we love to see experiments that should be happening in million-dollar laboratories chugging along on kitchen tables, like this magnetohydrodynamic drive system or some good old-fashioned PCB etching. [skywo1f] doesn’t seem to be running any quantum calculations yet, but the NMR device is an important building block in one flavor of quantum computer, so we’re excited to see where he takes his work next.