High Pressure Air Compressor Using A Pair Of Refrigeration Compressors

[Ed] from Ed’s Systems, aka [Aussie50] took some time to demo his high pressure Frankenstein air compressor he stitched together from two refrigeration compressors. The two Danfoss SC15 compressors can produce upwards of 400psi and can run all day at the 300 psi range without overheating. The dual units may get up to pressure quickly considering the small accumulator “tank”, but high CFM isn’t the goal with this build. [Ed] uses the system to massacre some LCD panels with lead, ball bearings, and other high speed projectiles shot from a modified sandblasting gun. Just a bit of air at 400 psi is all you need for this terminator toy.

Don’t think the destruction is wasteful either; [Ed] strives to repair, rebuild, reuse, repurpose and a few other R’s before carefully separating and sorting all the bits for recycling. This modification included lots of salvaged hardware from older teardowns such as high pressure hoses, connectors, accumulator and pressure cutoff switches.

At first it seems strange to see something engineered for R22 refrigerant working so well compressing air. Morphing refrigeration systems into air compressor service is something [Ed] has been doing for a long time. In older videos, “fail and succeed”,  [Ed] shows the ins and outs of building silent air compressors using higher capacity storage tanks. Being no stranger to all variations of domestic and commercial refrigeration systems, [Ed] keeps home built air compressors running safe and problem free for years.

Don’t think this is the only afterlife for old refrigeration compressors, we’ve seen them suck too. You’ll get a few more tidbits, and can watch [Ed’s] video overview of his home built compressor after the break.

Continue reading “High Pressure Air Compressor Using A Pair Of Refrigeration Compressors”

Update: McHck’s Self Flashing Rig

A few weeks ago we featured the McHck project (pronounced McHack), a $5 Cortex M4 based platform which can be directly plugged into one’s computer. Recently, [Simon] announced that he made a firmware allowing a McHck to behave as a SWD adapter and also detailed his flashing rig.

Therefore, those who’d want to build their own McHck would only need to borrow an SWD programmer once to get started. When the first platform has been programmed with the SWD firmware, it can be used to flash and debug applications on the second McHck. Consequently, the microcontroller flashing rig [Simon] designed (shown in the picture above) is based on this. The few core elements are a TQFP48 ZIF programming socket, a push button and two LEDs. Simply push the Kinetis in the programming socket, close it and press the button. Success of the operation is indicated by the two LEDs. [Simon] used the Ragel State Machine Compiler to generate his flashing program and all the code he made can be downloaded from his github.

If you missed the original McHck post now’s your chance to go back and see what it is all about.

Cloning An Infrared Disarming Remote Of A $8 Home Security System

5

[Sylvio] decided to buy one of the cheap alarm systems you can find on the internet to have a look at its insides. The kit he bought was composed of one main motion sensor and two remote controls to arm/disarm it.

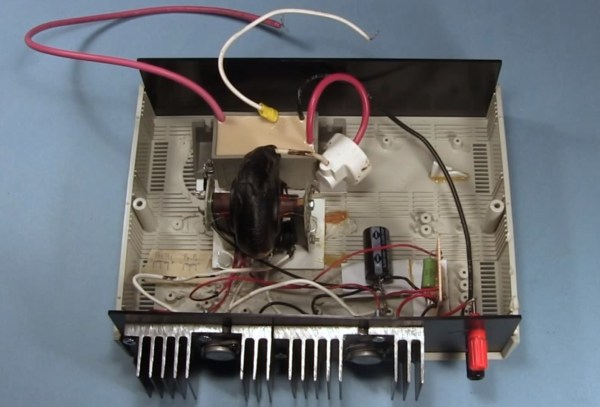
Communication between the remotes and the sensor is done by using infrared, requiring a direct line of sight for a signal to be received. Modern alarm systems typically use RF remotes with a typical frequency of 434MHz or 868MHz.  In his write-up, [Sylvio] first tries to replicate the IR signal with one of his ‘learning remote controls’ without success and then proceed to reverse engineering the remote circuit shown in the above picture. Hackaday readers may figure out just by looking at it that it is a simple astable multivibrator (read ‘oscillator’). Its main frequency is 38.5kHz, which is typical for IR applications. Therefore, if one of your neighbours had this ‘security system’ one could just disarm it with any of the same remotes…

[Sylvio] then explains different ways to replicate the simple IR signal, first with an Arduino then with a frequency generator and finally using the USB Infrared Toy from Dangerous Prototypes. We agree with his conclusion: “you get what you pay for”.

Organizing Transistors

SAMSUNG

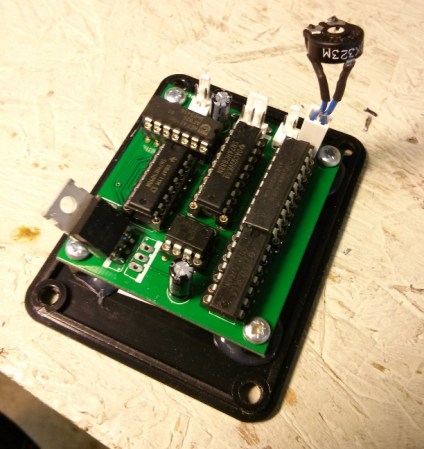
Late last year, [matseng] set up an interesting challenge for himself: design a new PCB every week, send it off to a fab house, and build a new project. It’s a grueling endeavor, but some of these projects are actually very useful and cool. One of the best so far is the TraId – a board that identifies a transistor type and pinout with a nice LED interface.

This build was partly inspired by Dangerous Prototypes’ Part Ninja, a board that determines the pinouts and values of transistors, resistors, caps, and diodes. The TraId is a much more cut down version usable only for transistors, displaying the orientation of the pins and type of transistor on a set of 8 LEDs.

Although the design is very sparse, we could imagine something like this being very useful in a hackerspace, lab, or anywhere else the gremlins of chaos come to reorganize parts drawers. If you’d like to build your own, all the required files are up on the gits.

An Improved Bubble Display With RGB LEDs

Making a bubble display is quite an undertaking, but [Jay] takes advantage of iterative design to construct this impressive (and at 60 tubes, massive) bubble display. The display functions by dispensing bubbles to serve as illuminated pixels in each tube as they rise through the fluid. His build log steps through the display’s construction with a keen attention to detail and above all, patience.

Rather than diving right in and slapping some tubes together, [Jay] took the time to research other bubble display projects, including one we featured a few years back that grew out of yet another HackaDay article. His prototypes started off small to test potential features: whether to use water or glycerin, timing for the air pumps and bubble size, and several others. [Jay] even filled the log with videos of every test, so you can watch the problems and solutions unfold at each step.

The finished display boasts sixty 30″ tall tubes, making it 64″ wide. [Jay] also installed RGB LEDs at every edge where the tubes meet to better distribute the light. You can watch one of the many videos of the display at work below.

Continue reading “An Improved Bubble Display With RGB LEDs”

Graffiti Briefcase For Stealth Tagging

We’re floored by painter and engineer [Bob Partington’s] graffiti briefcase, which proves how well art and tech can complement one another. Fear not, Arduino haters, [Bob]’s case is an analog dream: no microcontrollers here.

The guts consist of 2 components: a linear drive system and a trigger assembly. The former takes advantage of a small RC motor with a chain drive which slides the can’s mounting unit along two stainless steel rods. The latter includes a custom wound solenoid plugged into a 24V cordless drill battery, which slams down 5 pounds of force onto the can’s nozzle to fire the paint.

This all fits into an otherwise inconspicuous looking briefcase to provide some urban camouflage. The final component is a stencil, which slides into a rectangular hole on the bottom of the case. The paint can sprays downward through the stencil and tags the ground at the touch of a brass button located near the handle.  [Bob] has plenty of other cool inventions you should check out that are less illegal. Or, stick it to the man by automating your tagging with Time Writer.

Continue reading “Graffiti Briefcase For Stealth Tagging”