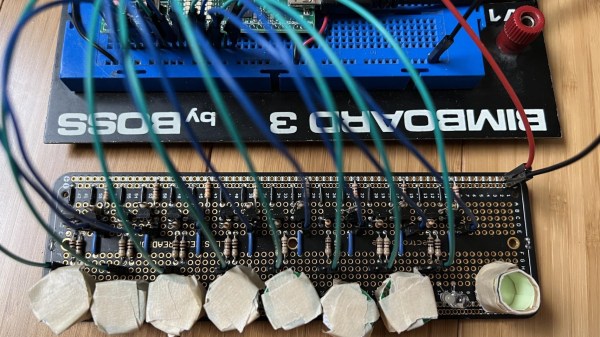
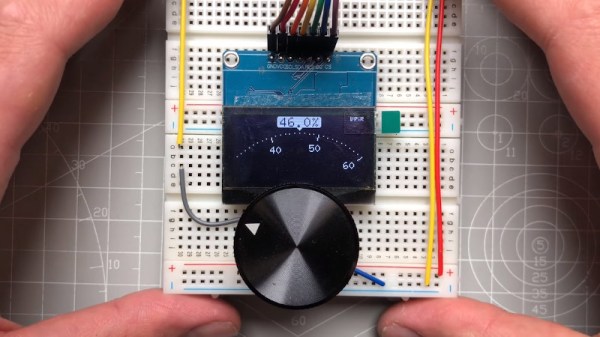
Haptic Smart Knob Does Several Jobs

A knob is a knob, a switch is a switch, and that’s that, right? And what about those knobs that have detents, set in stone at the time of manufacturing? Oh, and those knobs that let you jog left to right and then snap back to center — that can’t be modified…right? Well, you likely know where this is going, and in the video below the break, [scottbez1] shows off a new open source haptic input knob that can be all of these things with just some configuration changes!

The list of possibilities is long: virtual snap points, virtual spring loading, virtual detents, virtual end points. It’s a virtual smörgåsbord of configuration options that make this haptic smart knob a one stop shop for all of your knob needs. This is all possible because the knob contains a high resolution magnetic encoder chip that has a single degree resolution. The sensor is coupled, through software, to a brushless DC motor. The round LCD gives visual feedback as well.

As [Myself] on the Hackaday Discord channel noted, having configurable spacing and strength for detents, springs, and stops, is nothing short of incredible. Being able to reconfigure the knob at-will means that it can become context sensitive. It’s wonderfully unique and it’s open source, so you can make your own with the information available at GitHub.

And according to its creator, the only thing the Haptic Smart Knob can’t do is do your taxes or blend your margarita. Well, it’s open source, so perhaps some of our more enterprising readers can submit just the right pull request.

This isn’t Hackaday’s first Motorized Volume Knob feature, but it might be one of the neatest we have seen so far. Thanks to [mattvenn] on the Hackaday Discord server for the great tip!

Continue reading “Haptic Smart Knob Does Several Jobs”

RFM9x module held in an adapter board with flexipins

FlexyPins Might Help With Those Pesky Castellated Modules

[SolderParty] just announced FlexyPins (Twitter, alternative view) – bent springy clips that let you connect modules with castellated pins. With such clips, you can quickly connect and disconnect any castellated module, swapping them without soldering as you’re prototyping, testing things out, or pre-flashing modules before assembly. They’re reportedly gold-plated, and a pack of ~100 will set you back 6EUR, shipping not included.

Of course, this is basically “fancy pieces of wire”, purpose-shaped, gold-plated and, hopefully, made out of material that is springy enough and doesn’t snap easily after bending a few times. We’ve seen this concept used for prototyping before, with random pieces of wire doing a pretty good job of maintaining connectivity, but these clips bring it that much closer to production-grade. It also makes us wonder – just how hard it is to solder 30-40 of them into a circuit? Do they self-align enough with the footprints given, or do you have to hold them with tweezers at a peculiar angle as you solder them? Time will tell, of course.

Continue reading “FlexyPins Might Help With Those Pesky Castellated Modules”

Hands probing inside a case with tools

Hardware Hacking 101 Needs Matching Toolkit

One doesn’t always have the luxury of sipping tea comfortably while hacking a piece of hardware at a fully-equipped workbench, where every tool is within reach. To address this, [Zokol] shares an early look at a hardware hacking toolkit-in-progress, whose purpose is to make hacking sessions as productive as possible while keeping size and weight within reasonable limits. There isn’t a part list yet, but there are some good tips on creating your own.

A view of a wide variety of toolsTo put together an effective hardware hacking toolkit, one must carefully consider what kinds of tasks need to be performed, and in what order. Once a basic workflow is identified, one can put together a set of complementary hardware tools and resources to meet the expected needs. The goal is to have the tools to go as far as one can in a single session, and identify any specialized equipment that will be needed later. That way, follow-up sessions can be as effective as possible.

Since hardware hacking is all about inspecting (and possibly modifying the behavior of) electronic devices, [Zokol] observes that step one is always to begin with external interfaces. That means common cables and adapters should all be part of a hardware hacking toolkit, otherwise the session might end awfully early. The next step is to open the device, so common tools and ways to deal with things like adhesives are needed. After that, diagnostic tools like multimeters come into play, with tools becoming more specialized as investigation proceeds. It’s a very sensible way to approach the problem of what to bring (and not bring) in a hardware hacking toolkit, and we can’t wait to see what the final version looks like.

Hardware hacking sometimes involves hardware that can’t be opened without damaging it. The Google Stadia controller is one such piece of hardware, and [Zokol] addressed the problem of how to permanently disable the microphone by figuring out exactly where to drill a hole.

the Caps Wiki logo, showing a few bulging capacitors, with "Caps Wiki" text under it

Caps Wiki: Place For You To Share Your Repair Notes

A right-to-repair battle is being waged in courts. The results of it, we might not see for a decade. The Caps Wiki is a project tackling our repairability problem from the opposite end – making it easy to share information with anyone who wants to repair something. Started by [Shelby], it’s heavily inspired by his vintage tech repairs experience that he’s been sharing for years on the [Tech Tangents] YouTube channel.

When repairing a device, there are many unknowns. How to disassemble it? What are the safety precautions? Which replacement parts should you get? A sporadic assortment of YouTube videos, iFixit pages and forum posts might help you here, but you have to dig them up and, often, meticulously look for the specific information that you’re missing.

The Caps Wiki talks a lot about capacitor replacement repairs – but not just that. Any device, even modern ones, deserves a place on the Caps Wiki, only named like this because capacitor repairs are such a staple of vintage device repair. You could make a few notes about something you’re fixing, and have them serve as help and guideline for newcomers. With time, this won’t just become a valuable resource for quick repairs and old tech revival, but also a treasure trove of datapoints, letting us do research like “which capacitors brands or models tend to pass away prematurely”. Plus, it also talks about topics like mains-powered device repair safety or capacitor nuances!

Continue reading “Caps Wiki: Place For You To Share Your Repair Notes”

Pre-exploded PSU close-up: shown is inductor with the heatsink it shorted against.

The Little Replacement PSU That Could: Kill A Microsoft Surface And Monitor

Recently [Big Clive], everyone’s favorite purveyor of anything electronic that’s dodgy, cheap, cheerful, decidedly crispy or any combination thereof, got sent a very dead external power supply unit. Being clearly a third-party PSU with poorly written and many (likely not truthful) safety approval markings on its label, this PSU had the dubious honor of having destroyed a Microsoft Surface computer as well as the monitor that was connected at the time.

In [Clive]’s video (also embedded after the break) the black and very crispy board is examined, showing a wealth of vaporized traces and plenty of soot. What’s however most fascinating is the failure mode: instead of something obvious like e.g. the main transformer between the primary and secondary side failing, here it would seem that an inductor (see heading image) on the secondary side had its insulation rubbed off and shorted on a nearby heatsink. A heatsink that just happened to be also electrically connected on the primary (mains-level) side.

Judging by the former owner’s report and aftermath, this led to a very sudden and violent demise of the PSU, with mains power very likely making its way into the unsuspecting Surface system and connected monitor. The number of ‘very nope’ design decisions made in this PSU are astounding, and a lesson for both aspiring EEs and anyone considering getting a ‘cheap’ third-party replacement PSU.

(Thanks to [Helge] for the tip)

Continue reading “The Little Replacement PSU That Could: Kill A Microsoft Surface And Monitor”

Remoticon 2021 // Matt Venn Helps You Make ASICS

What would you make if you were given about ten square millimeters of space on a silicon wafer on a 130 nm process? That’s the exact question that the Open MPW program asks, and that [Matt Venn] has stepped up to answer. [Matt] came to Remoticon in 2020 to talk about his journey from nothing to his own ASIC, and he came back in 2021 to talk about what has happened in a year.

image of the metal layers of an IC
[maxiborga] has been making beautiful renders of his and others’ chip designs
We expected great designs, but the variety of exciting and wonderful designs that have been submitted we think exceeded our expectations. [Matt] goes through quite a few of them, such as an analog neuron, a RISC-V Arduino-compatible microprocessor, and a satellite transceiver. Perhaps an unexpected side effect has been the artwork. Since the designs are not under an NDA, anyone can take the design and transform it into something gorgeous.

Of course, all of this hardware design isn’t possible without an open toolchain. There is an SRAM generator known as OpenRAM that can generate RAM blocks for your design. Coriolis2 is an RTL to GDS tool that can do placement and routing in VLSI. Finally, FlexCell is a cell library that tries to provide standard functions in a flexible, customizable way that cuts down on the complexity of the layout. There are GitHub actions that can run tests and simulations on PRs to keep the chip’s HDL in a good state.

However, it’s not all roses, and there was an error on the first run (MPW1). Hold time violations were not detected, and the clock tree wasn’t correct. This means that the GPIO cannot be set up, so the designs in the middle could be working, but without the GPIO, it is tricky to determine. With a regular chip, that would be the end, but since [Matt] has access to both the layout and the design, he can identify the problem and come up with a plan. He’s planning on overriding the IO setup shift register with an auxiliary microcontroller. (Ed Note: [tnt] has been making some serious progress lately, summarized in this video.)

It is incredible to see what has come from the project so far, and we’re looking forward to future runs. If this convinces you that you need to get your own ASIC made, you should check out [Matt]’s “Zero to ASIC” course.

Continue reading “Remoticon 2021 // Matt Venn Helps You Make ASICS”

BenAkrin-PlottyBot-TypeWriterMode

PlottyBot: A DrawBot That Plots A Lot

Fire up those 3D printers because if you’re like us, you’ll want your own PlottyBot. Still, have a pile of “thank you notes” to write from recent winter holiday gift exchanges? Hoping to hand letter invitations to a wedding or other significant event? Need some new art to adorn your lock-down shelter or shop? It sounds like [Ben] could help you with that.

Besides being a handsomely designed desktop DrawBot, this project from [Ben] looks to have some solid software to run it, a community of makers who have tested the waters, and very detailed build instructions. Those include everything from a BOM with links for ordering parts to animated GIF assembly for the trickier steps.

If you’d like to graduate from “handwritten” cards and letters to something poster-sized are customization tips for expanded X and Y dimensions. As we’ve included in other recent articles, one caveat to mention is the current scarcity of the Raspberry Pi Zeros that PlottyBots require. But if you have one on hand or think you’ll be able to source one by the time you’ve 3D printed all the parts, it might just be the perfect time to add another bot to your family. As a heads up, this project is self-hosted on a solar-powered server, so maybe take turns reading the complete build log.

A nice bonus if you need help drawing something suitably complex to require a robot’s help, [Ben] also created MandalGaba which looks like an awesome online tool for drawings like the ones shown above.