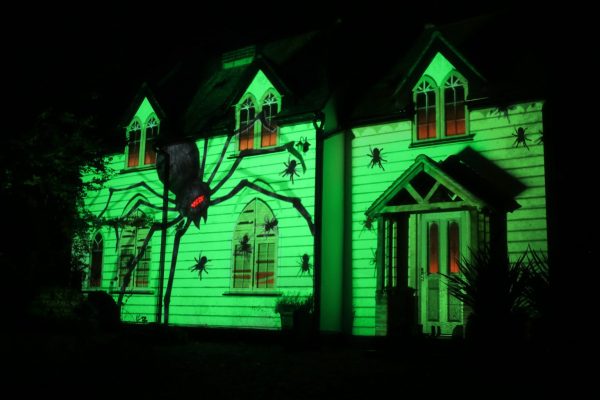
One Man’s Quest To Build His Own Speakers

Why build your own stereo speakers? Some people like to work on cars in their garage. Some people build fast computers. Others seek the perfect audio setup. The problem for a newcomer is the signal to noise ratio among audiophile experts. Forums are generally filled with a vocal group of extremists obsessing on that last tiny improvement in some spec.  It can be hard for a beginner to jump in and learn the ropes.

[Ynze] had this problem. He’d finished a custom amplifier and decided to build his own speakers. He found a lot of spirited debates about what was important for good speakers. He tried to wade through the discussions and determine which things had real practical value. The results and his speaker build are documented in a post that you’ll want to check out if you would like to design and build your own speakers.

Some of the topics ranged from solder type to capacitor construction and 700 Euro capacitors. [Ynze’s] goal was to build something that sounded good while keeping costs in line. He claims he spent about 250 Euro and wound up with speakers equivalent to 750 Euro store-bought speakers.

Continue reading “One Man’s Quest To Build His Own Speakers”

Trashed TV Gets RGB LED Backlight

It might not be obvious unless you’ve taken one apart, but most of the TVs and monitors listed as “LED” are simply LCD panels that use a bank of LEDs to illuminate them from behind. Similarly, what are generally referred to as “LCDs” are LCD panels that use fluorescent tubes for illumination. To get a true LED display with no separate backlight, you need OLED. Confused? Welcome to the world of consumer technology.

With those distinctions in mind, the hack that [Zenodilodon] recently performed on a broken “LED TV” is really rather brilliant. By removing the dead white LED backlights and replacing them with RGB LED strips, he not only got the TV working again, but also imbued it with color changing abilities. Perfect for displaying music visualizations, or kicking your next film night into high gear with a really trippy showing of Seven Samurai.

In the video after the break, [Zenodilodon] starts his RGB transplant by stripping the TV down to its principal parts. The original LEDs were toasted, so they might as well go straight in the bin alongside their driver electronics. But the LCD panel itself was working fine (tested by shining a laser pointer through it to see if there was an image), and the plastic sheets which diffuse the LED backlight were easily salvaged.

With the old LEDs removed, [Zenodilodon] laid out his new strips and soldered them up to the external controller. He was careful to use all white wires, as he was worried colored wires might reflect the white light and be noticeable on the display. After buttoning the TV back up, he went through a few demonstrations to show how the image looked with the white LEDs on, as well as some interesting effects that could be seen when the LEDs are cycling through colors.

The RGB strips don’t light up the display as well as the original backlight did, as there are some obvious dark spots and you can see some horizontal lines where the strips are. But [Zenodilodon] says the effect isn’t too bad in real-life, and considering it was a cheap TV the image quality was probably never that great to begin with.

On the flip side, if you find an LED TV or monitor in the trash with a cracked screen, it might be worth taking it home to salvage its super-bright white LEDs for your lighting projects.

Continue reading “Trashed TV Gets RGB LED Backlight”

Amplifier Controlled Motorized Display

It’s easy to get jaded by gadgets like the Chromecast or Sonos, which let the user control AV equipment remotely from a mobile device or computer. You can pick something to play from your phone and send it off to your speakers via the magic of Wi-Fi. But it’s still nice to have a display to look at for music visualizations and that sort of thing, at least occasionally.

To address this only occasional desire to have a display on your media setup, you could follow in the footsteps of [Steven Elliott] and create a DIY motorized display which only pops up when needed. Inspired by seeing videos of TVs rising out of cabinets and other such trickery, he decided to create his own version using an old computer monitor he had lying around.

The monitor is lifted with a beefy linear actuator, which has been placed inside of a square metal fence post to keep from rotating. It already had a power supply and control board with relays for extending and retracting, so [Steven] just needed to find a convenient way of firing them off.

The answer came from a somewhat unconventional source: his amplifier. [Steven] explains that many amplifiers feature a “Trigger Output”, which uses a standard stereo 3.5mm connector and sends a 12V pulse to connected device. This is generally used to turn on downstream devices when the amplifier switches to the respective input. It’s too short and not nearly powerful enough to close the actuators relays, but it’s easy enough to detect.

[Steven] uses a LeoStick microcontroller to wait for the pulse from the amplifier, and then use that to raise or lower the display depending on the selected input. There’s also a SPST momentary switch which can be used to trigger the actuator manually. Beyond the fact the linear actuator is a bit loud, he says the setup works very well and prevents him from having to start up his projector if he just wants to take a quick glance at what’s playing or program his DVR.

We don’t see many motorized display lifts like this anymore, not since wall mounted LCDs became popular anyway. But it’s still a cool effect, and today made quite a bit easier thanks to the fact that TVs and monitors no longer weigh as much as a small car.

[Thanks to Baldpower for the tip.]

Voice Controlled Stereo Balance With ESP8266

A stereo setup assumes that the listener is physically located between the speakers, that’s how it can deliver sound equally from both sides. It’s also why the receiver has a “Balance” adjustment, so the listener can virtually move the center point of the audio by changing the relative volume of the speakers. You should set your speaker balance so that your normal sitting location is centered, but of course you might not always be in that same position every time you listen to music or watch something.

[Vije Miller] writes in with his unique solution to the problem of the roving listener. He’s come up with a system that can adjust the volume of his speakers without having to touch the receiver’s setup, in fact, he doesn’t have to touch anything. By leveraging configurable voice control software running on his computer, his little ESP8266-based devices do all the work.

Each speaker has its own device which consists of a NodeMCU ESP8266 and X9C104 digital potentiometer inside of a 3D printed case. The audio terminal block on the gadget allows him to connect it inline between the speaker and the receiver, giving [Vije] the ability to adjust the volume through software. The source code, which he’s posted on the Hackaday.io project page, uses a very simple REST-style API to change speaker volume based on HTTP requests which hit the ESP8266’s IP address.

The second part of the project is a computer running VoiceAttack, which lets [Vije] assign different actions based on what the software hears. When he says the appropriate command, the software goes through and fires off HTTP requests to the nodes in the system. Everything is currently setup for two speakers, but it shouldn’t be too difficult to expand to more speakers (or even rooms) with some adjustment to the software.

It’s not the first voice controlled speaker we’ve ever seen, but it does solve a very specific problem in a unique way. We’d be interested in seeing the next logical step, which would see this technology integrated into the speaker itself.

Continue reading “Voice Controlled Stereo Balance With ESP8266”

Cross-Correlation Makes Quick Work Of Ads

Once relegated to the proverbial Linux loving Firefox user, ad blocking has moved into public view among increased awareness of privacy and the mechanisms of advertising on the internet. At the annual family gathering, when That Relative asks how to setup their new laptop, we struggle through a dissertation on the value of ad blockers and convince them to install one. But what about mediums besides the internet? Decades ago Tivo gave us one button to jump through recorded TV. How about the radio? If available, satellite radio may be free of The Hated Advertisement. But terrestrial radio and online streams? [tomek] wasn’t satisfied with an otherwise sublime experience listening streaming Polish Radio Three and decided to build a desktop tool to detect and elide ads from the live audio stream.

[tomek] was aware of this hip knowledge domain called Digital Signal Processing but hadn’t done any of it themselves. Like many algorithmic problems the first step was to figure out the fastest way to bolt together a prototype to prove a given technique worked. We were as surprised as [tomek] by how simple this turned out to be. Fundamentally it required a single function – cross-correlation – to measure the similarity of two data samples (audio files in this case). And it turns out that Octave provides it in the box. After snipping the start-of-ad jingle out of a sample file and comparing it to a radio program [tomek] got the graph at the left. The conspicuous spike is the location of the jingle in the audio file.

At this point all that was left was packaging it all into a one click tool to listen to the radio without loading an entire analysis package. Conveniently Octave is open source software, so [tomek] was able to dig through its sources until they found the bones of the critical xcorr() function. [tomek] adapted their code to pour the audio into a circular buffer in order to use an existing Java FFT library, and the magic was done. Piping the stream out of ffmpeg and into the ad detector yielded events when the given ad jingle samples were detected.

[tomek] packaged that tool into a standalone executable, but the gem here is the followup post. After removing ads in the online stream they adapted a RaspberryPi to listen to an FM receiver and remote control their Yamaha tuner over the network. So when the tuner is playing Radio Three the Pi notices and ducks the audio appropriately to avoid those pesky ads. Video of this after the break.

Continue reading “Cross-Correlation Makes Quick Work Of Ads”

An Upcycled Speaker Box With Hidden Features

At first glance, this fire engine red speaker box built by [NoshBar] looks straightforward enough. Just an MDF case and couple of drivers recovered from a trashed stereo. But the array of controls and connectors on the front, and a peek on the inside, shows there’s more to this particular project than meets the eye.

Built almost entirely from parts [NoshBar] found in the trash, construction started with some salvaged MDF IKEA shelves and their corresponding twist lock cam fittings. We don’t usually see those style cam fittings used to build DIY enclosures, but if it works for all those furniture manufacturers why not?

A pair of Sony stereo speakers he found gave up their internals, and a TPA3116 amplifier board off of eBay drives them. He’s wired up an audio pass-through mode for using headphones when the amplifier is powered off, and dual inputs so he can switch between PC and PS4.

But the audio components are only half of what’s inside that shiny red exterior. [NoshBar] packed in an ATX PSU and broke out the 3.3 V, 5 V, and 12 V lines to the front panel so he can use it as a bench power supply for his Arduino projects. It’s also home to a gigabit Ethernet switch and a Raspberry Pi acting as a file server.

We’re always amazed at what hackers are able to accomplish with parts they’ve literally pulled out of the trash, from a waterwheel to charge your phone to a functional CNC router. It seems there’s plenty of treasure in your local dumpster if you’re willing to get a little dirty.

Hacked LCD Shutter Glasses See The Light

It’s always a little sad to see a big consumer technology fail. But of course, the upside for us hacker types is that the resulting fire sale is often an excellent source for hardware that might otherwise be difficult to come by. The most recent arrival to the Island of Unwanted Consumer Tech is 3D TV. There was a brief period of time when the TV manufacturers had nearly convinced people that sitting in their living room wearing big dorky electronic glasses was a workable solution, but in the end we know how it really turned out.

Those same dorky glasses are now available for a fraction of their original price, and are ripe for hacking. [Kevin Koster] has been playing around with them, and he’s recently came up with a circuit that offers the wearer a unique view of the world. Any reflective surface will look as though it is radiating rainbows, which he admits doesn’t show up as well in still images, but looks cool enough that he thought it was worth putting the board into production in case anyone else wants in on the refraction action.

To explain how it works, we need to take a couple of steps back and look at the mechanics of the LCD panels used in these type of glasses. At the risk of oversimplification, one could say that LCDs are sort of like capacitors: when charged the crystals align themselves in such a way that the polarization of the light passing through is changed. Combined with an external polarization filter, this has the end result of turning the panel opaque. To put the crystals back in their original arrangement, and let the light pass through again, the LCD panel is shorted out in the same way you might discharge a capacitor.

What [Kevin] found was that if he slowly discharged the LCD panel rather than shorting it out completely, it would gradually fade out instead of immediately becoming transparent. His theory is that this partial polarization is what causes the rainbow effect, as the light that’s passing through to the wearers eyes is in a “twisted” state.

[Kevin] has provided all of the information necessary to build your own “Rainbow Adapter”, but you can also purchase a kit or assembled board from Tindie. If you’re looking for other projects to make use of those 3D glasses collecting dust, how about turning them into automatic sunglasses or having a go at curing your lazy eye.