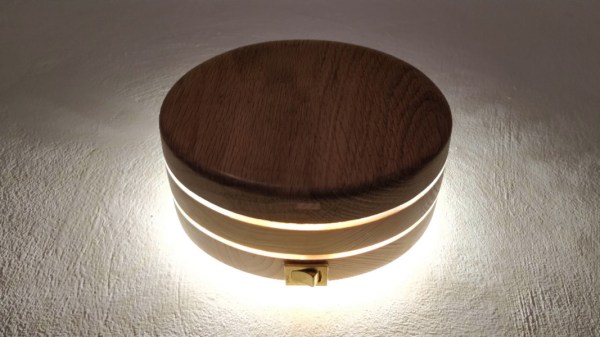
Prop-Driven Cardboard RC Car Doesn’t Skimp On Performance

[Kryzer Channel] takes making a DIY RC car to a whole new level with this prop-driven electric car that is made almost entirely out of cardboard (YouTube video, also embedded below.) By attaching an electric motor with a push prop to the back of the car, [Kryzer] avoids the need for any kind of drive system or gearing. Steering works normally thanks to some scratch-built linkages, but the brake solution is especially clever.

Braking is done by having a stocky servo push a reinforced stub downward, out of a hole in the center of the car. This provides friction against the road surface. After all, on an RC car a functional brake is simply not optional. Cutting the throttle and coasting to a stop works for a plane, but just won’t do for a car.

Winding thread around metal components then saturating with CA glue makes a durable assembly.

Layers of corrugated cardboard and hot glue make up the bulk of the car body, and some of the assembly techniques shown off are really slick and make the video really worth a watch. For example, the construction of the wheels (starting around 2:24) demonstrates making them almost entirely out of cardboard, saturated with CA glue for reinforcement, with a power drill acting as a makeshift lathe for trimming everything down. A section of rubber inner tube provides the tire surface and a piece of hard plastic makes a durable hub. Wraps of thread saturated in CA glue, shown here, is another technique that shows up in several places and is used in lieu of any sort of fasteners.

The well-edited video (embedded below) is chock full of clever assembly and construction. Unsurprisingly, this is not [Krazer]’s first cardboard vehicle: their video channel has other impressive cardboard models and racers to show off.

Continue reading “Prop-Driven Cardboard RC Car Doesn’t Skimp On Performance”

Automating Mini Blinds The Rental-Friendly Way

[Chris Mullins] wanted to automate opening and closing the slats of mini blinds in his apartment, and came up with a system to do it as a fun project. Manually opening and closing the slats means twisting a rod. Seems straightforward to automate that, but as usual when having to work around something that already exists, making no permanent alterations, complications arose.

The blinds are only 1 inch wide, leaving little room for mounting any sort of hardware. While there is a lot of prior art when it comes to automating blinds, nothing he found actually fit the situation [Chris] had, so he rolled his own.

The rod that is normally twisted to control the blinds is removed, and the shaft of a stepper motor takes its place. [Chris]’ mounting solution is made to fit blinds with narrow 1 inch tracks (existing projects he found relied on 2 inch tracks) and the 3D printed mount is fully adjustable, so the 28BYJ stepper motor can be moved into exactly the right position. Speaking of the stepper motor, the 28BYJ motor is unipolar but the A4988 driver he wanted to use is for bipolar steppers only. Luckily, cutting a trace on the motor’s PCB is all it takes to turn a unipolar motor into bipolar.

To drive the motor and provide wireless functionality, the whole thing works with a Wemos D1 ESP8266, an A4988 stepper driver, and a buck converter. While it worked fine as a one-off on a perfboard, [Chris] used the project as an opportunity to learn how to make a PCB using KiCad; the PCB project is here on GitHub and the ESP8266 runs the ESPHome firmware. Be sure to check out the project page on his blog for all the details; [Chris] links to all the resources there, and covers everything from a bill of materials to walking through configuration of ESPHome with integration into the open-source Home Assistant project.

Looking to control natural light but blinds aren’t your thing? Maybe consider automated curtains.

DropController Sets The Bar For Documentation

dropController has the kind of documentation we wish would spontaneously generate itself whenever we build something. [Martyn Currey] built a robust rig for water droplet photography, and we don’t want to dismiss the hardware, but the most impressive part might be the website. It might not be very fancy, but it’s thorough and logically organized. You can find parts lists, assembly manuals, tutorials, sketches, and schematics. If only all the projects that came our way were so well detailed.

Water droplet photography is pretty cool, although freehanding it will make your patience fall faster than 9.81 m/s². The concept is that a solenoid valve will flicker open to release a drop of water, wait for a certain number of microseconds, and then trigger your DSLR via a wired remote cable. The tricky part comes from controlling as many as six valves and three flashes. We don’t have enough fingers and toes to press all those buttons.

The bill of materials contains many commonly available parts like an Arduino Nano, an LM2596 voltage regulator, some MOSFETS, an HC-06 Bluetooth module, plus standard audio connectors to hook everything up. Nothing should break the bank, but if money is not an issue, [Martyn] sells kits and complete units.

Waterdrop controllers are not the newest kids on the block, and strobe photography is a time-honored tradition.

Continue reading “DropController Sets The Bar For Documentation”

Mercurial Light Box Has A Secret Switch

Hit up the lighting aisle of any big box hardware store these days and you’ll probably find a variety of Edison bulbs — modern bulbs meant to evoke the bare, complicated tungsten filament bulbs from the early days of electric candlelight. Edison bulbs use filament LEDs, which resemble skinny candles with wicks at both ends and give off a nice light, especially when diffused by acrylic.

This simple light box uses two filament LEDs that float inside on an internal circuit sculpture. [lonesoulsurfer] likes to use old cell phone batteries and USB charging boards in his builds, and that’s exactly what’s inside this box.

Our favorite part of the build elevates this simple light box into a curiosity for those not in the know. It’s controlled with a mercury tilt switch, so all you’d have to do in a power outage is locate the box and turn it upside down, provided it has a charge.

We love elemental switch design around here, like this light box that switches on with salt water.

Learn Software Reverse Engineering: Ghidra Class Videos From HackadayU Now Available!

The HackadayU video series on learning to use Ghidra is now available!

Ghidra is a tool for reverse engineering software binaries — you may remember that it was released as Open Source by the NSA last year. It does an amazing job of turning compiled binaries that tell the computer how to operate into human-readable C code. The catch is that there’s a learning curve to making the most out of what Ghidra gives you. Enter the Introduction to Reverse Engineering with Ghidra class led by Matthew Alt as part of the HackadayU series. This set of four one-hour virtual classroom videos were just made available so that you can take the course at your own pace.

Matthew has actually been schooling us for a while. He’s also known as [wrongbaud] and we’ve been spending a lot of time covering his reverse engineering projects, including the teardowns of NES-on-a-chip hardware and his excellent hacker’s guide to JTAG. His HackadayU class continues that legacy by pulling together course materials for a high-quality hands-on walk through Ghidra. You’ll get a dose of computer architecture, the compilation process, ELF file structure, and x86_64 instructions sets along the way. He’s done a superb job of making example code for the coursework available.

While this was the first HackadayU course, there are more on the way. Anool Mahidharia just finished teaching KiCAD & FreeCAD 101 and videos will be published a soon as the editing process is complete. The fall lineup of classes is shaping up nicely and will be announced soon. As a sneak peak, we have instructors working on classes covering tiny machine learning, a second set of classes on Ghidra reverse engineering, a protocol deep dive (I2C, SPI, one-wire, JTAG etc.), Linux on Raspberry Pi, building interactive art, and all about LEDs, and an intro to design with Rhino. Keep your eye on Hackaday for more info as classes are added to the schedule.

Continue reading “Learn Software Reverse Engineering: Ghidra Class Videos From HackadayU Now Available!”

Panic Button Is An Audio-Visual Parachute Out Of Zoom Calls

Everyone has been learning how to stream this year whether they want to or not. This has given rise to the embarrassment paradox, which states that the more urgently you need to kill your camera and microphone feeds in a videoconference call, the more difficult and time-consuming it will be. Zoom in particular will toggle the mic and camera with keyboard shortcuts, but when your toddler waddles into the room swinging a used diaper around in the air, keyboard shortcuts will seem woefully under-powered.

What you need is a single sturdy button that sends both of these toggle commands as quickly as possible. [Simon Prickett]’s panic switch does exactly that. It’s a delightfully tactile arcade button connected to a Trinket M0, which can emulate a keyboard quite easily as an Arduino or CircuitPython device.

This little keyboard doesn’t send these macros directly, because that would be way too risky. What if you were reading Hackaday instead of staring into the tiled faces of your coworkers? Then it wouldn’t work, because Zoom is out of focus.

Instead, it sends an obscure four-key macro to the computer that triggers an AppleScript. [Simon]’s AppleScript checks to see if Zoom is running. If not, it has the system announce the fact. If it is running, then the script sends cmd+shift+a and cmd+shift+v to Zoom directly to toggle the audio and video. Check out the demo after the break.

As you might expect, we’ve seen a couple of videoconference survival hacks over the past few months. Need to show something or work with your hands, but only have one camera? All you need is a mirror, a clothespin, and a length of wire for a simple split-screen setup.

Continue reading “Panic Button Is An Audio-Visual Parachute Out Of Zoom Calls”

TinyPilot Provides KVM-over-IP, With Low Cost And Even Lower Latency

Remote access is great, but if the machine stops booting, ceases to connect to the network, or needs low-level interaction like BIOS settings or boot management, remote access is worthless because it’s only available once the host computer is up and running. The usual solution is to drag a keyboard and monitor to the machine in question for physical access.

Ubuntu laptop (right) being accessed over IP, via web browser on the left.

For most people, swapping cables in this way is an infrequent task at best. But for those who work more closely with managing hardware or developing software, the need to plug and unplug a keyboard and monitor into machines that otherwise run headless can get tiresome. The modern solution is KVM (keyboard, video, mouse) over IP, but commercial options are expensive. [Michael Lynch]’s TinyPilot on the other hand clocks in at roughly $100 of parts, including a Raspberry Pi and USB HDMI capture device. It does have to drop the ‘M’ from KVM (meaning it does not support a mouse yet) but the rest of it hits all the bases, and does it all from a web browser.

What exactly does TinyPilot do? It provides remote access via web browser, but the device is an independent piece of hardware that — from the host computer’s point of view — is no different from a physical keyboard and monitor. That means keyboard and video access works before the host machine even boots, so even changing something like BIOS settings is no problem.

[Michael] demonstrates his design in the video embedded below, but we encourage you to check out the project page for a fascinating exploration of all the challenges that were part of TinyPilot’s development.

Continue reading “TinyPilot Provides KVM-over-IP, With Low Cost And Even Lower Latency”