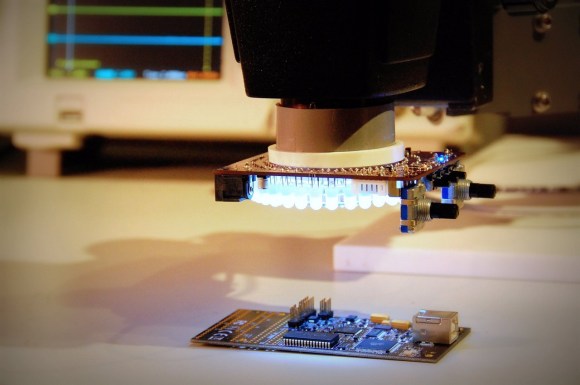
Wall Votive Display Controlled With A Glowing Cube

wall-votive-display

This wall hanging would look great even if it did no more than light up. But thanks to a unique controller it’s meant to work as an interactive display for your living area.

The rectangles and votive candle cups are a set of three store-bought hangings. But lighting the candles and remembering to blow them out was a pain, so [Adiel Fernandez] decided to add the LEDs to make the job easier. But why stop at that, in addition to an RGB light for each cup he made them fully addressable. It’s all the better for a light show, but this also opens up the arena for all manner of different uses.

Accompanying the wall installation is a palm-sized cube meant to sit on the coffee table. Whichever side of the cube us up sets the function for the display, with a rotation tweaking the function, and a fast spin used as a select. If the power icon is on the side facing up, a fast spin will turn the display on or off. There are also functions for weather, temperature, transportation (we were thinking something like a bus schedule notifier but it’s actually a bit different) and animation patterns. After the break you can watch a demo of the cube functionality.

Continue reading “Wall Votive Display Controlled With A Glowing Cube”

Elemental Display Is Also A LED Wall

elements

[Dan] is an element collector, someone who gets his socks knocked off by bismuth crystals and the orange vapor of bromine. Of course every element collector needs a proper display case, and since the periodic table table idea is cliché, [Dan] decided to build an elemental display that’s also a really awesome LED wall.

The build started off as most do with a few sheets of plywood and 120 acrylic shelves for each item in [Dan]’s collection. The real magic happened when [Dan]’s buddy [Bill] was called in to make the display a little more interesting.

Behind each acrylic shelf is a three-LED section of a LED strip, each part of the periodic table having a different color. The 120 individual shelving units are broken down into 16-shelf groups, each driven by a custom LED driver board. These driver boards are connected to a master Arduino with phone cables and make wonderful use of a very neat TCL5940 Arduino library.

The elemental display has a few options; all-on, twinkling, an Apple ‘breathing’ mode, and a graphic eq, as shown in the video after the break.

Continue reading “Elemental Display Is Also A LED Wall”

Infra Is A Television Made Of Infrared Pixels

ir-television-using-625-tv-remotes

This television is perfect except for its low resolution and the fact that it can’t be seen by the naked eye. [Chris Shen’s] art installation, Infra, uses 625 television remotes as pixels for a TV screen. There’s a little bit of insight to be gained from the details which [Chris] shared with EMSL.

The remote controls were all throw-aways. Even if there are problems with the buttons, battery connectors, or cases, chances are the IR led in each was still functional. So [Chris] patched into them using about 500 meters of speaker wire.

Why 625 pixel? Because that’s how many LEDs the Peggy board can handle. We’ve seen this open source LED board driving video in other projects. Here it’s been connected to each remote using Molex connectors. Each of the headers has the same pitch as a through-hole 5mm LED. The entire board was filled with them, and a mating crimp connector terminates the end of the wire coming out of each remote. This makes setup quite easy as the remotes don’t have to be installed in any particular order as long as the physical location matches Peggy’s grid.

You can get a glimpse of the piece playing video in the clip after the break.

Continue reading “Infra Is A Television Made Of Infrared Pixels”

7x7x7 LED Cube Driven By Arduino Mega

Sure, the physical build itself looks great, but it’s what [Michael] did with the firmware that impresses us the most. He’s using an Arduino Mega to drive the 7x7x7 cube and manages to squeeze out what he calls 142 frames per second with the setup. We’re not sure FPS is the right measurement, as we believe it’s the multiplexing rate that he’s trying to describle. It takes 144 uS to scan the entire matrix once. He performs the scan seven times per frame and the result is a flicker-free appearance, even to cameras.

You can see a video demonstration after the break. Since [Michael] emailed us directly with more details about the build we’ve pasted those below the fold as well.

If you’re looking for a more entry-level Arduino LED cube this 4x4x4 project is just the thing.

Continue reading “7x7x7 LED Cube Driven By Arduino Mega”

Really, Really Geeky Wedding Invitations

invitation

Being real, ultimate geeks, [Bill] and [Mara] didn’t want to settle for plain, paper-based wedding invitations. No, they wanted something cooler, and came up with their own DIY electronic wedding invitations.

Since they would be making the invitations themselves, [Bill] and [Mara] needed a simple circuit that could be easily mass produced. They turned to the classic microcontroller-powered blinking LED circuit powered by an ATtiny13.

The first order of business was producing 50 printed circuit boards for each of the invitations. For this, [Bill] picked up an Xerox Phaser laser printer off of ebay and a few sheets of copper-clad kapton film. The etch resist was printed directly onto the kapton film and etched in a bath of ferric chloride, effectively making a flexible PCB.

These circuit boards were soldered up and laminated between the printed invitation and the card stock cutter with the help of a Silhouette Cameo paper cutter. After the cards were assembled, the battery was wired up and the cards shipped out.

The microcontroller inside the card was programmed to be asleep most of the time, waking up only every few seconds to check a light sensor to determine if the card was opened or not. If the microcontroller sensed the card was open, the lights began blinking, making it one of the most memorable wedding invitations [Bill] and [Mara]’s guests will ever receive.

You can check out a demo of the invitations after the break.

Continue reading “Really, Really Geeky Wedding Invitations”

Messenger Bag LED Matrix Keeps Bikers Safe At Night

messenger-bag-led-matrix

Get a little more exposure than one under-saddle bike light can provide by building your own LED enabled messenger bag. It looks like the bag itself was fabricated from scratch by [Andrew Maxwell-Parish] rather than altering an existing bag. He had a few goals for the project, the most interesting of which was to make the electronics removable. His reasoning for this is so he can get the bag past security at the airport.

The design is quite simple, there’s a large flap which is attached at the top of the bag and has a couple of clips at the bottom to keep ti closed. On the inside of the flap he sewed a snap system which holds one piece of material on which all of the electronics are attached. The Lilypad system is used (it looks like the original hardware and not the FLORA upgrade). The main unit is sewn to one side, while the Charlieplex LED matrix was attached in a grid centered on the flap. The lights shine through the orange fabric, keeping them fairly safe from the weather and giving them a reddish hue.

If you’re looking for a few more features check out this GPS enabled messenger bag.

Sunrise Alarm Clock Mounted Above The Bed

sunrise-alarm-from-led-strips

This sunrise alarm clock was made in a bit different form factor than we normally see. Instead of a box next to the bed it’s a bar above the headboard which slowly illuminates every morning. This was [Holly’s] first electronics project. She spent pretty much all summer working on it and accumulated a skill set that included designing for and operating the laser cutter and assembling and programming the electronics.

She didn’t start from square one. The hardware and programming were greatly simplified by the availability of RGB LED strips and the Monochron clock which drives them. [Holly] altered the code to bring up a blueish hue over a 35-minute time period. Since this will be used to wake her at 5:30am she was also obliged to include some backup sounds just in case. But after the project was finished and mounted she forgot to turn them on and was pleasantly surprised that the lights woke her up on time. The mounting bracket seen above uses t-slot rail with laser cut brackets to hold the half-cylinder shade for the sconce. The final product looks fantastic!