A Better USI I2C Library For The MSP430

USI

TI’s MSP430 chips are rather interesting – they’re low power, very capable, and available for under a dollar in most cases. Some of these chips, though, don’t have native SPI or I2C interfaces; instead, everything is done through a USI, or Universal Serial Interface module. [Jan] found the stock I2C USI module was a little rough around the edges, so he created his own.

[Jan] found the TI example code for using the USI as an I2C device overly complicated and something that an intern whipped up in a week and was never touched again. In response to this, he created a much, much simpler USI/I2C module that’s actually readable. It’s available over on the GitHub if you want to grab it for yourself.

Compared to the TI code, [Jan]’s library is dead simple. There are only two functions, one for initialization, and another for sending and receiving. Easy, small, and it works. Can’t do much better than that.

ATMega & ATtiny Core Temperature Sensors

temp

We don’t know if this will come as a surprise to the regular Hackaday reader, but a whole bunch of Atmel microcontrollers have a very cool feature hidden away in their datasheets. Most of them – everything from the ATMega 168, 328, 32u4, to the ATtiny85 and  84 have a temperature sensor right on the chip. [Connor] did a little bit of research on this sensor and came up with a little bit of code that spits out the core temperature of these Atmel chips over the serial port.

The temperature sensor on these Atmel chips is accessed by writing a code – ‘100111’ for the Mega32u4 and ‘100010’ for the tiny84, for example – into the ADMUX register on the chip. According to the datasheet, the returned temperature is accurate to +- 10°C, but that can be easily calibrated by holding an ice cube (in a plastic bag, of course) up to the chip.

With a little more code, [Connor] is able to output the temperature of the microcontroller core over a serial port. In testing, his chip started out at 20°C and reached equilibrium at 24°C after about a minute. Pretty neat, and could be used as a temperature sensor for a project in a pinch.

Automatically Sorting Beads By Color

beadsorter

[Tomas] wanted to try building something mechanical with electronic control, and ended up with this sorter that organizes beads into one of two containers based on color. He built most of the structure from popular interlocking plastic bricks, then added a stepper motor salvaged from an old scanner and two plastic discs.

The two discs sit on top of each other. The bottom one is stationary and has two holes drilled in it, with a container sitting below each hole. The top disc has a smaller, bead-sized hole and rotates from its starting position—where it collects one bead—to a camera for analysis. After the camera determines the color of the bead, the disc rotates again to position itself over one of the two sorting holes in the disc below, and the bead falls into the awaiting container. The device is controlled by the MSP430 microcontroller on a FITKit (translated), which is the development platform of choice for [Tomas’s] school.

[Tomas] originally attempted to determine the color of beads by using 3 different color LEDs and a light-dependent resistor, but switched to using a webcam and a Java program to capture images and calculating average hues. You can find more details and the source code on his site, but first see the short video below.

Continue reading “Automatically Sorting Beads By Color”

3D Printed Netduino Remote Controlled Car

netduinocar

[Matt] lives in South Africa, where homes have smallish crawlspaces (some only 30cm high!) that he can’t quite squeeze himself into. Even if he could, he probably wouldn’t: they’re apparently vacation homes for the local rats. He did, however, want to explore these spaces to get a better idea what’s going on inside, so he built a Windows Phone-controlled car with a Netduino and 3D-printed parts.

Such a specialized application requires unique parts, so [Matt] designed and 3D-printed the wheels and frame from scratch. You’ve probably noticed that the wheels aren’t your typical cylinders. The terrain [Matt] faces is sand, so the spiked shape provides better grip. The body’s design required extra attention because it holds the motors, the Netduino, the motor driver, and the battery.

A Bluetooth module connects to the Netduino and allows [Matt] to drive the car with his Windows Phone, and an inexpensive 5V LED board provides some light for those dark corners. How does it see once inside the crawlspace? It looks like [Matt’s] getting to that part. His plan is to simply mount a second phone running Skype and watch the stream. Stick around after the break to see [Matt] use the car to both confuse and excite his dog.

Continue reading “3D Printed Netduino Remote Controlled Car”

Update From Wayback: AVGA Reborn As RetroWiz

retrowiz-vga-avr-gaming-system

This one has been a long time coming. We’re finally seeing an update to [Jaromir’s] retro gaming platform based around and ATmega chip. The thing that was novel about it back in 2009, and continues to be to this day, is the use of VGA output (PAL) from an AVR chip rather than composite video like most offerings.

Good projects never die and recently he picked the hardware up again, spinning a mostly surface mount board and putting together a new website to feature his work. Above you can see a demo of Commander Keen 4 running on the hardware (video below). He’s also has a rather trippy Super Mario port and adapted [Albert Seward’s] PacMan source for the hardware.

The chip is being clocked at 32MHz with VGA clock running at 19.6608 MHz. This gives him sixteen colors with a resolution of 192×144. He concedes that you get better resolution out of composite video, but who needs resolution for retro gaming?

Continue reading “Update From Wayback: AVGA Reborn As RetroWiz”

SLDongle: The Microcontroller Gift That Keeps On Giving

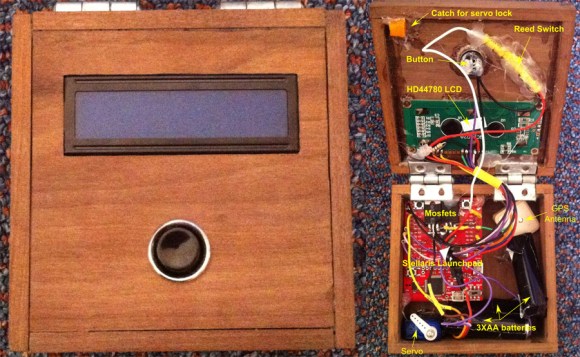
It must be nice to be one of [kiu]’s colleagues. Some people pass out chocolates or stress balls at work as Christmas gifts, but [kiu] made a bunch of SL dongles to introduce his colleagues to the world of microcontrollers.

The dongles are based on the ATMega88PA and work on three levels to provide something for everyone. The no-experience-necessary option is to plug it in to a USB port and admire the light show sequences. If you know enough to be dangerous, you can remotely control the LEDs from a USB host using [kiu]’s sldtool for Linux or Mac. He originally included examples that visualize CPU utilization and ultimately added a Ruby-based departure countdown for the next outbound train at the nearby station.

If you’re 1337 enough you can flash your own C or assembly code via USB. Holding down the button during power-up lets you use the dongle as a USBasp so it can be flashed with avrdude. [kiu] says the bootloader can’t be unlocked through software and is theoretically unbrickable. Stick around after the break to see the full demo.

Continue reading “SLDongle: The Microcontroller Gift That Keeps On Giving”

GPS Engagement Ring Box

gpsEngagementRingBox

[James] got engaged recently, in part thanks to his clever GPS Engagement Ring Box, and he sent us a brief overview of how he brought this project to life. The exterior of the box is rather simple: one button and an LCD. Upon pressing the button, the LCD would indicate how far it needed to be taken to reach a pre-selected destination. After carrying it to the correct location, the box would open, revealing the ring (and a bit of electronics).

Inside is a GPS antenna and a Stellaris Launchpad, which are powered by three Energizer lithium batteries to ensure the box didn’t run out of juice during the walk. To keep the lid closed, [James] 3D printed a small latch and glued it to the top of the box, which is held in place by a micro servo. Once the box reaches its destination, the microcontroller tells the servo to swing out of the way, and the box can then open. As a failsafe, [James] added a reed switch to trigger an interrupt to open the box regardless of location. It seems this was a wise choice, because the GPS was a bit off and the box didn’t think it was in the correct place.

Swing by his blog for more information on the box’s construction and the wiring. We wish [James] the best and look forward seeing his future hacks; perhaps he’ll come up with some clever ones for the wedding like our friend Bill Porter.