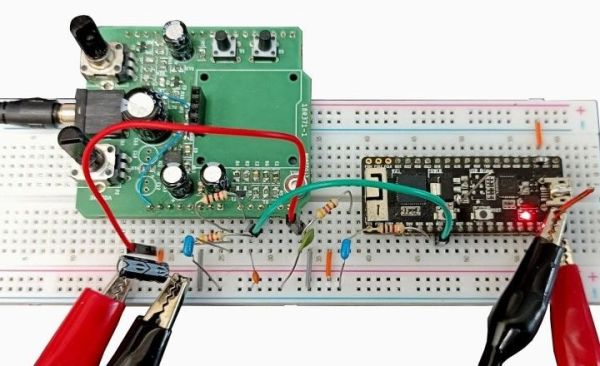
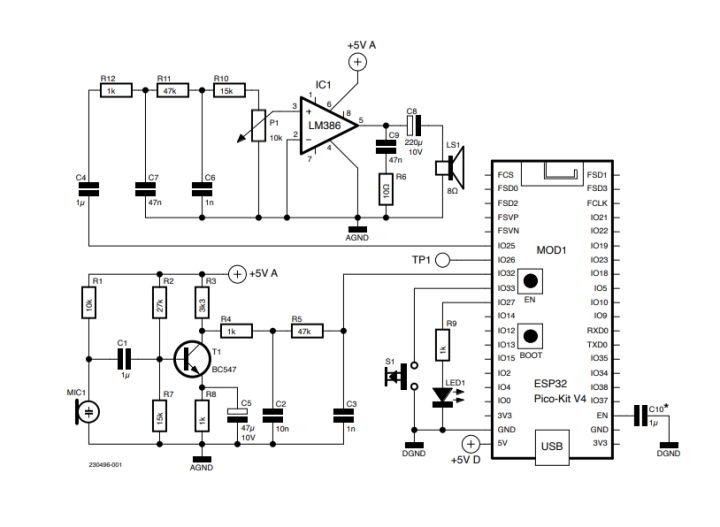
Cornell Updates Their MCU Course For The RP2040

The School of Electrical and Computer Engineering at Cornell University has made [Bruce Land]’s lectures and materials for the Designing with Microcontrollers (ECE 4760) course available for many years. But recently [Bruce], who semi-retired in 2020, and the new lecturer [Hunter Adams] have reworked the course and labs to use the Raspberry Pi Pico. You can see the introductory lecture of the reworked class below.

Not only are the videos available online, but the class’s GitHub repository hosts extensive and well-documented examples, lecture notes, and helpful links. If you want to get started with RP2040 programming, or just want to dig deeper into a particular technique, this is a great place to start.

From what we can tell, this is the third overhaul of the class this century. Back in 2012 the course was using the ATmega1284 AVR microcontroller, and in 2015 it switched to the Microstick II using a Microchip PIC32MX. Not only were these lecture series also available free online, but each has been maintained as reference after being replaced. One common thread with all of these platforms is their low cost of entry. Assuming you already have a computer, setting up the hardware and software development environment for these modules costs less than the price of a pizza dinner, a fact no doubt appreciated by the ECE department’s budget director.

We’ve covered this course before back in 2015 when it first changed. Another free online course on embedded system design is from [Prof James Conrad] at UNC Charlotte, based on the Renasas RX63N microcontroller — the UNC Charlotte team drove development of the autonomous vehicle project we covered back in 2009. If you know of other online embedded systems classes, let us know in the comments below.

Continue reading “Cornell Updates Their MCU Course For The RP2040”

Videos Teach Bare Metal RP2040

When we write about retrocomputers, we realize that back in the day, people knew all the details of their computer. You had to, really, if you wanted to get anything done. These days, we more often pick peripherals and just assume our C or other high level code will fit and run on the CPU.

But sometimes you need to get down to the bare metal and if your desire is to use bare metal on the RP2040, [Will Thomas] has a YouTube channel to help you. The first video explains why you might want to do this followed by some simple examples. Then you’ll find over a dozen other videos that give you details.

Any video that starts, “Alright, Monday night. I have no friends. It is officially bare metal hours,” deserves your viewing. Of course, you have to start with the traditional blinking LED. But subsequent videos talk about the second core, GPIO, clocks, SRAM, spinlocks, the UART, and plenty more.

As you might expect, the code is all in assembly. But even if you want to program using C without the SDK, the examples will be invaluable. We like assembly — it is like working an intricate puzzle and getting anything to work is satisfying. We get it. But commercially, it rarely makes sense to use assembly anymore. On the other hand, when you need it, you really need it. Besides, we all do things for fun that don’t make sense commercially.

We like assembly, especially on platforms where most people don’t use it. Tackling it on a modern CPU is daunting, but if you want to have a go, we know someone who can help.

Continue reading “Videos Teach Bare Metal RP2040”

A gray 3d-printed box with RV-bridge embossed on it, and a connector-terminated bundle of wires coming out of it.

RV-Bridge Takes HomeKit To The Open Road

In the world of proprietary protocol darkness, it’s comforting to see that the RV realm (Recreational Vehicle, also known as a motorhome) has mostly settled on RV-C, an open protocol that lets various devices and systems inside an RV talk to each other over CAN. The undeniable openness of RV-C is surprising, but we haven’t seen many hobbyists tinker with it — yet.

Now, [Randy Ubillos] sets an example — his gift to us is an ESP32 firmware called RV-Bridge and it lets you control your RV’s RV-C network from HomeKit. After all, your motorhome could benefit from home automation, too!

The RV-C network in [Randy]’s family RV already had a factory-provided front-end and an iOS app, but naturally, it had a limited set of features. Having looked around online he found that both RV-C and HomeKit had open libraries for them, and set out to join these worlds together.

Now he’s released the first revision of RV-Bridge, fully-featured enough for comfortable day-to-day use, and with a setup guide for those who want to try it out! When it comes to hardware, you’ll want an ESP32 board with CAN support — [Randy] has found a perfect board for sale, and made it even more fitting by designing a 3D printed case for RV use; as usual, files are on GitHub!

Making your stock RV more comfy through hacker methods is exactly what we expect to grace our tips line! The kinds of RV projects we’ve seen so far, are also outstandingly cool, yet of different kind – things like building your own RVs out of something not meant to be an RV, whether it’s an abandoned airliner, a school bus, or a jet engine! Oh, and if your hackerspace owns a RV, you can always convert it to something else, be it a mobile hackerspace or a spaceship simulator.

A CH32V003 Toolchain — If You Can Get One To Try It On

We’re in an exciting time for cheap microcontrollers, as with both the rise of RISC-V and the split between ARM and its Chinese subsidiary, a heap of super-cheap and very capable parts are coming to market. Sometimes these cheap chips come with the catch of being difficult to program though, but for one of them the ever-dependable [CNLohr] has brought together his own open-source toolchain. The part in question is the WCH CH32V003, which is a ten-cent RISC-V part that has an impressive array of capabilities. As always though, there’s a snag, in that we’re also told that while supplies are improving this part can be hard to find. The repository is ready for when you can get them again though, and currently also contains some demo work including addressable LED driver code.

As an alternative there’s a comparable and slightly cheaper ARM-based part, the Puya PY32. It’s reckoned to be the cheapest of the flash-based microcontrollers, and like the WCH part is bearing down on the crop of one-time-programmable chips such as the famous and considerably less powerful 3-cent Padauk. This end of the market is certainly heating up a little, and from our point of view this can only mean some exciting projects ahead.

A man sits in front of a wooden table. There is a black box with a number of knobs hand-labeled on blue painter's tape. A white breadboard with a number of wires protruding from it is visible on the box's left side. An oscilliscope is behind the black box and has a yellow waveform displaying on its screen.

A More Expressive Synth Via Flexure

Synthesizers can make some great music, but sometimes they feel a bit robotic in comparison to their analog counterparts. [Sound Werkshop] built a “minimum viable” expressive synth to overcome this challenge. (YouTube)

Dubbed “The Wiggler,” [Sound Werkshop]’s expressive synth centers on the idea of using a flexure as a means to control vibrato and volume. Side-to-side and vertical movement of the flexure is detected with a pair of linear hall effect sensors that feed into the Daisy Seed microcontroller to modify the patch.

The build itself is a large 3D printed base with room for the flexure and a couple of breadboards for prototyping the circuits. The keys are capacitive touch pads, and everything is currently held in place with hot glue. [Sound Werkshop] goes into detail in the video (below the break) on what the various knobs and switches do with an emphasis on how it was designed for ease of use.

If you want to learn more about flexures, be sure to checkout this Open Source Flexure Construction Kit.

Continue reading “A More Expressive Synth Via Flexure”

Pi Pico Calculates Water Usage

Modern WiFi-enabled microcontrollers have made it affordable and easy to monitor everything from local weather information to electricity usage with typically no more than a few dollars worth of hardware and a little bit of programming knowledge. Monitoring one’s own utility data can be a little bit more difficult without interfering with the metering equipment, but we have seen some clever ways of doing this over the years. The latest is this water meter monitoring device based on a Raspberry Pi Pico.

The clever thing here isn’t so much that it’s based on the tiniest of Raspberry Pis, but how it keeps track of the somewhat obscured water flow information coming from the meter. Using a magnetometer placed close to the meter, the device can sense the magnetic field created as water flows through the meter’s internal sensors. The magnetic field changes in a non-obvious way as water flows through it, so the program has to watch for specific peaks in the magnetic field. Each of these specific waveforms the magnetometer detects counts to 0.0657 liters of water, which is accurate for most purposes.

For interfacing with a utility meter, this is one of the more efficient and elegant hacks we’ve seen in a while. There have, of course, been other attempts to literally read the meter using web cams and computer vision software, but the configuration for these builds is much more complex than something like this. You can interface with plenty of utility meters other than water meters, too, regardless of age.

Internet Connected Pinball Machine Shows Off Scores

Before video games, there were pinball machines. Not that they don’t exist today, but a modern pinball machine will likely have microprocessors and other fancy things that traditional pinball machine designers could never dream of. [Eli] had one of these mechanical machines from 1974 as a kid and, later, encountered a more modern machine with a rudimentary microprocessor and other integrated circuits onboard. One thing this enabled is the ability to remember high scores. But you have to physically look at the machine, and you can only see the top four scores. [Eli] decided to adapt the machine to upload high score data to the Internet, and it is a fun project.

[Eli]’s design goals were to make it automatic and robust. That is, if the network is down or the machine loses power, you shouldn’t lose high score data. In addition, he didn’t want to change the appearance or damage the 40-year-old machine. You can see a video of how it all turned out below.

The Laser Cue machine is one of many built around the “Williams System 7” platform. A 6808 CPU, along with some I/O chips to manage all the lights, sensors, and bells. The game has only 1K of RAM, 12K or ROM, and 128 bytes (no prefix, just bytes) of RAM with battery backup. There was even a common “operating system” called Flipper ROM, and that’s actually documented over on GitHub.

The ESP32 version of the WiFi interface board

Since the memory for the machine is all in external chips, it was a reasonable idea to replace the CPU with a board that monitored signals on the board. The CPU would plug into this new board, and then a newer microcontroller with an Internet connection could eavesdrop on bus traffic. However, removing the old CPU and jamming pins into the ancient socket was worrisome, so instead, [Eli] elected to tap into a test connector that was already on the board but not plugged into anything.

An ESP32 is more than capable of the speeds, although connecting to 5 V logic was a bit of a problem. The CPU has 5 V tolerant pins, but some of the 25 available pins on the development board either set items on boot or may briefly be outputs and were thus unusable. To reduce the necessary pins, [Eli] decided to do some of the decoding in separate logic. Instead of using TTL chips, he elected to use a programmable logic array.

After that, it seemed it would be straightforward, but there was something preventing the ESP32 from reading each bus cycle. [Eli] never got to the bottom of it but instead switched to the Raspberry Pi Pico W. Using the chip’s special I/O processors made the job easy, and it worked perfectly. The rest of the project was just fit and finish. Be sure to read to the end to find out the lessons learned which might help you on your next similar project.

A modern DIY machine might even have an FPGA inside. Don’t have room for a big full-sized pinball machine? No problem.

Continue reading “Internet Connected Pinball Machine Shows Off Scores”