IoT Pool Monitor Helps You Keep It Crystal Clear

Having a pool is great, but it also requires significant monitoring and maintenance to keep it crystal clear and clean. The OPNpool controller from [Coert Vonk] aims to help in this task, integrating neatly into the smart home ecosystem of today.

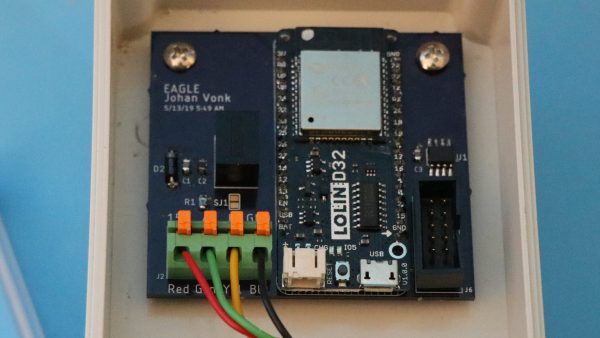
OPNpool runs on an ESP32, and is capable of monitoring pool controllers, pumps, and chlorinators, as well as working with thermostats and other hardware to control the state of the pool. This allows the system to do useful things like run high-powered pumps when electricity is cheapest, or to find the best timing to run heating circuits. The controller relies on MQTT messaging and can integrate with Home Assistant for those that prefer to run their own cloud-independent smart home systems.

With WiFi onboard the ESP32, there’s no need for a hardwired LAN connection, and the system can be administered remotely over the web. It’s also capable of talking with other hardware over RS-485 and bringing it under its own control. With OPNpool installed, monitoring pool conditions can be done from the leisure of one’s deck chair with a smartphone, rather than squinting and dark LCDs in equipment cabinets.

It’s a useful tool that could be just the ticket for the savvy, IoT-aware pool owner. We’ve seen other DIY pool controllers before, too. With summer just around the corner, it’s the perfect time to get hacking!

This DIY UPDI Programmer Is Nice And Cheap

[Daumemo] likes experimenting with DIY electronics, and like many people, eventually ran across an AVR microcontroller with a Unified Program and Debug Interface (UPDI). One option is of course to purchase an UPDI programmer, but an even better solution was to make a DIY USB version from nice, cheap parts.

Programming an Attiny404 over the UPDI interface.

UPDI is an interface for external programming and on-chip debugging of microcontrollers, and [Daumemo]’s solution is based on the jtag2updi project. It combines an Arduino Nano (in this case, a clone) with a single resistor, a single capacitor, and a six pin angled header (with a cleverly bent pin) to enable programming UPDI devices over a USB connection. [Daumemo] is happy to report that the device works just fine in both Microchip Studio with AVRDUDE, or PlatformIO.

Is an Arduino Nano a bit overpowered in this role? Maybe, but the price is certainly right. There’s no need for a custom PCB either, since everything can be soldered direct to the Nano board. A matching 3D printed enclosure is about all that’s needed to make a robust and reliable DIY USB UPDI programmer out of a handful of parts, and that sounds good to us.

On the other hand, if you do find yourself making custom PCBs, you may be interested in another of [Daumemo]’s DIY projects: a printable structure to turn a rotary tool into a PCB drill press.

Versatile Reflow Oven Controller Uses ESP32-S2

[Maker.Moekoe] wanted a single controller board that was usable with different reflow ovens or hotplates. The result is a versatile board based on the ESP32-S2. You can see a video of the board’s assembly in the video below.

The board sports several inputs and outputs including:

  • 2x MAX6675 thermocouple sensor input
  • 2x Fan output with flyback diodes
  • 2x Solid state relay output
  • 3x Buttons
  • 1x LED
  • 1x Buzzer
  • 1x Servo motor output
  • 0.96 inch OLED display

You could probably find a use for the board for other similar applications, not just ovens.

The video is oddly relaxing, watching parts reflow. It is like watching a 3D printer, no matter how many times we see it, we still find it soothing to watch. You can also see how he integrated the board with a toaster oven.

Overall, the board looks great and the workmanship is also very good. If you’ve never seen anyone set heat-set threaded inserts into a 3D printed piece, be sure to watch around the four minute mark.

We’ve seen plenty of oven projects. You can even use an Easy Bake oven.

Continue reading “Versatile Reflow Oven Controller Uses ESP32-S2”

Arming With An OS

We see tons of projects with the infamous “Blue Pill” STM32 boards. They are cheap and plentiful and have a lot of great features, or at least they were before the chip shortage. I recently picked up a “Black Pill”, which is very similar but has an even more powerful processor. For a few bucks, you get an ARM CPU that can run at 100 MHz (but with USB, probably 96 MHz). There’s 512 kB of flash and 128 kB of RAM. There’s a USB type C port, and even a button and an LED onboard. The thing fits on a breadboard and you can program it with a cheap STLink dongle which costs about $10.

The Black Pill module on a breadboard.

Of course, you then have to consider the software. The STM32Cube stuff is a lot to set up and learn but it does let you do just about anything you can imagine. Then there is the STM32Duino plug-in that lets you use it as a beefy Arduino. That works and is easy enough to set up. However, there’s also Mbed. The only problem is that Mbed doesn’t work right out of the box. Turns out, though, it isn’t that hard to set up. I’ll show you how easy it is to get things going and, next time, I’ll show you a practical example of a USB peripheral that uses the mBed RTOS features.

First Steps

Obviously, you are going to need a Black Pill. There are at least two choices but for as cheap as they are there is little reason not to get the STM32F411 version that has more memory. The DIP form factor will fit in whatever breadboard you happen to have and a USB C cable will power the board so unless you are driving a lot of external circuitry, you probably don’t need an external supply.

Continue reading “Arming With An OS”

Mindblowing Graphics From An ATtiny85

[Görg Pflug] wrote in with his really nice graphics library. It’s got multiple layers, two text consoles, greyscale, internal halftoning, and sprites. It can pull off a number of classic graphics tricks and demos. Oh yeah, and did we mention it runs on a freaking ATtiny85 and an I2C OLED screen?!

This is an amazing piece of work — if you’d asked us if this was possible, we would have probably said “no”. And now it’s yours to use in your own projects. The GitHub repo is full of demos showing off everything from switching between multiple layers, extremely rapid text scrolls, animations, boing balls, and even a Wolfenstein-style raycaster. On an ATtiny85.

There’s a demo video, embedded below, that shows it all off, but honestly you have to think about what’s going to to be suitably wowed. The first demo just seems to have a graphic wave over static text, for instance. No big deal? It’s blending the greyscale layers together and dithering them out to black and white for the OLED in real time! On an ATtiny85.

While the library is written in straight C++, there are even a couple examples of how you’d integrate this with Arduino’s Wire library if you so wished. We don’t know about you, but this makes us want to whip together an ATtiny85 and SSD1306 OLED demo board just to start playing around. This isn’t just an amazing hack, but it would also be a useful way to add graphics and a nice console to any project you’re working on.

Did we mention it’s all done on an ATtiny85?  Over I2C? Kudos!

Continue reading “Mindblowing Graphics From An ATtiny85”

ESP32: Is Two Better Than One?

We’ve looked at the WROOM-DA module before. It’s an ESP32 with two antennas, and [Andreas Spiess] says it is the ugliest ESP32 he’s ever seen. But beauty is only skin deep, after all. Did [Andreas] find beauty in the twin antennas? Watch the video below and see for yourself.

According to the block diagram, the twin antennas are not used simultaneously but offer diversity one at a time. There is also 8GB 8 MB of flash, double the amount on traditional WROOM modules. Mounting the device was a bit difficult since most ESP32 carrier boards will block some portion of the antenna array.

Continue reading “ESP32: Is Two Better Than One?”

SAMD11 Provides Two Serial Ports For Price Of One

While the average computer user likely hasn’t given much thought to the lowly serial port in decades, the same can’t be said for the hardware hacker. Cheap serial-to-USB adapters are invaluable for snooping debug ports or programming chips, and if you ask us, you can never have too many laying around the bench. [Quentin Bolsée] loves them so much that he’s even figured out how to build a dual-port adapter with a SAMD11C14 microcontroller.

As [Quentin] explains in the write-up, this isn’t just some kind of Y-cable. When connected to the host computer, the adapter shows up as two distinct serial ports, each with independent settings for things like baud rate and parity. This handy little gadget will let you tap into the serial ports of two devices simultaneously if you’re looking to do some Hollywood-style hacking, but more practically, it allows you to establish a debug and programming interface to the same board using just one USB connection.

[Quentin] milled a custom PCB for his adapter, which we have to say looks phenomenal, but those with more limited equipment at home should be able to send the MIT licensed board files off for production. He’s also provided the source code for the SAMD11C14’s firmware, so you’ve got everything you need to spin up your own version of this neat tool.

Two ports not enough for your parallel hacking needs? Believe it or not, we’ve also seen a quad USB-to-serial adapter that you can put together, though it’s a considerably more complex circuit.