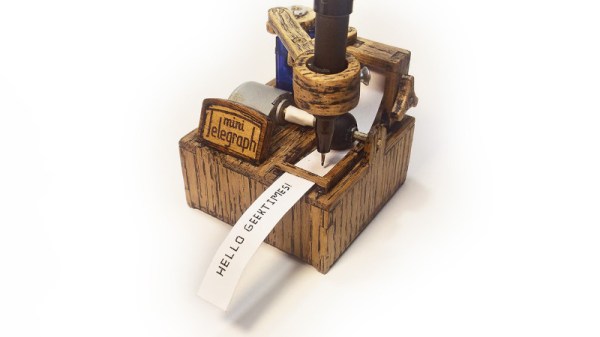
Magnetic Angle Sensor Mods Make Encoder Better For Blasting

Most of the hacks we see around these parts have to do with taking existing components and cobbling them together in interesting new ways. It’s less often that we see existing components gutted and repurposed, but when it happens, like with this reimagined rotary encoder, it certainly grabs our attention.

You may recall [Chris G] from his recent laser-based Asteroids game. If not you should really check it out — the build was pretty sweet. One small problem with the build was in the controls, where the off-the-shelf rotary encoder he was using didn’t have nearly enough resolution for the job. Rather than choosing a commodity replacement part, [Chris] rolled his own from the mechanical parts of the original encoder, like the shaft and panel bushing, and an AS5048A sensor board. The magnetic angle sensor has 14 bits of resolution, and with a small neodymium ring magnet glued to the bottom of the original shaft, the modified encoder offers far greater resolution than the original contact-based encoder.

The sensor breakout board is just the right size for this job; all that [Chris] needed to do to get the two pieces together was to 3D-print a small adapter. We have to admit that when we first saw this on Hackaday.io, we failed to see what the hack was — the modified part looks pretty much like a run-of-the-mill encoder. The video below shows the design and build process with a little precision rock blasting.

Continue reading “Magnetic Angle Sensor Mods Make Encoder Better For Blasting”

Homebrew Espresso Machine Has Closed-Loop Control

[Ben Katz] is in the process of building a compact, closed-loop espresso machine, and really seems to be pulling it off in the first shot. Though it may not be the final product, we’re in awe of the beautiful guts and would love to taste-test the early results.

This machine will hit a sweet spot between lever-type espresso machines that are like driving a manual without power steering, and those fully automated machines that squeeze all the fun out of playing barista but are easier on the joints.

Here’s how it works so far: a motor drives an electric gear pump that pumps the water through a heater. It’s a closed-loop system, so there’s a 3-way valve after the heater that keeps sending the water back until it’s deemed hot enough. Once that happens, the valve switches functions and begins to pump water through the group head and on to the coffee grounds.

[Ben] designed and milled a beautiful group head that’s designed to fit a La Pavoni portafilter and some other parts he already had on hand. Grab a coffee and watch it pull the first shot after the break, then stick around to see the milling and the drilling.

Ready to kick that Keurig to the curb and get an espresso machine? Don’t just throw it out or take it to a field and smash it with a baseball bat — turn that thing into an automatic drip for a small houseplant.

Continue reading “Homebrew Espresso Machine Has Closed-Loop Control”

Don’t Tase Me, Keeb!

Okay, so this doesn’t really use a taser — that’s just click bait and we apologize. An actual taser would be a terrible way to train yourself to be a better typist, because depending on where you choose to deliver the shock, you could damage your typing nerves pretty quickly with a few milliamps at 50,000 volts.

Instead of a taser, [nobody6502] got a pack of prank gum off of Amazon that delivers a much more doable shock that is painful enough to get the user to type more carefully. [nobody6502] set up a simple no-pain, no-train website that presents random English words one at a time and checks for typos against an open-source list of nearly half a million entries. Misspell a word, and a get a relay-driven shock from the gum circuit.

The main brain of this pain trainer is a Particle Argon board which has I/O pins that can be controlled from the web. When the website detects a typo, it sends a signal to the Argon, which turns on a relay that activates the shock mechanism. What’s most impressive is that [nobody6502] doesn’t have a full-blown computer and programmed everything on an iPad. Check out the build video after the break.

Are you a hunt and peck typist? There’s a negative reinforcement keyboard for that.

Continue reading “Don’t Tase Me, Keeb!”

Machining A Honing Jig Will Keep Skills Sharp

[Amy Makes Stuff] has long used a pair of diamond honing blocks to freehand sharpen planes, chisels, and all the other dull things around the shop. Although this method works fairly well, the results are often inconsistent without some kind of jig to hold the blade securely as it’s being sharpened. These types of devices are abundant and cheap to buy, but as [Amy] says in the video after the break, then she doesn’t get to machine anything. Boy, do we know that feeling.

[Amy] was able to make this completely out of stuff she had lying around, starting with a block of scrap aluminium that eventually gets cut into the two halves of the jig. The video is full of tips and tricks and it’s really interesting to see [Amy]’s processes up close. Our favorite part has to be that grippy knob that expands and contracts the jig. [Amy] made it by drilling a bunch of holes close to the outside edge of a circle, and then milled away the edge until she had a fully fluted knob. Once she had the jig finished, she upgraded her honing blocks by milling a new home for them out of milky-white high-density polyethylene.

Mills are fantastic tools to have, but they’re a bit on the pricey side. If you’re just getting started, why not convert a drill press into a mill? Wouldn’t that be more fun that just buying one?

Continue reading “Machining A Honing Jig Will Keep Skills Sharp”

Increasing The Resolution Of The Electrical Grid

As a society in the USA and other parts of the world, we don’t give much thought to the twisting vines of civilization that entangle our skies and snake beneath our streets. The humming electrical lines on long poles that string our nations together are simply just there. Ever-present and immutable. We expect to flick the switch and power to come on. We only notice the electrical grid when something goes wrong and there is a seemingly myriad number of ways for things to go wrong. Lighting strikes, trees falling on lines, fires, or even too many people trying to crank on the A/C can all cause rolling blackouts. Or as we found out this month, cold weather can take down generation systems that have not been weatherized.

We often hear the electrical grid described as aging and strained. As we look to the future and at the ever-growing pressure on the infrastructure we take for granted, what does the future of the electrical grid look like? Can we move past blackouts and high voltage lines that criss-cross the country?

Continue reading “Increasing The Resolution Of The Electrical Grid”

30 FPS Flip-Dot Display Uses Cool Capacitor Trick

Most people find two problems when it comes to flip-dot displays: where to buy them and how to drive them. If you’re [Pierre Muth] you level up and add the challenge of driving them fast enough to rival non-mechanical displays like LCDs. It was a success, resulting in a novel and fast way of controlling flip-dot displays.

Gorgeous stackup of the completed display. [Pierre] says soldering the 2500 components kept him sane during lockdown.
If you’re lucky, you can get a used flip-dot panel decommissioned from an old bus destination panel, or perhaps the arrivals/departures board at a train station. But it is possible to buy brand new 1×7 pixel strips which is what [Pierre] has done. These come without any kind of driving hardware; just the magnetized dots with coils that can be energized to change the state.

The problem comes in needing to reverse the polarity of the coil to achieve both set and unset states. Here [Pierre] has a very interesting idea: instead of working out a way to change the connections of the coils between source and sink, he’s using a capacitor on one side that can be driven high or low to flip the dot.

Using this technique, charging the capacitor will give enough kick to flip the dot on the display. The same will happen when discharged (flipping the dot back), with the added benefit of not using additional power since the capacitor is already charged from setting the pixel. A circuit board was designed with CMOS to control each capacitor. A PCB is mounted to the back of a 7-pixel strip, creating modules that are formed into a larger display using SPI to cascade data from one to the next. The result, as you can see after the break, does a fantastic job of playing Bad Apple on the 24×14 matrix. If you have visions of one of these on your own desk, the design files and source code are available. Buying the pixels for a display this size is surprisingly affordable at about 100 €.

We’re a bit jealous of all the fun displays [Pierre] has been working on. He previously built a 384 neon bulb display that he was showing off last Autumn.

Continue reading “30 FPS Flip-Dot Display Uses Cool Capacitor Trick”

Retro Dreamcast Rhythm Game Controller Built From Scratch

Pop’n Music is a rhythm game which has had both arcade and home console releases over the years. [Charlie Cole] is a fan of the Dreamcast version, and decided to build his own controller for the game using the new hotness, the Raspberry Pi Pico.

The controller itself is built out of layers of lasercut MDF, along with an acrylic top and cork bottom to make it sit nicely on surfaces. Arcade buttons are installed to play the rhythm game, mimicking the design of the official cabinets seen in arcades. To run the controller, a Pico was pressed into service, with [Charlie] hoping to use the Pico’s PIO hardware to easily and effectively interface with the Dreamcast’s Maple bus. There were a few headaches along the way, and it didn’t quite live up to expectations, but with some clever use of dual cores, [Charlie] was able to get everything up and running.

Often, such vintage gaming hardware can be thin on the ground, so having the skills to build your own can come in handy. We’ve seen rhythm game hardware modded before too, like this repurposed DJ Hero controller. Video after the break.