Not too many people build their own microphones, and those who do usually build them out of materials like plastic and metal. [Frank Olson] not only loves to make microphones, but he’s also got a thing about making them from wood, with some pretty stunning results.
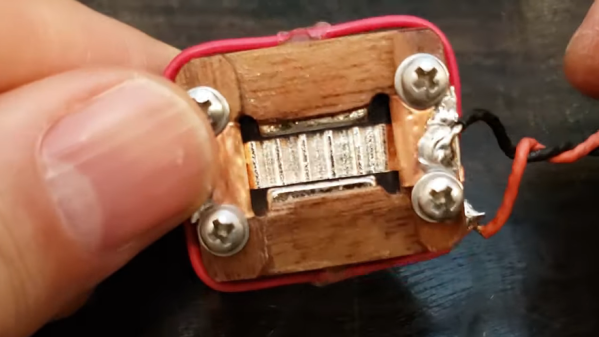
[Frank]’s latest build is a sorta-kinda replica of the RCA BK-5, a classic of mid-century design. Both the original and [Frank]’s homage are ribbon microphones, in which a thin strip of corrugated metal suspended between the poles of magnets acts as a transducer. But the similarities end there, as [Frank] uses stacked layers of walnut veneer as the frame of his ribbon motor. The wood pieces are cut with a vinyl cutter, stacked up, and glued into a monolithic structure using lots of cyanoacrylate glue. The video below makes it seem easy, but we can imagine getting everything stacked neatly and lined up correctly is a chore, especially when dealing with neodymium magnets. Cutting and corrugating the aluminum foil ribbon is no mean feat either, nor is properly tensioning it and making a solid electrical contact.
The ribbon motor is suspended in a case made of yet more wood, all of which contributes to a warm, rich sound. The voice-over for the whole video below was recorded on a pair of these mics, and we think it sounds just as good as [Frank]’s earlier wooden Model 44 build. He says he has more designs in the works, and we’re looking forward to hearing them, too. Continue reading “A New Wrinkle On Wooden Ribbon Microphones”

 The project is built around a VFM202MDA vacuum fluorescent display, which provides that lovely green-blue glow we all know and love, driven by a PT6314 driver chip. This has the benefit that it can be readily driven by a microcontroller in much the same way as the familiar HD44780 character LCD driver chip. With some minor tweaks, the character set can be modified to allow the display to become a surprisingly-responsive VU meter.