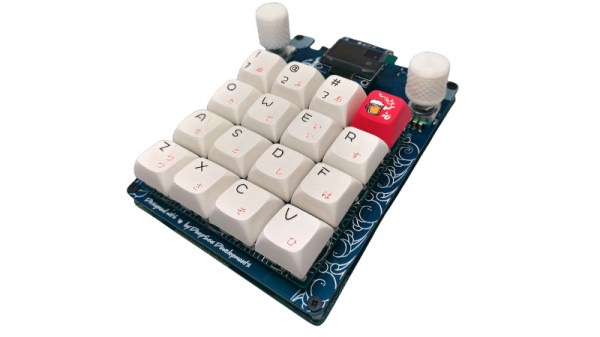
Custom Macro Keyboard With Sweet Backlighting

From the smallest 60% keyboards for those with no desk space to keyboards with number pads for those doing data entry all day, there’s a keyboard size and shape for just about everyone. The only problem, even with the largest keyboards, is that they’re still fairly limited in what they can do. If you find yourself wishing for even more functionality, you might want to build something like this custom macro keyboard with built-in LED backlighting.

Rather than go with a standard mechanical keyboard switch like a Cherry MX, this build is based around TS26-2 pushbuttons with built-in LED lighting. [atkaper] only really needed one button for managing the mute button on MS Teams, but still built a total of eight switches into this keyboard which can all be individually programmed with different functions. The controller is an Arduino Leonardo and the enclosure was 3D printed.

Paired with the classic IBM Model M keyboard, this new macro keyboard adds plenty of functionality while also having control over LED backlighting. Macro keyboards are incredibly useful, especially with their ability to easily change function with control over the software that runs on them. The key to most builds is the 32U4 chip found in some Atmel microcontrollers which allows it to easily pass keyboard (and mouse) functionality to any computer its plugged in to.

A metal spaceship throttle replica with a spherical knob

Razor Crest Control Lever For The Grogu In Your Life

If you’re looking to add a little more sci-fi authenticity to your gaming setup, you could do much worse than this functional control lever replica that [ZapWizard] has entered into the Hackaday.io Sci-Fi Contest.

Taking inspiration from Disney’s The Mandalorian, this functional prop is almost identical to the throttle seen on the bridge of the Razor Crest gunship, piloted by the television show’s eponymous bounty hunter. The electronic heart of this build is relatively straightforward – a Trinket M0 measures the resistance of an ultra-thin potentiometer, and masquerades as a typical one-axis USB throttle.

The mechanical components and aesthetically pleasing housing is where this project really shines. Helical 3D printed gears smooth out the movement of the solid aluminum throttle shaft, and a simple detent mechanism ‘catches’ the throttle at the middle point. The ballast and baseplate are cut from stainless steel, giving the throttle considerable heft, aiding in its stability on a tabletop (it’s also possible to secure it down using screws or powerful magnets). The throttle case is 3D printed and covered in aluminum foil tape, which is then chemically blackened and aged for that well-loved appearance.

Of course, the most iconic part of this build is the spherical knob, which screws onto the aluminum shaft for Grogu’s convenience. [ZapWizard] put in an order for one over at Custom 3D Stuff, and it absolutely ties the entire build together.

Interested in prop builds from the world of science-fiction, functional or otherwise? Then take a look through the entries in our Sci-Fi Contest. Or better yet, start building your own entry — there’s still about a month to go before the deadline.

Continue reading Razor Crest Control Lever For The Grogu In Your Life”

Building A DIY Flight Yoke For Flight Simulator

Flight yokes are key to getting an authentic experience when playing a flight simulator, but [Michel Rechtin] didn’t want to pay big money for a commercially-available solution. He ended up building a design using a lot of parts he had laying around, which saved money and worked out great.

The build is based around an Arduino Micro, which reads a series of potentiometers from the yoke and pedals to control pitch, roll, and yaw, A series of buttons are then added to control ancillary functions for the plane and simulator software.

Much of the build uses old 3D printer components, including linear bearings and rods for the pitch axis for smooth operation. There’s even a throttle setup and some more buttons and switches for a more complete flying experience.

Files are available on Thingiverse from anyone looking to replicate [Michael]’s build. We love to see a yoke built from scratch, though we’ve also seen creative builds repurpose PlayStation controllers for the same purpose. Video after the break.

Continue reading “Building A DIY Flight Yoke For Flight Simulator”

Absolem Is A Rabbit Hole Keyboard Build

This is usually how it happens — [mrzealot] had been using some awful chiclet-style keyboard without much of a care, and topping out at 50-60 WPM using an enhanced hunt-and-peck method. But he really wanted back-lighting, and so got his first taste of the mech life with a Master Keys Pro S. Hooked, [mrzealot] started researching and building his endgame keyboard, as you do once bitten. It looked as though his type would have as few keys as possible, and thumb keys laid out in arcs.

And so the cardboard prototyping began, with real switches and keycaps and a split design. After getting tired of adjusting the halves’ position on the desk, [mrzealot] threw that plan out the window and started scheming to build a monoblock split. He had a steel switch plate cut for this prototype, and used cardboard for the bottom layer, complete with a little hatch to access the Pro Micro’s reset button.

Now satisfied with the 36-key layout, it was time to go wireless with a Feather nRF52 Bluefruit LE. This is where things get serious and final, with a laser-cut layered oak case and thick, blank, PBT keycaps.

Under all that plastic lies a range of actuation force levels on the key caps that (in our opinion) range from heavy to really heavy — 62 gram switches on the pinkies and ring fingers, 65 g on the middle, 67 g on the index fingers, and a whopping 78 g for the thumb clusters.

We just love the way this ended up looking, and are pretty jealous of that neoprene layer on the bottom. Beauty aside, there is some real utility here to be shared. In designing the layout, [mrzealot] created a keyboard generator called ergogen that will get you closer to your endgame without the need for CAD skills, just YAML.

Those of you who read Hackaday closely may recognize the term ‘ergogen’ from [Matthew Carlson]’s coverage of [Ben Vallack]’s guide to creating a low-profile keyboard. This is something else in the same vein.

Thanks for the tip, [HBBisenieks].

World’s Worst I/O Dock Doesn’t Deserve Elegant Fix

Even spendy commercial products can end up being lemons. This is something [Mike Buss] is familiar with, as he had the misfortune of being stuck using what he declares is the world’s worst USB hub, and it’s not even a mystery discount device from overseas: it’s an HP Thunderbolt Dock G2. It is a sort of combination I/O dock and USB hub, and it caused him no end of frustration until he “fixed” it with a crude workaround.

The problems with [Mike]’s dock come down to two major issues. The first is that the USB-C connection will, if moved even the slightest amount, instantly trigger a disconnect from the host computer. Frankly, that sounds like a defect, but that’s not all. The other issue is that the whole top of the device is actually a giant, hyper-sensitive button. Even a stern gaze seems to be enough to cause it to activate. What does the button do? It puts the host computer to sleep; something that we all agree should suffer from as few false activations as possible.

We’ll spoil the surprise by revealing that the “fix” was nothing more than putting a 3D printed enclosure around the troublesome device, as shown in the image above. Keeping the dock covered and perfectly still at least prevents the two aforementioned issues, and that’s good enough for [Mike].

The curious part of all this is just how badly the device’s design affected normal use. We’d suspect a defect or malfunction, but a cursory search of reviews online suggests [Mike]’s experience isn’t unique. It’s certainly not the first poorly-designed product we’ve seen fixed by a new enclosure, but some problems just aren’t worth the effort of a more elegant solution.

Morse Keyboard Communicates With The Blink Of An Eye

Most of us use our hands to interface with computers, but the human body is capable of many types of input other than that of fingers and feet. But what about people who can’t use their extremities and don’t have a voice? For their sake, it’s time to get creative.

[Michael Paul Coder] has made a way to type simply by blinking in Morse code. Those of you with long memories may recall Lucid Scribe, where he was attempting to document lucid dreaming experiments by detecting rapid eye movements with an accelerometer and triggering his computer to play music. This would in turn notify [Michael] that he was in fact dreaming and was safe to tie a cape around his neck and take a flying leap from a tall building.

Whereas [Michael]’s creation needed a commercial EEG device before, he’s now made it work with just an old webcam thanks to the new trans-consciousness messaging protocol, which operates by using facial detection and then interpreting the amount of changed pixels between video frames. Be sure to check it out in action after the break.

You know how much we love assistive technology around here — just two years ago, the Byte took top honors in The Hackaday Prize.

Continue reading “Morse Keyboard Communicates With The Blink Of An Eye”

An input device combining a joystick with several knnobs and buttons

Modular Multi-Input Macro Keypad Integrates Mouse And Joystick

While most computer users make do with just a keyboard and mouse, power users often have multiple additional input devices. Gamers use joysticks or dedicated mice, CAD engineers have specialized gadgets for manipulating 3D objects, while graphic designers might want programmable macro buttons to automate various tasks. [Sascha Nitsch] didn’t fancy cluttering his desk with a whole bunch of input devices and therefore decided to combine as many functions as possible into the CIMDIT: a Completely Insane Multi Device Input Thingy.

The main components making up the CIMDIT are a 3-axis joystick module, which can double as a 3D CAD mouse, and a set of buttons, knobs and sliders to enable various functions. One rotary encoder is used to choose an operating mode, while four others can be used as programmable inputs. A small OLED display shows which mode is currently selected, but can also be used to display notifications from various programs.

An Arduino Pro Micro provides a USB interface to a PC and reads out the various input units. The entire design is modular, so it can be customized to any desired combination of analog and digital inputs. [Sascha] made a neat 3D printed enclosure to hold the 3-axis module along with 26 buttons, five rotary encoders and one analog slider. KiCAD files for the PCBs and the FreeCAD source for the enclosure are available under an open-source license on [Sascha]’s Git repo.

The same thing applies to the software driving the CIMDIT, though adding functionality to it might turn out to be tricky: [Sascha] had to perform some serious code optimization to fit everything into the Arduino’s 32 kB of program flash. The Git repo also includes a convenient tool to create key mappings to be programmed into the controller, saving you from having to compose a binary file by hand.

Love macro keypads? Check out these cool examples with gesture detection, an e-ink display or simply beautiful wooden keys.