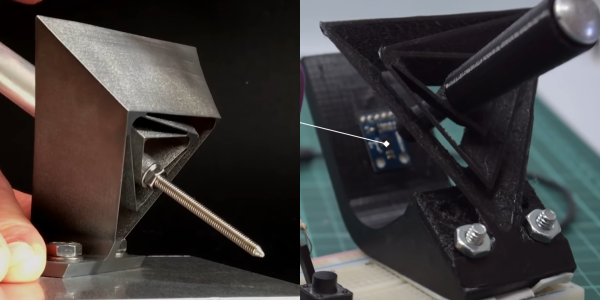
The Macro Keyboard Is On Deck

The idea of a reconfigurable macro keyboard is a concept that has been iterated on by many all the way from custom DIY keypads to the polarizing TouchBar on MacBooks. The continual rise of cheap powerful microcontrollers with Wi-Fi and 3D printers makes rolling your own macro keyboard easier every year. [Dustin Watts] has joined the proverbial club and built a beautiful macro pad called FreeTouchDeck.

We’ve seen macro keyboards that use rotary encoders to cycle through different mappings for the keys. FreeTouchDeck has taken the display approach and incorporates a touch screen to offer different buttons. [Dustin] was inspired by a similar project called FreeDeck, which offers six buttons each with a small screen. FreeTouchDeck is powered by an ESP32 and drives an ILI9488 touch screen with an XPT2046 touch controller. This means that FreeTouchDeck can offer six buttons with submenus and all sorts of bells and whistles. A connection to the computer is done by emulating a Bluetooth keyboard. By adding a configuration mode that starts a web server, FreeTouchDeck allows easy customization on the fly.

[Dustin] whipped up a quick PCB that makes it easy to solder the ESP32 and the TFT together, but a breadboard works just fine. Gerbers for that are available on GitHub. To wrap it all up, a nice 3D printed shell encloses the whole system in a clean, tidy way. The code, documentation, and case designs are all on his GitHub.

Continue reading “The Macro Keyboard Is On Deck”

Speaker Snitch Tattles On Privacy Leaks

A wise senator once noted that democracy dies with thunderous applause. Similarly, it’s also how privacy dies, as we invite more and more smart devices willingly into our homes that are built by companies that don’t tend to have our best interests in mind. If you’re not willing to toss all of these admittedly useful devices out of the house but still want to keep an eye on what they’re doing, though, [Nick Bild] has a handy project that lets you keep an eye on them when they try to access the network.

The device is built on a Raspberry Pi that acts as a middle man for these devices on his home network. Any traffic they attempt to send gets sent through the Pi which sniffs the traffic via a Python script and is able to detect when they are accessing their cloud services. From there, the Pi sends an alert to an IoT Arduino connected to an LED which illuminates during the time in which the smart devices are active.

The build is an interesting one because many smart devices are known to listen in to day-to-day conversation even without speaking the code phrase (i.e. “Hey Google” etc.) and this is a great way to have some peace-of-mind that a device is inactive at any particular moment. However, it’s not a foolproof way of guaranteeing privacy, as plenty of devices might be accessing other services, and still other devices haveĀ  even been known to ship with hidden hardware.

Continue reading “Speaker Snitch Tattles On Privacy Leaks”

A Portable Serial Terminal That Should Be From The 1970s

The humble standalone serial terminal might be long gone from the collective computing experience, but in the ghostly form of a software virtual terminal and a serial converter it remains the most basic fall-back and essential tool of the computer hardware hacker. [Mitsuru Yamada] has created the product that should have been made in the serial terminal’s heyday, a standalone handheld terminal using a 6809 microprocessor and vintage HP dot matrix LEDs. In a die-cast box with full push-button keyboard it’s entirely ready to roll up to a DB-25 wall socket and log into the PDP/11 in the basement.

Using today’s parts we might achieve the same feat with a single-chip microcontroller and a small LCD or OLED panel, but with an older microcomputer there is more system-building required. The 6809 is a wise choice from the 1970s arsenal because it has some on-board RAM, thus there’s no need for a RAM chip. Thus the whole thing is achieved with only a 2716 EPROM for the software, a 6850 UART with MAX232 driverĀ  for the serial port, and a few 74 chips for glue logic, chip selects, and I/O ports to handle keyboard and display. There’s no battery in the case, but no doubt that could be easily accommodated. Also there’s not much information on the keyboard itself, but in the video below we catch a glimpse of its wiring as the box is opened.

The value in a terminal using vintage parts lies not only in because you can, but also in something that can’t easily be had with a modern microcontroller. These parts come from a time when a computer system had to be assembled as a series of peripherals round the microprocessor because it had few onboard, leading to a far more in-depth understanding of a computer system. It’s not that a 6809 is a sensible choice in 2020, more that it’s an interesting one.

By comparison, here’s a terminal using technology from today.

Continue reading “A Portable Serial Terminal That Should Be From The 1970s”

PinePhone Gets 3D Printed Mechanical Keyboard

Do you remember when smartphones had real physical keyboards? Working the command line on some remote machine over SSH was a breeze, and you could even knock out a few lines of code if you were so inclined. But these days you’ve either got to lug around an external keyboard, or suffer through pecking out a few words per minute on a piece of glass. Doesn’t sound much like progress to us.

By the looks of it, [James Williams] doesn’t think so either. He’s designed a physical keyboard add-on that snaps onto the back of the PinePhone to deliver a proper, albeit condensed, typing experience. This is no repurposed BlackBerry board either; he’s created a custom mechanical keyboard that manages to fold into an incredibly small size thanks to resin printed keycaps and Kailh low profile switches. Other than the hand-drawn legends, it’s probably not a stretch to say this is a better keyboard than what many people have on their actual computers.

In addition to the 3D printed frame and Kailh switches, there’s also an Arduino Pro Micro onboard to communicate with the phone. Rather than use USB, the keyboard is wired to the I2C accessory port on the rear of the PinePhone. It sounds like [James] needs a little more time to polish his QMK build before its ready to release, so you might want to wait a bit before you start printing off your own copy of the parts.

Those following along with the development of the PinePhone know there’s supposedly an official keyboard accessory in the works, but who wants to wait when we’re so close to mobile Linux nirvana? Besides, we doubt it will be nearly as pleasant to type on as the board [James] has put together.

Mouse-Controlled Mouse Controller Is Silly, But Could Be Useful

Useless machines are generally built as a fun pastime, as they do nothing of value by their very definition. The most popular type generally involves a self-cancelling switch. However, there’s plenty of other useless machines to build, and we think [Jeffery’s] build is particularly creative.

The build consists of an XY gantry that moves a standard computer mouse. To control the gantry, a Raspberry Pi feeds the system G-Code relative to the motion of a second mouse plugged into the single-board computer. It’s pretty standard fare overall, with the Pi sending commands to an Arduino that runs the various stepper motors via a CNC controller shield.

Yes, it’s a mouse that moves a mouse – and on the surface, this appears to be a very useless machine. However, we could imagine it being useful for remote control of a very old system that uses a non-standard mouse that is otherwise difficult to emulate. Additionally, it wouldn’t take much extra work to turn the XY gantry into a competent pen-plotter – of which we’ve seen many. Video after the break.

Continue reading “Mouse-Controlled Mouse Controller Is Silly, But Could Be Useful”

Taking Over The Amazing Control Panel Of A Vintage Video Switcher

Where does he get such wonderful toys? [Glenn] snagged parts of a Grass Valley Kalypso 4-M/E video mixer switcher control surface from eBay and since been reverse engineering the button and display modules to bend them to his will. The hardware dates back to the turn of the century and the two modules would have been laid out with up to a few dozen others to complete a video mixing switcher console.

[Glenn’s] previous adventures delved into a strip of ten backlit buttons and gives us a close look at each of the keyswitches and the technique he used to pull together his own pinout and schematic of that strip. But things get a lot hairier this time around. The long strip seen above is a “machine control plane” module and includes a dozen addressible character displays, driven by a combination of microcontrollers and FPGAs. The square panel is a “Crosspoint Switch Matrix” module include eight individual 32 x 32 LCDs drive by three dedicated ICs that can display in red, green, or amber.

[Glen] used an STM8 Nucleo 64 to interface with the panels and wrote a bit of code to help map out what each pin on each machine control plane connector might do. He was able to stream out some packets from the plane that changed as he pressed buttons, and ended up feeding back a brute-force of that packet format to figure out the LED display protocols.

But the LCDs on the crosspoint switch were a more difficult nut to crack. He ended up going back to the original source of the equipment (eBay) to get a working control unit that he could sniff. He laid out a man-in-the-middle board that has a connector on either side with a pin header in the middle for his logic analyzer. As with most LCDs, the secret sauce was the initialization sequence — an almost impossible thing to brute force, yet exceedingly simple to sniff when you have a working system. So far he has them running under USB control, and if you are lucky enough to have some of this gear in your parts box, [Glen] has painstakingly recorded all of the details you need to get them up and running.

Atreus Gets A TrackPoint And Layer LEDs

Fancy, split keyboards are cool and all, and they can really help with repetitive strain injury issues depending on a lot of different factors. But the big, glaring problem is that they often lack nice features that regular keyboards have — things like a number pad, media buttons, or in [discordia]’s case, a ThinkPad-style pointing stick. Fortunately, there’s a perfect spot for one between the two halves of the Keyboardio Atreus.

[discordia] is happy with the Atreus, but the whole layers thing can take some getting used to. Since Atreus only has 44 keys, it utilizes a layering system to change their function to cover all the keys you’d find on a full keyboard. After getting stuck in one rarely-used layer for a while, they decided to remedy the situation with some RGB LEDs to indicate the active layer. If you’ve got an Atreus that could use a few upgrades, check out [discordia]’s step-by-step instructions for adding a trackpoint and one-wire RGB LEDs.

If you have an old enough ThinkPad on your hands, then you may want to liberate the clicky keyboard, too.