Get Organized With This Raspberry Pi E-Ink Calendar

Like many hackers, we love e-ink. There’s something mesmerizing and decidedly futuristic about the way the images shift around and reconstitute themselves. Like something from Harry Potter, but that you can buy on Alibaba instead of from a shop in Diagon Alley. But as anyone who’s used the technology can tell you, the low refresh rate of an e-ink screen limits its potential applications. It works great for reading books, but beyond that its struggled to find its niche in a world of cheap LCDs.

But [Zonglin Li] has recently wrapped up a project which shows that e-ink has at least one more use case: personal calendars. You can get way with only updating the screen once a day so the refresh rate won’t matter, and the rest of the time it’s going to be static anyway so you might as well enjoy the energy savings of leaving the screen off. With a Raspberry Pi behind the scenes pulling data from the Internet, it can populate the calendar with everything from your personal schedule to when your favorite podcast drops.

In practice, [Zonglin] is actually updating the display every hour as he’s included the current weather conditions on the top left of the screen, but even still, this is a perfect application for the very unique properties of e-ink displays. The display is a 7.5 inch 640×384 model from Waveshare that retails for about $50 USD, so between the display, the Raspberry Pi, and something to put it all in (here, a picture frame) this is a pretty cheap build compared to some of the large format e-ink displays out there.

The software side is written in Python 3, and [Zonglin] has documented how others can easily plug in their own information so it can pull schedule data from Google Calendar and local conditions from Open Weather Map. The MIT licensed source code is also very well organized and commented, so this could serve as an excellent base if you’re looking to create a more comprehensive e-ink home information display.

If this seems a little too pedestrian for your tastes, you could always put together an e-ink movie player, a surprisingly functional Linux terminal, or a very slick ESP8266-based name tag. If you’ve got the better part of $1K USD and don’t know what to do with it, you could even get an e-ink license plate.

Play Chess Like Harry Potter

If you are a Harry Potter fan, you might remember that one of the movies showed an Isle of Lewis chess set whose pieces moved in response to a player’s voice commands. This feat has been oft replicated by hackers and [amoyag00] has a version that brings together a Raspberry Pi, Arduino, Android, and the Stockfish chess engine in case you want to play by yourself. You can see a video of the game, below.

Interestingly, the system uses Marlin — the 3D printing software — to handle motion using the Arduino. We suppose moving chess pieces over a path isn’t much different than moving a print head. It is certainly a novel use of GCode.

Continue reading “Play Chess Like Harry Potter”

Cheap Power Over Ethernet For The ESP32

While most projects we see with the ESP32 make use of its considerable wireless capabilities, the chip can be connected to the wired network easily enough should you have the desire to do so. [Steve] liked the idea of putting his ESP32s on the wired network, but found the need for a secondary power connection burdensome. So he took it upon himself to modify some cheap Power Over Ethernet (PoE) hardware and create a single-cable solution (Google Translate).

[Steve] bought a PoE module intended for security cameras and ran a close eye over the board to figure out what kind of hardware it was using to generate the nominal 12 V output. He identified an MP2494 step-down converter, and with the datasheet in hand found how the output voltage is configured by changing the values of resistors in the circuit. Swapping out the stock 21.5 kΩ resistor for a 57.1 kΩ one changed the output of the converter to the 5 V necessary for his electronics.

But of course that was only half of the problem solved; he still had to connect the Ethernet side of the PoE device to the Waveshare LAN8720 board that’s providing Ethernet for the ESP32. So he removed the RJ45 jack from the LAN8720 completely, and wired that directly to the connector on the PoE board. Helpfully, the PoE board had all the pins labeled on the bottom side so this wasn’t nearly as tricky to figure out as you might expect (if only it was always that easy).

We’ve previously covered the Waveshare LAN8720 board for anyone who’s interested in the ins and outs of getting their ESP32 talking Ethernet. If you’re wondering how you can put PoE to work for you, our very own [Jonathan Bennett] has been showing off his home Raspberry Pi infrastructure which makes extensive use of the new PoE hat.

Open Source Biological Gear For The Masses

At the risk of putting too fine a point on it, Hackaday exists because people are out there building and documenting open source gadgets. If the person who built a particular gizmo is willing to show the world how they did it, consider us interested. Since you’re reading this, we’ll assume you are as well. Over the years, this mentality has been spreading out from the relatively niche hacker community into the greater engineering world, and we couldn’t be happier.

Case in point, the Poseidon project created at the California Institute of Technology. Developed by students [Sina Booeshaghi], [Eduardo Beltrame], and [Dylan Bannon], along with researcher [Jase Gehring] and professor [Lior Pachter], Poseidon consists of an open source digital microscope and syringe pump which can be used for microfluidics experiments. The system is not only much cheaper than commercial offerings, but is free from the draconian modification and usage restrictions that such hardware often comes with.

Of course, one could argue that major labs have sufficient funding to purchase this kind of gear without having to take the DIY route. That’s true enough, but what benefit is there to limiting such equipment to only the established institutions? As in any other field, making the tools available to a wider array of individuals (from professionals to hobbyists alike) can only serve to accelerate progress and move the state of the art forward.

The Poseidon microscope consists of a Raspberry Pi, touch screen module, and commercially available digital microscope housed in a 3D printed stage. This device offers a large and clear view of the object under the microscope, and by itself makes an excellent educational tool. But when running the provided Python software, it doubles as a controller for the syringe pumps which make up the other half of the Poseidon system.

Almost entirely 3D printed, the pumps use commonly available components such as NEMA 17 stepper motors, linear bearings, and threaded rods to move the plunger on a syringe held in the integrated clamp. Controlled by an Arduino and CNC shield, these pumps are able to deliver extremely precise amounts of liquid which is critical for operations such as Single-cell RNA sequencing. All told a three pump system can be built for less than $400 USD, compared to the tens of thousands one might pay for commercially available alternatives.

The Poseidon project joins a relatively small, but very exciting, list of DIY biology projects that we’ve seen over the years. From the impressive open source CO2 incubator we saw a few years ago to the quick and dirty device for performing polymerase chain reaction experiments, there’s little doubt about it: biohacking is slowly becoming a reality.

Continue reading “Open Source Biological Gear For The Masses”

So You Bought A Raspberry Pi Compute Module. What Now?

The Raspberry Pi Compute Module hasn’t seen as much attention as it should have in our community, probably because the equivalents from the familiar consumer range can be so much cheaper. When a Raspberry Pi Zero is a similar size to a Compute Module and costs so much less, we can’t blame you for asking what would be the point of using the industrial version.

It’s interesting then to see an Instructables piece from [Manolis Agkopian] in which he takes the reader through the process of creating their own Compute Module project. Following hot on the heels of the recent launch of the latest in the range it’s come to us at an appropriate moment to take a fresh look at the fruity computer’s more obscure incarnation. He starts with a description of the Compute Module and its official development board, before taking us through setting up a module and putting an OS on it. Finally he shows us his board design, which he offers us as a jumping-off point for our own projects.

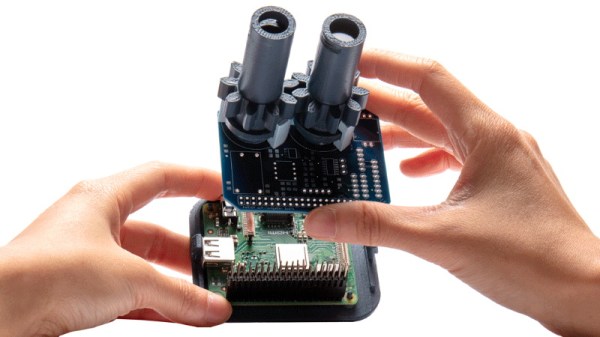
So given that it’s piqued your interest, why might you want to design a Compute Module project? The answer’s simple enough: the consumer boards only provide the subset of features the Pi foundation people deemed appropriate for their mission. A Compute Module project is the equivalent of designing a Raspberry Pi that does it your way, tailored exactly for your needs. If you want an example, look no further than this stereoscopic camera.

Via Hacker News.

AI On Raspberry Pi With The Intel Neural Compute Stick

I’ve always been fascinated by AI and machine learning. Google TensorFlow offers tutorials and has been on my ‘to-learn’ list since it was first released, although I always seem to neglect it in favor of the shiniest new embedded platform.

Last July, I took note when Intel released the Neural Compute Stick. It looked like an oversized USB stick, and acted as an accelerator for local AI applications, especially machine vision. I thought it was a pretty neat idea: it allowed me to test out AI applications on embedded systems at a power cost of about 1W. It requires pre-trained models, but there are enough of them available now to do some interesting things.

You can add a few of them in a hub for parallel tasks. Image credit Intel Corporation.

I wasn’t convinced I would get great performance out of it, and forgot about it until last November when they released an improved version. Unambiguously named the ‘Neural Compute Stick 2’ (NCS2), it was reasonably priced and promised a 6-8x performance increase over the last model, so I decided to give it a try to see how well it worked.


I took a few days off work around Christmas to set up Intel’s OpenVino Toolkit on my laptop. The installation script provided by Intel wasn’t particularly user-friendly, but it worked well enough and included several example applications I could use to test performance. I found that face detection was possible with my webcam in near real-time (something like 19 FPS), and pose detection at about 3 FPS. So in accordance with the holiday spirit, it knows when I am sleeping, and knows when I’m awake.

That was promising, but the NCS2 was marketed as allowing AI processing on edge computing devices. I set about installing it on the Raspberry Pi 3 Model B+ and compiling the application samples to see if it worked better than previous methods. This turned out to be more difficult than I expected, and the main goal of this article is to share the process I followed and save some of you a little frustration.

Continue reading “AI On Raspberry Pi With The Intel Neural Compute Stick”

Raspberry Pi Counts Down To The Last Bitcoin

Even though it might appear to be pretend Internet money, by design, there are a finite number of Bitcoins available. In the same way that the limited amount of gold on the planet and the effort required to extract it from the ground keeps prices high, the scarcity of Bitcoin is intended to make sure it remains valuable. As of right now, over 80% of all the Bitcoins that will ever exist have already been put into circulation. That sounds like a lot, but it’s expected to take another 100+ years to free up the remaining ones, so we’ve still got a way to go.

Even though his device will probably no longer exist when the final Bitcoin hits the pool, [Jonty] has built a ticker that will count down as the final coins get mined from the digital ground. The countdown function is of course a bit tongue-in-cheek, but the gadget also shows slightly more pertinent information such as the current Bitcoin value, so you can always remember what a huge mistake it was not to invest while they were still worth pennies.

On the hardware side, this is a pretty simple project. The enclosure is laser cut 5 mm MDF, and it holds a Raspberry Pi 3, a MAX7219 32×8 LED dot matrix display, and a 10 mm white LED with accompanying resistor. The white LED is placed behind an acrylic diffuser to give the Bitcoin logo on the side of the display a soft pleasing glow when the device is powered up. There are no buttons or other controls on the ticker, once the software has been configured it just gets plugged in and away it goes.

As for the software, it takes the form of a Python script [Jonty] has created which uses Requests and Beautiful Soup to scrape the relevant data from bitcoinblockhalf.com. The script supports pulling any of the 19 variables listed on the site and displaying it on the LED matrix, which range from the truly nerdy stats like daily block generation to legitimately useful data points that anyone with some Bitcoin in their digital wallets might like to have ticking away on their desks.

The first decade of Bitcoin has been a pretty wild ride, not only monetarily, but in the wide array of hardware now involved in cryptocurrency mining and trading. From Bitcoin traffic lights to custom-made mining rigs that are today more useful as space heaters, it takes a lot of hardware to support these virtual coins.

Continue reading “Raspberry Pi Counts Down To The Last Bitcoin”