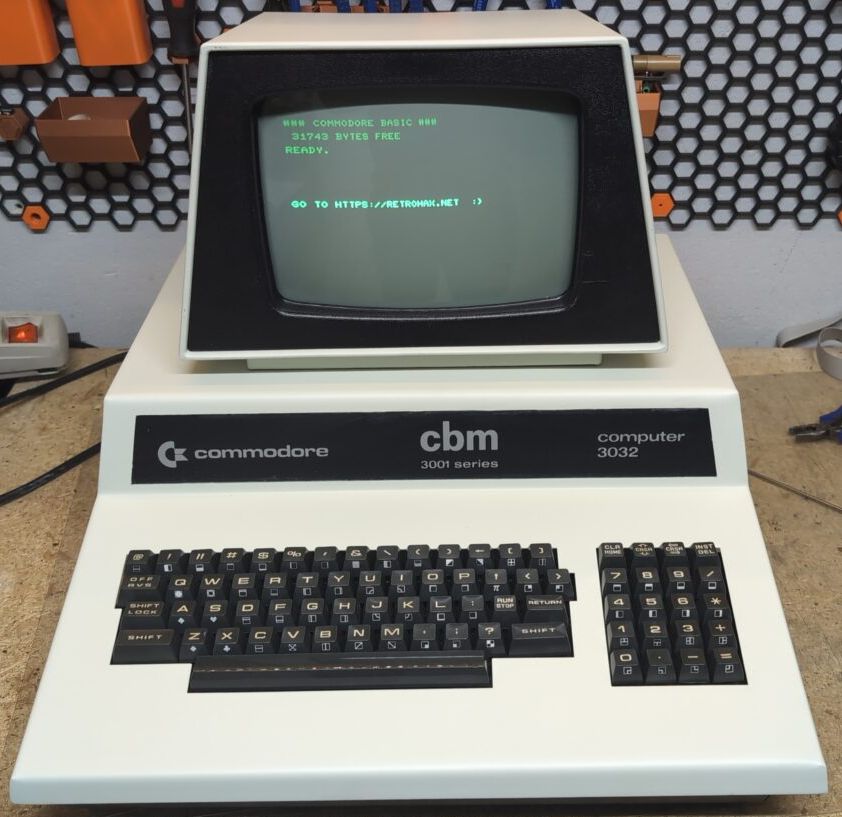
Resurrecting A Bricked Wii U With A Raspberry Pi Pico

There are reports that some Nintendo Wii U systems out in the wild are falling victim to mysterious failures. As is so often the case, certain error codes have been found in common across failed units out in the community, and [Voultar] decided to investigate to see if he could fix this problem with a little hacking.

[Voultar] wasn’t able to source a Wii U with the much-discussed NAND failure mode, but he was able to source a number of supposedly bricked Wii U systems displaying the error codes 160-0101 and 160-0103. The hack is achieved with an exploit in the Wii U’s USB Host Stack descriptor parsing module, developed by [GaryOderNichts]. It allows the injection of a payload that lets one run unsigned code on the Wii U, achieved via a Raspberry Pi Pico. The Pico is ultimately used to boot off an SD card running a recovery program for the Wii U. By resetting the Wii U’s “coldboot title ID”, it solves the error and gets the console booting properly, as per normal.

[Voultar] was able to fix five consoles displaying the common error messages, which we’d call a win. It’s not going to be a fix for every failed Wii U out there, but if you’ve got the dreaded 160-0101 or -0103 errors, it might be worth a shot.

Continue reading “Resurrecting A Bricked Wii U With A Raspberry Pi Pico”

LiPo Replacement Keeps Portable Scanner In The Action

If there’s anything people hate more than being locked into a printer manufacturer’s replacement cartridges, it’s proprietary batteries. Cordless power tools are the obvious example in this space, but there are other devices that insist on crappy battery packs that are expensive to replace when they eventually die.

One such device is the Uniden Bearcat BC296D portable scanner that [Robert Guildig] found for a song at a thrift store, which he recently gave a custom LiPo battery upgrade. It came equipped with a nickel-cadmium battery pack, which even under the best of circumstances has a very limited battery life. Using regular AA batteries wasn’t an option, but luckily the space vacated by the OEM battery pack left a lot of room for mods. Those include a small module with BMS functions and a DC-DC converter, a 2,400 mAh 4.2 V LiPo pillow pack, and a new barrel connector for charging. With the BMS set for six volts and connected right to the old battery pack socket, the scanner can now run for seven hours on a one-hour charge. As a bonus, the LiPo pack should last a few times longer than the NiCd packs, and be pretty cheap to replace when it finally goes too. There’s a video after the hop with all the details.

If you’re looking at a similar battery replacement project, you might want to check out [Arya]’s guide to everything you need to know about lithium-ion circuitry.

Continue reading “LiPo Replacement Keeps Portable Scanner In The Action”

A Classic Shortwave Radio Restored

Before the Internet, if you wanted to hear news from around the world, you probably bought a shortwave receiver. In the golden age of world band radio, there was a great deal of high-quality programming on the shortwave bands and a large variety of consumer radios with shortwave bands. For example, the Sony CRF-160 that [M Caldeira] is restoring dates from the late 1960s or early 1970s and would have been a cool radio in its day. It retailed for about $250 in 1972, which sounds reasonable, but — don’t forget — in 1972 that would have been a 10% downpayment on a new car or enough to buy a Big Mac every day for a year with change left over.

As you can see in the video below, the radio seemed to work well right out of the gate, but the radio needed some rust removal and other sprucing up. However, it is an excellent teardown, with some tips about general restoration.

Continue reading “A Classic Shortwave Radio Restored”

Leaky SMD Electrolytics? Try These Brute Force Removal Methods

When you say “recapping” it conjures up an image of a dusty old chassis with point-to-point wiring with a bunch of dried-out old capacitors or dodgy-looking electrolytics that need replacement. But time marches on, and we’re now at the point where recapping just might mean removing SMD electrolytics from a densely packed PCB. What do you do then?

[This Does Not Compute]’s answer to that question is to try a bunch of different techniques and see what works best, and the results may surprise you. Removal of SMD electrolytic caps can be challenging; the big aluminum can sucks a lot of heat away, the leads are usually pretty far apart and partially obscured by the plastic base, and they’re usually stuffed in with a lot of other components, most of which you don’t want to bother. [TDNC] previously used a hot-air rework station and liberally applied Kapton tape and aluminum foil to direct the heat, but that’s tedious and time-consuming. Plus, electrolytics sometimes swell up when heated, expelling their corrosive contents on the PCB in the process.

As brutish as it sounds, the solution might just be as simple as ripping caps off with pliers. This seems extreme, and with agree that the risk of tearing off the pads is pretty high. But then again, both methods seemed to work pretty well, and on multiple boards too. There’s a catch, though — the pliers method works best on caps that have already leaked enough of their electrolyte to weaken the solder joints. Twisting healthier caps off a PCB is likely to end in misery. That’s where brutal method number two comes in: hacking the can off the base with a pair of flush cutters. Once the bulk of the cap is gone, getting the leads off the pad is a simple desoldering job; just don’t forget to clean any released schmoo off the board — and your cutters!

To be fair, [This Does Not Compute] never seems to have really warmed up to destructive removal, so he invested in a pair of hot tweezers for the job, which works really well. But perhaps you’re not sure that you should just reflexively replace old electrolytics on sight. If so, you’re in pretty good company.

Continue reading “Leaky SMD Electrolytics? Try These Brute Force Removal Methods”

Creating A New Metal Rohde & Schwarz EB200 Miniport Receiver Dial Knob

Recently [Roberto Barrios] got his hands on a Rohde & Schwarz EB200 monitoring and surveillance receiver that, despite its late 90s vintage, was in mint condition. Aside from damage to the main dial, that is, which was very much broken. With no off-the-shelf replacement available in 2023, the obvious answer was to get a close-enough dial knob with the rough proportions and use a lathe to machine it into shape. Initially, [Roberto] had used some filler material to replace the front of the original knob that was missing, but this was a decidedly inferior tactile experience with questionable long-term reliability.

Dimensions of the Rhode & Schwarz EB200 dial knob. (Credit: Roberto Barrios)

The challenge in replacing the original knob with a proper replacement was in how the dial knob is mounted on the receiver, as an internally threaded shell that goes on the internal dial encoder assembly. With a lathe at his behest, taking an off-the-shelf dial knob that accepts a 6 mm shaft and turning it into a compatible knob was a straightforward affair. Removing the excess material and creating the internal 1 mm pitch thread allowed the newly made knob to fit on the receiver like an OEM part. The only niggle was having to remove 1.8 mm off the face of the brass body to get the knob to sit close to the front panel.

Unlike the old patched-up knob, this new one is fully out of metal and has the absolutely essential feature of the recessed area for easy fine-tuning. Although perhaps not the most exciting fix for old gear, it’s decidedly essential to keep it functional.

Burnt Resistor Sleuthing

You smell smoke and the piece of gear you are working on stops working, probably at an inopportune time. You open it up and immediately see the burned remains of a resistor. You don’t have the schematic, the Internet has nothing to say, and the markings on the resistor are burned away. What do you do? [Learn Electronics Repair] has some advice.

The resistor is probably open, but even if it isn’t, you can’t count on any measurement you make. The burning could easily change the value. The technique comes from comments on one of his earlier videos where he had such a burned resistor but was able to find the correct value. He decided to test the suggestion: cut away the burned resistor and measure the pieces that are left. It probably won’t give you the exact value, but it will get you in the ballpark.

So a rotary tool did the surgery, and you can see it all in the video below. We aren’t sure this method would work on every type of resistor you might encounter, and surface mount will also present special problems. However, if you are stabbing in the dark anyway, it won’t hurt to try.

Everyone knows the smoke that comes out is magic. Sometimes, you cut into components by necessity. Other times, it is for art’s sake.

Continue reading “Burnt Resistor Sleuthing”

PCB Repair Is A Sticky Proposition

What do you do when a PCB is cracked or even broken in two? [MH987] has a plan: superglue the board back and then bridge the traces with solder, solder paste, or wire. The exact method, of course, depends on the extent of the damage.

We’ve had some success with similar techniques, and, honestly, for single-sided boards, we would be tempted to add a thin backer behind the crack. We’ve also used conductive paint to repair traces, but it’s good to have having as many tricks as possible because you never know what will work best for a particular repair. The post mentions that this is easier to do on a single-sided board, but it is certainly possible to do on a two-layer board.

The example repair is a Walkman which — if you are a youngster — was a portable music player that takes cassette tapes. These haven’t been made since 2010, so it is important to repair what you have.

If you can’t repair your Walkman, you could build an updated version. If your board is seriously damaged, you might get hope from this more extreme repair.