I recently had the opportunity to attend a lecture by Harvard Professor Paul Horowitz. It’s a name you likely recognize. He is best known for his iconic book the Art of Electronics which is often referred to not by its name but by the last names of the authors: “Horowitz and Hill”.
Beyond that, what do you know about Paul Horowitz? Paul is an electrical engineer and physicist and Paul has spent much of his storied career learning and practicing electronics for the purpose of finding intelligent extra terrestrial life.
We’d never seen an iconoscope before. And that’s reason enough to watch the quirky Japanese, first-person video of a retired broadcast engineer’s loving restoration. (Embedded below.)
Quick iconoscope primer. It was the first video camera tube, invented in the mid-20s, and used from the mid-30s to mid-40s. It worked by charging up a plate with an array of photo-sensitive capacitors, taking an exposure by allowing the capacitors to discharge according to the light hitting them, and then reading out the values with another electron scanning beam.
The video chronicles [Ozaki Yoshio]’s epic rebuild in what looks like the most amazingly well-equipped basement lab we’ve ever seen. As mentioned above, it’s quirky: the iconoscope tube itself is doing the narrating, and “my father” is [Ozaki-san], and “my brother” is another tube — that [Ozaki] found wrapped up in paper in a hibachi grill! But you don’t even have to speak Japanese to enjoy the frame build and calibration of what is probably the only working iconoscope camera in existence. You’re literally watching an old master at work, and it shows.
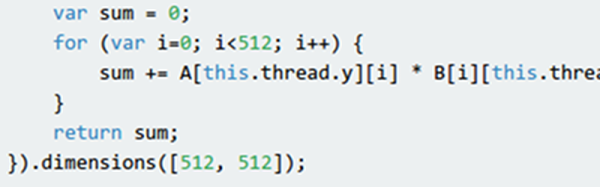
Everyone knows that writing programs that exploit the GPU (Graphics Processing Unit) in your computer’s video card requires special arcane tools, right? Well, thanks to [Matthew Saw], [Fazil Sapuan], and [Cheah Eugene], perhaps not. At a hackathon, they turned out a Javascript library that allows you to create “kernel” functions to execute on the GPU of the target system. There’s a demo available with a benchmark which on our machine sped up a 512×512 calculation by well over five times. You can download the library from the same page. There’s also a GitHub page.
The documentation is a bit sparse but readable. You simply define the function you want to execute and the dimensions of the problem. You can specify one, two, or three dimensions, as suits your problem space. When you execute the associated function it will try to run the kernels on your GPU in parallel. If it can’t, it will still get the right answer, just slowly.
While there are plenty of hackers that hack just for the love of it, it’s no secret that many of us are looking to hit it big someday. Tales of the businesses like HP and Apple that started in someone’s garage inevitably lead to musings like, “Hey, I’ve got a garage!” and grand plans to turn that special idea into the Next Big Thing™. Many will try, most will fail for one reason or another, but hope springs eternal, and each new widget seems to start the entrepreneurial cycle again.
But for as much pressure as we may feel to be the next Packard, Wozniak, or Musk, not everyone is cut out to be the boss. Some of us have no interest in or aptitude for business — we don’t want to hire or fire people, we don’t want to wheel and deal, and we certainly don’t want to worry about salesmanship. Some of us just want to abstract all that complexity away and just find a job, preferably one that leverages the things we love to do. Continue reading “Ask Hackaday: Selling Yourself As A Hacker”→
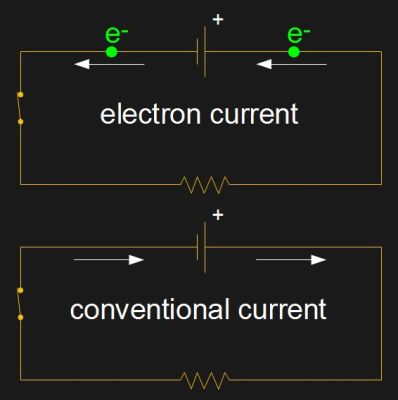
Electric current comes in many forms: current in a wire, flow of ions between the plates of a battery and between plates during electrolysis, as arcs, sparks, and so on. However, here on Hackaday we mostly deal with the current in a wire. But which way does that current flow in that wire? There are two possibilities depending on whether you’re thinking in terms of electron current or conventional current.
Electron current vs. conventional current
In a circuit connected to a battery, the electrons are the charge carrier and flow from the battery’s negative terminal, around the circuit and back to the positive terminal.
Conventional current takes just the opposite direction, from the positive terminal, around the circuit and back to the negative terminal. In that case there’s no charge carrier moving in that direction. Conventional current is a story we tell ourselves.
But since there is such a variety of forms that current comes in, the charge carrier sometimes does move from the positive to the negative, and sometimes movement is in both directions. When a lead acid battery is in use, positive hydrogen ions move in one direction while negative sulfate ions move in the other. So if the direction doesn’t matter then having a convention that ignores the charge carrier makes life easier.
Saying that we need a convention that’s independent of the charge carrier is all very nice, but that seems to be a side effect rather than the reason we have the convention. The convention was established long before there was a known variety of forms that current comes in — back even before the electron, or even the atom, was discovered. Why do we have the convention? As you’ll read below, it started with Benjamin Franklin.
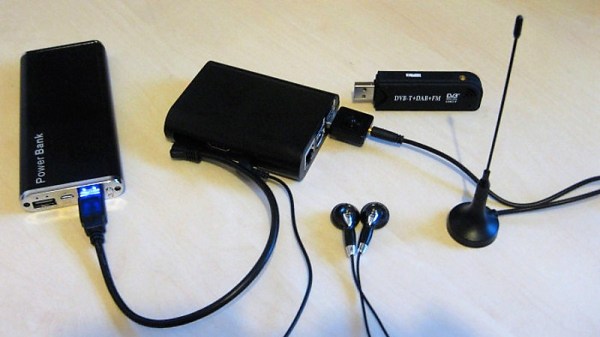
We all do it — park our cars, thumb the lock button on the key fob, and trust that our ride will be there when we get back. But there could be evildoers lurking in that parking lot, preventing you from locking up by using a powerful RF jammer. If you want to be sure your car is safe, you might want to scan the lot with a Raspberry Pi and SDR jammer range finder.
Inspired by a recent post featuring a simple jammer detector, [mikeh69] decide to build something that would provide more directional information. His jammer locator consists of an SDR dongle and a Raspberry Pi. The SDR is set to listen to the band used by key fobs for the continuous, strong emissions you’d expect from a jammer, and the Pi generates a tone that varies relative to signal strength. In theory you could walk through a parking lot until you get the strongest signal and locate the bad guys. We can’t say we’d recommend confronting anyone based on this information, but at least you’d know your car is at risk.
We’d venture a guess that a directional antenna would make the search much easier than the whip shown. In that case, brushing up on Yagi-Uda antenna basics might be a good idea.
At least one in their lives — or several times a day — everyone has wished they had a third hand to help them with a given task. Adding a mechanical extra arm to one’s outfit is a big step, so it might make sense to smart small, and first add an extra thumb to your hand.
This is not a prosthetic in the traditional sense, but a wearable human augmentation envisioned by [Dani Clode], a master’s student at London’s Royal College of Art. The thumb is 3D-printed out of Ninjaflex and mounted to a printed brace which slides over the hand. One servo rotates the thumb, and a second pulls it closed using a bowden cable system — not unlike that of a bicycle brake. Control of the thumb is achieved by pressure sensors in the wearer’s shoes, linked via Bluetooth to a wristband hosting the servos and the electronics. We already use our hands and feet in conjunction, so why not capitalize on this intuitive link?