A Mainframe Tape Drive Emulator

Retro computer fans come in all shapes and sizes. Some like the big name machines from the dawn of the home computer era, others like collecting quirky pieces like early laptops and handheld devices. Even more obscure are those who choose to collect old mainframe hardware. This can be challenging, due to its relative obscurity and the limited resources available. [skaarj] is just one such fanatic, however, and has begun creating a PERTEC tape drive emulator for his Cold War era mainframe.

For those of us who didn’t work in industrial computing back in the 1980s, the PERTEC interface is an unfamiliar beast. It became somewhat of a defacto standard for connecting tape drives to mainframes. [skaarj] aims to understand and emulate this interface, creating a device with a full suite of capabilities. The PERTEC Whisperer is intended to be capable of reading and writing from PERTEC tape drives, including dumping tapes to an integrated SD card. The device will also be able to emulate a drive when connected to a mainframe.

Thus far, the adventure has already netted some successes. [skaarj] learned useful tricks, like rewinding a 9-track Qualstar 1260 with VHS tape, and how to pull apart the protocols involved using an old-school HP1662 logic analyzer. We can’t wait to see where the project goes next, and it might just have us hunting for a mainframe to call our very own.

Jumbo LEDs Make For A Handy ATtiny Beacon

Inspiration can come from anywhere. Sometimes it’s just a matter of seeing an interesting part that you want to fiddle around with badly enough that you end up developing a whole idea, and potentially product, around it. That’s how [Bobricius] found himself creating this very slick little warning beacon, and looking at the end result, we think he made the right decision.

The Kingbright DLC-6SRD “jumbo” LED is actually six individual emitters built into a plastic diffuser. Interfacing with the device is simple enough; each LED has its normal anode and cathode leg, all you need to do is power them up. What [Bobricius] has created is a simple PCB design that the DLC-6SRD can plug right into, complete with a 2032 coin cell holder on the opposite side.

Of course, just lighting up all six elements at the same time wouldn’t be very interesting. [Bobricius] is controlling them individually right off of the digital pins of an ATtiny10 with the help of some Charlieplexing. This makes all kinds of interesting patterns possible, and as demonstrated in the video after the break, the current iteration of the project uses some very simple code to “rotate” the LED as if it was the flasher on an emergency vehicle.

The addition of a few blinking LEDs can make a world of difference in terms of nighttime visibility, so a cheap stick-on module that adds such a distinctive light pattern could be a very important safety device. It could also be useful for UAVs, following the FAA’s new rules which would mandate anti-collision lights for night flying.

Continue reading “Jumbo LEDs Make For A Handy ATtiny Beacon”

A Stylish Low Part Count Non-Contact Thermometer

A non-contact thermometer is a pretty common tool these days, and one that most of us probably have kicking around the lab. You can grab them online for as little as $10 USD, and while they’re nowhere near as capable as a thermal camera, they certainly have their uses. But even with their increased availability, there are at least two safe assumptions we can make about owners of said gadgets: they didn’t make it themselves, and they are probably pretty ambivalent about its aesthetics.

Which makes this project by [Ijon Tichy] particularly interesting. Not only is this a non-contact infrared thermometer that’s extremely easy to build should you be so inclined, but it’s actually quite attractive. In fact, if it wasn’t for the video of it in operation after the break, we would have assumed it was some kind of faux-retro cosplay prop. Even if you don’t have any use for an IR thermometer, you might just want to add one of these to your toolbox on principle.

The main components of the thermometer are a MLX90614 sensor, a gorgeous HP QDSP-6040 bubble display, and a ATtiny2313 microcontroller to tie it all together. The rest are passive components, with the exception of the TP4056 charging module that got tacked on to handle the 200 mAh lithium-ion battery. All of the components are arranged neatly in a line down the length of the thermometer, which is assembled on a piece of perfboard. Rather than go with a 3D printed enclosure that would cover it all up, [Ijon] decided to encapsulate everything in a clear epoxy resin. It looks fantastic, though you’re going to want to triple check all those solder joints before pouring on your “enclosure”.

[Ijon] has provided the diagrams and source code you need to build your own version of this artisanal thermometer, but we think with a custom PCB and perhaps a less liquid enclosure that still shows off the goods, this could be a very popular gadget for the discerning hacker. As we’ve seen, even the most basic of tools can benefit from a stylish makeover.

Continue reading “A Stylish Low Part Count Non-Contact Thermometer”

Resistance Is Futile, You Want This LED Cube

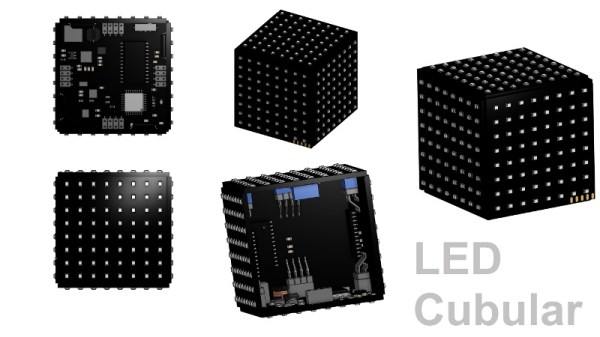
We’re suckers for a good desk toy here at Hackaday, so this 2019 Hackaday Prize entry from [Jack Flynn] certainly caught our eye. The idea is that by using professionally manufactured dual layer PCBs and only surface mount components, you can create a cube that has an LED matrix on each face and all of the electronics hidden within. We’re not entirely sure if there’s any practical application for such a device, but we know we’d certainly like to have one blinking madly away on our shelf regardless.

Before having any of the PCBs manufactured, [Jack] is putting a considerable amount of thought into the design so he doesn’t end up painting himself info a corner (which is of course eight times as bad when you’re building a cube). By importing the PCB files into OnShape, he’s able to “assemble” a virtual representation of the final product to better understand how everything will fit together. He wants to limit the amount of times the cube will need to be pulled apart, so everything from how it will sit in its 3D printed cradle to the placement of breakaway tabs that ensure the internal power switch is accessible are being carefully planned out.

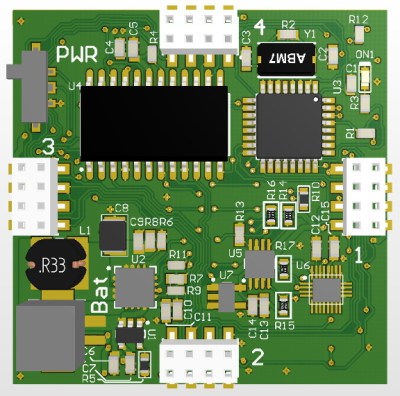
The current design puts the “brains” on the bottom board, with every other panel holding a daisy-chained MAX7219 to drive its own individual 64 LED matrix. Initially the dimensions of the ATmega328p powered cube will be 42 x 42 x 42 mm, with a total of 384 LEDs. Ultimately, [Jack] hopes the modular nature of the design could allow the size of the cube to be increased, or perhaps even take on a different shape entirely.

Generally the LED cubes we see are of the more wiry variety, so it’s particularly interesting when they take on solid forms like this one. Given the nearly universal popularity of blinking LED gadgets, we think this particular project is well positioned to make the leap from one-off hack to a commercial product.

Continue reading “Resistance Is Futile, You Want This LED Cube”

2019 Hackaday Prize Hack Chat

Join us Wednesday, April 17 at noon Pacific time for the 2019 Hackaday Prize Hack Chat!

The 2019 Hackaday Prize was just announced, and this year the theme is designing for manufacturing. The hacker community has come a long, long way in the last few years in terms of the quality of projects we turn out. Things that were unthinkable just a few short years ago are now reduced to practice, and our benches and breadboards are always stuffed with the latest and greatest components and modules, all teaming up to do wondrous things. But what about the next step? Do you have what it takes to turn that mess o’ wires into a product? What skills do you need to add to your repertoire to make sure you can actually capitalize on your prototype — or more importantly, to get your ideas into someone else’s hands where they can actually do some good? That’s what the Hackaday Prize is all about this year, and we want you taking your projects to the next level!

Majenta Strongheart will be hosting the Hack Chat as we discuss:

  • The importance of designing for manufacturing;
  • What tools we have available to turn prototypes into projects;
  • How the Hackaday Prize is set up this year, and why the theme was selected; and
  • Why you should participate in the 2019 Hackaday Prize

You are, of course, encouraged to add your own questions to the discussion. You can do that by leaving a comment on the 2019 Hackaday Prize Hack Chat and we’ll put that in the queue for the Hack Chat discussion.

join-hack-chatOur Hack Chats are live community events on the Hackaday.io Hack Chat group messaging. This week we’ll be sitting down on Wednesday, April 17, at noon, Pacific time. If time zones have got you down, we have a handy time zone converter.

Click that speech bubble to the right, and you’ll be taken directly to the Hack Chat group on Hackaday.io. You don’t have to wait until Wednesday; join whenever you want and you can see what the community is talking about.

Open Source Company Gives Us A Peek At Financial Innards

Here at Hackaday we are willing to bet that in a universe free of all monetary constraints, many of our readers would leave their day jobs in order to pursue their hardware hobbies full time. Obviously this is only practical for a lucky minority of people (for a wide variety of reasons) but we’re willing to bet that a significant stumbling block is figuring how to do it in the first place. You quit your job, but then what? If more information about starting and sustaining small hardware business’ was available more people would take the plunge to start one. There are software companies with salary transparency but this is only part of the picture and we can’t think of many hardware companies that offer the same. What we really want is to get an image of the entire business end to end; from suppliers to COGS to salary. And we want to see it for hardware.

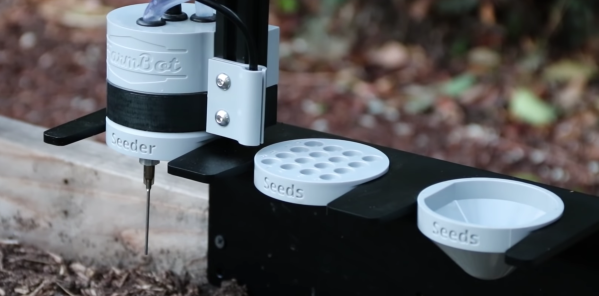
Years ago the first and second Hackaday Prizes captured an entrant named FarmBot whose goal was to build open source robotic farming equipment to make it easier for anyone to grow their own food. A few successful Kickstarters and years later they’ve been shipped multiple versions of the Genesis and Genesis XL robotic farming system and have a sustainable business! And now they’ve decided to open source their business operations too. Suffice to say, this provides quite an uncommon view into the guts of what makes a small open source hardware business tick. Let’s take a closer look!

There is a wealth of information exposed in the company documentation; it’s as though they took their internal wiki and made it public, which we suppose is exactly what happened. The most interesting part for our readers might be the statistics page that tracks costs and quantities for their products. This is where the magic lives. You can use to it see that so far they’ve sold 124 Genesis XL machines at an average selling price of $3,834.34 for $475,458.30 of revenue (it cost $187,200 to build their run of 200 machines). You can also see that each machine has 1,415 parts and takes about 25 hours to assemble. This page is where the true guts of the business live.

Everything else is here too. Here’s where you can learn about what vendors FarmBot uses use logistics, or power, or web infrastructure monitoring. And this is the page with the infamous salary calculation formulas if you want to guess what you’d make as an employee. Then there’s a bunch of boring but important stuff. Fulfillment processes live here, and the consumables they use to support that fulfillment are listed here (with costs!).

One reason we enjoy open source so much is that it affords a wonderful opportunity for people to learn instead of keeping the important parts of a product or process perpetually under wraps. We’re hoping that documentation like this becomes more prevalent and foster an explosion of small hardware companies to follow it.

Turning LEGO Blocks Into Music With OpenCV

We’re not sure what it is, but something about LEGO and music go together like milk and cookies when it comes to DIY musical projects. [Paul Wallace]’s Lego Music project is a sequencer that uses the colorful plastic pieces to build and control sound, but there’s a twist. The blocks aren’t snapped onto anything; the system is entirely visual. A computer running OpenCV uses a webcam to watch the arrangement of blocks, and overlays them onto a virtual grid where the positions of the pieces are used as inputs for the sequencer. The Y axis represents pitch, and the X axis represents time.

Embedded below are two videos. The first demonstrates how the music changes based on which blocks are placed, and where. The second is a view from the software’s perspective, and shows how the vision system processes the video by picking out the colored blocks, then using their positions to change different values which has an effect on the composition as a whole.

Continue reading “Turning LEGO Blocks Into Music With OpenCV”