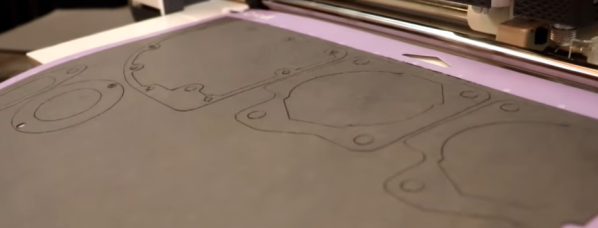
Converting A Drill Press Into A Milling Machine

Mills are a huge investment, and for hobbyists without the space to install their own personal mill, it can sometimes be a pain to have to find a facility with a mill to complete your project.

What if you could convert your drill press into a mill instead? YouTuber [Small Metalworking Machines] explores this in his video, where he takes a small Central Machinery drill press and adds a few mods. He took some steps to improve the quill, spindle, and bearings — boring down the quill, replacing the bearings, and finally turning and re-threading the spindle it at 1/2-20.

With the adjustments, he was able to add in a cheap drill chuck, which fit in quite nicely with just a slight wobble of 5 thousandths on either side. To introduce some control, he added in a worm gear to engage a gear on the spindle. A pivot point disengages the worm gear, while bearings provide it controlled movement from the worm wheel.

He also added a cheap milling table from eBay, attached to the base of the drill press, all for a total of $120. While it’s not perfect, it’s still significantly less expensive than buying a mill!

Continue reading “Converting A Drill Press Into A Milling Machine”

Making A Custom Caliper Case For Pros

Every professional has a tool set that they would never part with. Likewise, for experimental physicists, mechanical engineers, and tinkerers, a caliper set can be unspeakably crucial to their work. That’s why [Andrew Birkel] designed his own personal caliper set to fit just the right proportions for his tools while adding a bit of personal flair.

The project uses CNC routing, Solidworks for CAD, laser engraving, and woodworking to design the custom case for a set of calipers, metric and English screw pitch gauges, fillet gauges, and radius gauges. It’s a practical build for a custom tool set that doesn’t already come with a case of its own. The particular tools were chosen for their use in particle physics experiments: for determining threads, inside and outside curvatures, and measuring length, depth, and width.

The box was made from an oversized piece of wood with holes drilled into the sides. After compiling the G-code program for the build, the two halves of the box was was milled from the wood. The first run on the CNC mill with aluminum managed to cause the grain to split, so [Birkel] went with a CNC router instead. Once the piece was sanded, hidden barrel hinges were added. The finished box was wiped down with mineral oil and teak oil to bring out the natural coloration of the wood as well as to add protection (lacquer mixed into the oil). To finish it off, the case was customized with a laser engraved name and email for identification.

It’s a pretty slick build to say the least, and certainly one that can be customized to the dimensions of whatever tools your personal caliper set happens to have.

Unique 3D Printer Turned CNC Engraver

As we’ve said in the past, one of the most exciting things about the proliferation of low-cost desktop 3D printers (beyond all the little boats we get to see on Reddit), is the fact that their motion control systems are ripe for repurposing. Outfitting a cheap 3D printer with a drag knife, pen holder, or even a solid-state laser module, are all very common ways of squeezing even more functionality out of these machines.

But thanks to the somewhat unusual nature of his printer, [Hammad Nasir] was able to take this concept a bit farther. Being considerably more rigid than the $99 acrylic-framed box of bolts we’ve become accustomed to, he was able to fit it with a basic spindle and use it for CNC engraving. He won’t be milling any steel on this rig, but judging by the pictures on the Hackaday.io page for the project, it does a respectable job cutting designs into plastic at least.

The IdeaWerk 3D printer that [Hammad] used for this project is phenomenally overbuilt. We don’t know whether the designers simply wanted to make it look futuristic and high-tech (admittedly, it does look like it could double as a movie prop) or they thought there was a chance it might get thrown down the stairs occasionally. In either event, it’s built like an absolute tank.

While the frame on lesser printers would likely flex as soon as the bit started moving across the workpiece, this thing isn’t going anywhere. Of course this machine is presumably still running on the standard GT2 belt and NEMA 17 arrangement that has been used in desktop 3D printers since the first wooden machines clattered to life. So while the frame might be ready to take some punishment, the drive system could respectfully disagree once the pressure is on.

Modification was simplified by the fact that the hotend and extruder assembly on the IdeaWerk is mounted to the X axis with just a single bolt. This makes it exceptionally easy to design alternate tool mounts, though arguably the 3D printed motor holder [Hammad] is using here is the weak link in the entire system; if it’s going to flex anywhere, it’s going to be there.

If you’re more photonically inclined, you might be interested in this similarly straightforward project that sees a 2.5 W laser module get bolted onto an entry level 3D printer.

Your TS80 – Music Player

By now most readers will be familiar with the Miniware TS100 and TS80 soldering irons, compact and lightweight temperature controlled soldering tools that have set a new standard at the lower-priced end of the decent soldering iron market. We know they have an STM32 processor, a USB interface, and an OLED display, and that there have been a variety of alternative firmwares produced for them.

Take a close look at the TS80, and you’ll find the element connector is rather familiar. It’s a 3.5 mm jack plug, something we’re more used to as an audio connector. Surely audio from a soldering iron would be crazy? Not if you are [Joric], who has created a music player firmware for the little USB-C iron. It’s hardly a tour de force of musical entertainment and it won’t pull away the audiophiles from their reference DACs, but it does at least produce a recognisable We Wish You A Merry Christmas as you’ll see from the video below the break.

Since the TS100 arrived a couple of years ago we’ve seen a variety of inventive firmware for it. You may remember [Joric]’s previous triumph of a Tetris game for the iron, but our favourite is probably the TS100 oscilloscope.

Continue reading “Your TS80 – Music Player”

Adding USB-C To The TS100, But Not How You Think

USB-C has its special Power Delivery standard, and is capable of delivering plenty of juice to attached hardware. This has led many to modify their TS-100 soldering irons to accept the connector. [Jana Marie] is the latest, though she’s taken rather a different tack than you might expect.

[Jana] didn’t want to modify the original hardware or hack in an adapter. Instead, she struck out on her own, developing an entire replacement PCB for the TS-100 iron. The firmware is rough and ready, and minimal work has been done on the GUI and temperature regulation. However, reports are that functionality is good, and [Jana]’s demonstration shows it handling a proper desoldering task with ease.

Files are on Github for those that wish to spin their own. The PCB is designed to snap neatly inside the original case for a nice fit and finish. Power is plentiful too, as the hardware supports USB Power Delivery 2.0, which is capable of running at up to 100 W. On the other hand, the stock TS-80 iron, which natively supports USB-C, only works with Quick Charge 3.0, and thus is limited to a comparatively meager 36 W.

We’ve seen plenty of TS-100 hacks over 2019. Some have removed the standard barrel jack and replaced it with a USB-PD board. Meanwhile, others have created adapters that plug in to the back of the iron. However, [Jana] is dictating her own terms by recreating the entire PCB. Sometimes it pays to go your own way!

[Thanks to elad for the tip!]

Laser Welding With A Tattoo Removal Gun

Dating as far back as the early 1960’s, researchers were zapping tattoo inks with laser light was an effective way to remove the markings from human skin. At the time it was prohibitively expensive. But the desire to have an undo-button for badge choices is strong, and thus the tattoo removal gun was born.

These days you can pick up one of these zappy, burn-y wonders for far less than a flagship cellphone put their high-power-output to alternative use. [Andrew] recently discovered that these devices can be readily repurposed into a laser welding tool with just a bit of work under the hood.

He first came across the technology via videos from [styropyro], whose work we’ve featured before. The tattoo removal gun features a YAG laser, which is pulsed to create a high power density. In initial testing, the pulses were too short and of too high intensity to effectively weld with; instead, the pulses simply cratered the metal.

After delving in further, [Andrew] discovered that by removing the Q-switch optical component, the pulses from the laser could be lengthened. This reduces the power density, and allows the tool to weld various materials even on its lower power settings. Success was found welding steel, titanium, and other materials, though attempts to weld copper and silver faced little success. Test pieces included razor blades and small screws, which could easily be welded with the tool. Results of the razor blade welding is spectacular, with a high-quality welding bead achieved by taping the laser to a CNC mill for precise movement.

It could prove to be a useful tool for those experimenting with complex projects involving bonding metals at very fine scales. If you’re pursuing something exotic yourself, we want to hear about it!

Motorizing A Plasma Cutter On The Cheap

A hand-held plasma cutter is an excellent tool to have if you are working with sheet metal, but it’s not particularly well suited to making long or repetitive cuts. Which is why [workshop from scratch] worked his usual scrapheap magic and built his own motorized track for making perfectly straight cuts.

Most of the frame, and even the small truck that rides on it, is made out of square stock in various sizes. A couple of bearings are enough to make sure the movement is smooth and doesn’t have too much slop. Motion is provided by a long threaded rod and two nuts, which are welded to the side of the truck.

If you had the patience (and forearm strength) you could just put a crank on the rod and be done with it, but in this case [workshop from scratch] used the motor, gearbox, and chuck from an old electric drill to grab onto the threaded rod and do the spinning for him. He rigged up an enclosure for the side of the rack that holds the motor, DC power supply, and motor controller, along with a couple of switches and a knob to control the speed.

A modification allows him to enable the plasma cutter with one of the switches on the panel, which gives the setup a much more complete feel than just putting a zip tie on the trigger. With this design, the plasma cutter itself can still be removed from the mount and used normally. You can even remove the motorized component with a few bolts if you just wanted to do manual cuts on the bed.

In the video after the break, the keen-eyed viewer may notice a few familiar pieces of gear in the background, such as the hydraulic bench vise we covered earlier in the year. As the name of the channel implies, [workshop from scratch] is all about building the workshop tools that many take for granted, and they’ve all been phenomenally fascinating projects. While we admire the gumption it takes to try and build a lathe out of scrap granite slabs, there’s something to be said for DIY tools that end up looking nearly as good as commercial offerings.

Continue reading “Motorizing A Plasma Cutter On The Cheap”