Although it’s possible to buy a soldering setup out of the box, the one that works for you will likely develop over time. Honestly, it may never stop evolving. Sure, you can start with el-cheapo helping hands or a nice hobby vise, but it probably won’t end there. Why? Because no one of these tools will be right for all applications, unless you plan to solder the same thing over and over again. Sometimes it’s just easier to alligator clip a board in place than to slowly manipulate the jaws of a vise, but those helping hands have such a limited range of motion.
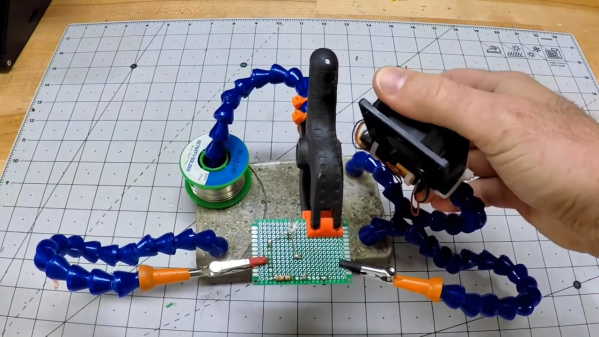
Have you been meaning to build a soldering squid out of coolant hose because that stuff just looks so dang cool and bendy? Well, then let Hackaday alum [JeremySCook] show you how it can be done. A few years ago he built a similar squid with a wooden base, but it just isn’t heavy enough, so he redesigned it with a concrete base. He took the opportunity to make some nice tweaks, like zip-tying a small PC fan and 9 V to make an endlessly repositionable ventilation system, and adding a big clip in the back for extra stability while soldering. And of course, threading the solder spool on to one of the hoses is genius.
If you follow [Jeremy] at all, you know he’s been playing around with concrete for a while now, and it’s neat to see him cement his devotion to the stuff by using it in the pursuit of better tools. He’s got the files for the printed mold up on GitHub, and the build video after the break should be all set up by now.
Not custom enough for you? Fire up that printer and make your own ball and socket arms.
Continue reading “Concrete Solder Squid Is A Solid Solution”


 The
The 


