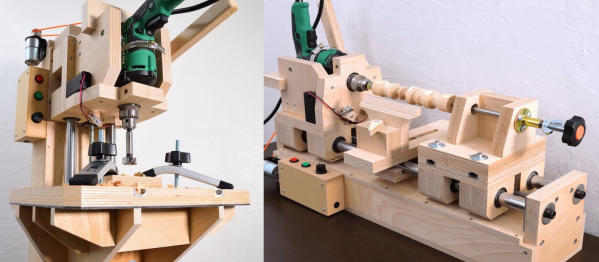
DIY Reflow Oven Is Heavily Documented

[DJ Legion] decided he wanted a reflow oven so he bought a toaster oven and an assortment of parts including a solid state relay, a Teensy, a display, and a thermocouple. What makes this a different project is the amount of video documentation. The four videos below encompass about 50 minutes of information and he’s promising more to come.

We haven’t found his software — probably because he’s still working on it, but we’re watching his GitHub page expectantly. We really liked the 3D printed faceplate that integrated the controller into the oven. It almost looks like a commercial unit. The use of the woodgrain paper over the 3D printed parts was a nice touch.

[DJ] is not done, though. He wants to increase the heat up time and possibly add convection. He’s also planning on a new video that will show actually making a board and how he has refined the calibration curves.

We are impressed but would have been tempted to just grab a Reflowduino. The work’s already done, and you get wireless control and lots of other goodies. Of course, we also get the urge to do it yourself, so we can’t really throw stones. If you don’t want to mess with an oven, you can always raid the hair salon.

Continue reading “DIY Reflow Oven Is Heavily Documented”

A No-Cost, Heavy Metal Lathe From Junkyard Parts

We have to admit that our first thought on seeing a Frankenlathe made from old engine blocks was that it was a set piece from a movie like The Road Warrior. And when you think about it, the ability to cobble together such a machine tool would probably make you pretty handy to have around in an apocalypse.

Sadly, surviving the zombie mutant biker uprising seemed not to be the incentive for [Paul Kuphaldt]’s version of the [Pat Delany] “Multimachine”. He seemed to be in it for the money, or more precisely from the lack of it. He was shooting for a zero-dollar build, and although he doesn’t state how close he came, we’re going to guess it was pretty close. The trick is to find big castings for the bed and headstock – Mopar slant 6 blocks in this case. The blocks are already precision machined dead flat and square, and the cylinder bores provide ample opportunities for stitching the castings together. The drivetrain comes from a 3-speed manual transmission, a 3/4-ton Chevy truck axle donated the spindle, and a V8 cylinder head was used for the cross slide. The tailstock seems to be the only non-automotive part on the machine.

We’d love to see a video of it in action, but there are ample pictures on [Paul]’s website to suggest that the heavy castings really make a difference in keeping vibration down. Don’t get us wrong – we love cast aluminum Gingery lathes too. But there’s something substantial about this build that makes us feel like a trip to the boneyard.

[via r/homemadetools]

Watch This LEGO Pantograph Carve Chocolate Messages

[Matthias Wandel] is best known for his deeply interesting woodworking projects, so you might be forgiven for not expecting this lovely chocolate-engraving pantograph made from LEGO. With it, he carves a delightful valentine’s message into a square of chocolate, but doesn’t stop there. He goes the extra mile to cut the chocolate carefully into a heart, and a quick hit with a heat gun takes the rough edges off for a crisp and polished end result.

The cutting end is a small blade stuck inside a LEGO piece, but that’s the only non-LEGO part in the whole assembly. A key to getting a good carve was to cool the chocolate before engraving, and you can see the whole process in the video embedded below.

Continue reading “Watch This LEGO Pantograph Carve Chocolate Messages”

Joulescope DC Energy Analyzer Reviewed

[VoltLog] got a hold of a prerelease unit of Joulescope — a DC energy analyzer that promises to make it easy to optimize power and energy usage of your electronic designs. You can find his review in the video below. The device is a very fast ammeter and voltmeter. Given that, it is easy to compute energy and, over time, power.

The device is set to retail for about $400 according to a letter in the video, although the website mentions closer to $800. Both of those seem to be a bit much for a piece of specialty gear that is really just a fast analog to digital converter and some software. To be fair, the device can read ranges between 18 microamps to 10 amps with resolutions as low as 1.5 nanoamps on the lower side of the range. Is it worth it? That will depend on your application and your price sensitivity.

Continue reading “Joulescope DC Energy Analyzer Reviewed”

3D Print Your Own Electric Screwdriver

For the odd job every now and then, a regular screwdriver does the job. However, in situations like a small production operation, it can quickly become uncomfortable to use. In these situations, an electric screwdriver is incredibly useful. There’s no need to rush out to the store, however – you can build one yourself, and [Electronoobs] did just that.

The build is simple, consisting of a series of cheap modules hooked up together. An 18650 battery provides power through a boost converter to an H-bridge motor controller, which allows the DC geared motor to be driven both forwards and backwards. There’s also a USB battery charge module, that allows the screwdriver to be recharged from a standard micro USB charger. It’s all neatly packaged in a 3D printed case with a couple of tactile buttons for forward and reverse operation.

It’s a testament to the quality of modern supply chains that one can assemble a usable tool like this at home from prepackaged modules. All the parts, including the bearing and drill chuck, were sourced from eBay.

We’ve seen servos repurposed into electric screwdrivers, too. Video after the break.

Continue reading “3D Print Your Own Electric Screwdriver”

Making A Hammer With Beautiful Engravings

Tools are a key part of any maker’s pursuit of their work. For most of us, our tools come from the local hardware store or are purchased online. Some prefer to craft their own, however, and [Uri Tuchman] is just one such person.

[Uri] starts at the absolute beginning, with a piece of unfinished rectangular stock. The workpiece is marked up, and the shape of the hammer head meticulously filed out by hand. The wooden handle is similarly prepared from raw stock with a combination of planes, chisels and files.

It may not be the fastest way to work, but careful hand craftsmanship is always impressive to watch. The build also showcases [Uri]’s talent at engraving, with the complex designs all carved out of the surface a millimeter at a time. [Uri] recommends enamel paint to highlight such works, for its rich color and the ease of removing excess paint.

Where [Uri] has built a beautiful piece of art that moonlights as a hammer, it’s possible to go in completely the opposite direction with a build. Video after the break.

[Thanks to BrightBlueJim for the tip!] Continue reading “Making A Hammer With Beautiful Engravings”

CNC Your Own PCB With This Tutorial

It is getting so easy to order a finished printed circuit board that it is tough to justify building your own. But sometimes you really need a board right now. Or maybe you need a lot of fast iterations so you can’t wait for the postal service. [Thomas Sanladerer] shows how he makes PCBs with a CNC machine and has a lot of good advice in the video below.

He starts with Eagle, although, you could use any creation package. He shows what parameters he changes to make sure the traces don’t get eaten away and how to do the CAM job to get the files required to make the boards. If you don’t use Eagle, you’ll need to infer how to do similar changes and get the same kind of output.

We’ve only heard a few people pronounce Gerber (as in Gerber file) with a soft G sound, but we still knew what he meant. We have the same problem with GIF files. However, once you have Gebers, you can join the video’s workflow about 5 minutes in.

At that point, he uses FlatCAM to convert the Gerbers to a single G-code file that integrates the paths and drill files. There were a few tricks he used to make sure all the tracks are picked up. Other tricks include leveling a spoil board by just milling it down and mounting different size bits. He also has ideas on aligning the Z axis.

Continue reading “CNC Your Own PCB With This Tutorial”