Vintage Sewing Machine To Computerized Embroidery Machine

It is February of 2018. Do you remember what you were doing in December of 2012? If you’re [juppiter], you were starting your CNC Embroidery Machine which would not be completed for more than half of a decade. Results speak for themselves, but this may be the last time we see a first-generation Raspberry Pi without calling it retro.

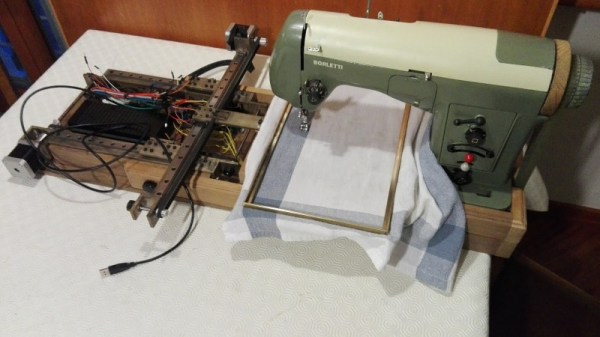
The heart of the build is a vintage Borletti sewing machine, and if you like machinery porn, you’re going to enjoy the video after the break. The brains of the machine are an Arduino UNO filled with GRBL goodness and the Pi which is running CherryPy. For muscles, there are three Postep25 stepper drivers and corresponding NEMA 17 stepper motors.
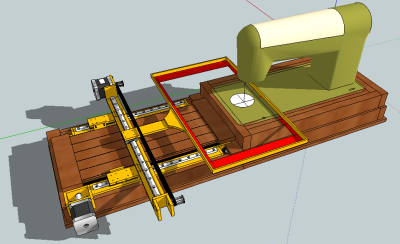
The first two axes are for an X-Y table responsible for moving the fabric through the machine. The third axis is the flywheel. The rigidity of the fabric frame comes from its brass construction which may have been soldered at the kitchen table and supervised by a big orange cat. A rigid frame is the first ingredient in reliable results, but belt tension can’t be understated. His belt tensioning trick may not be new to you, but it was new to some of us. Italian translation may be necessary.

The skills brought together for this build were vast. There was structural soldering, part machining, a microcontroller, and motion control. The first time we heard from [juppiter] was December 2012, and it was the result of a Portable CNC Mill which likely had some influence on this creation. Between then, he also shared his quarter-gobbling arcade cabinet with us.

Continue reading “Vintage Sewing Machine To Computerized Embroidery Machine”

Cross-Brand Adapter Makes For Blended Battery Family

Even though he’s a faithful DeWalt cordless tool guy, [Richard Day] admits to a wandering eye in the tool aisle, looking at the Ryobi offerings with impure thoughts. Could he stay true to his brand and stick with his huge stock of yellow tools and batteries, or would he succumb to temptation and add another set of batteries and chargers so he could have access to a few specialty lime green tools?

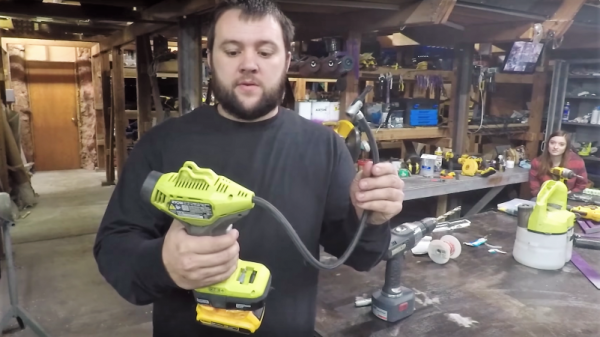
Luckily, we live in the future, so there’s a third way — building a cross-brand battery adapter that lets him power Ryobi tools with his DeWalt batteries. [Richard]’s solution is a pure hack, as in physically hacking battery packs and forcing them to work and play well together. Mechanically, this was pretty easy — a dead Ryobi pack from the recycling bin at Home Depot was stripped down for its case, which was glued to a Dewalt 20-v to 18-v battery adapter. The tricky part came from dealing with the battery control electronics. Luckily, the donor DeWalt line has that circuitry in the adapter, while Ryobi puts it in the battery. That meant simply transplanting the PCB from the adapter to the Ryobi battery shell would be enough. The video below shows the process and the results — Ryobi tools happily clicking away on DeWalt batteries.

While [Richard] took a somewhat brute-force approach here, we imagine 3D-printed parts might make for a more elegant solution and offer other brand permutations. After all, printing an adapter should be easier than whipping up a cordless battery pack de novo.

Continue reading “Cross-Brand Adapter Makes For Blended Battery Family”

Turn Your Lathe Into A Shaper

Ingenuity is the name of the game with manual machine tools. You often have to get creative to use the tools you have to create the part you want. That’s exactly what happened when [John] needed to cut internal splines and keyways using his lathe.

Lathes are usually used to turn metal, but internal keyways and splines are operations often performed with a broach. An older tool called a shaper would be perfect here, but shapers are relatively rare these days — or are they? There are many examples of shaper attachments for lathes. These are human-powered devices that scrape a bit of metal off each pass. The lathe itself is used to keep the workpiece in place and move the tool in a repeatable way.

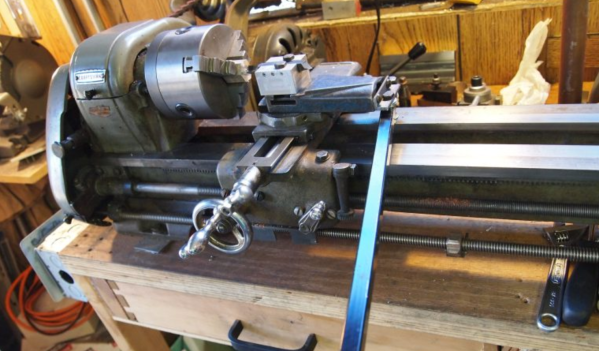
Rather than create a shaper jig from scratch, [John] decided to use his compound slide as the shaper slide itself. He removed the compound slide lead screw, which allowed the compound to slide freely. He then fabricated a double hinged bar and bolted this to the compound slide. Moving the bar causes the slide to move. Just add a cutting tool, and you’re ready to cut a keyway. Add an indexing plate, and you’re ready to cut a spline. You can see the tool in action after the break.

If you want to learn more about lathes and what goes into them, you can learn how to build one from scratch.

Continue reading “Turn Your Lathe Into A Shaper”

3D-Printed Punch And Die Stand Up To Steel

When you think of machine tooling, what comes to mind might be an endmill made of tungsten carbide or a punch and die made of high-speed steel. But surely there’s no room in the machine tool world for 3D-printed plastic tools, especially for the demanding needs of punching parts from sheet metal.

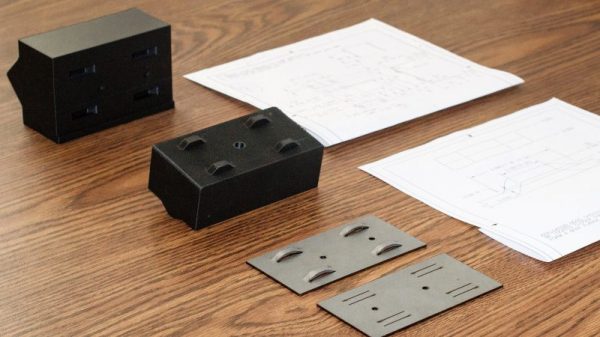
As it turns out, it is possible to make a 3D-printed punch and die set that will stand up to repeated use in a press brake. [Phil Vickery] decided to push the tooling envelope to test this, and came away pleasantly surprised by the results. In fairness, the die he used ended up being more of a composite between the carbon-fiber nylon filament and some embedded metal to reinforce stress points in the die block. It looks like the punch is just plastic, though, and both were printed on a Markforged Mark 2, a printer specifically designed for high-strength parts. The punch and die set were strong enough to form 14-gauge sheet steel in a press brake, which is pretty impressive. The tool wasn’t used to cut the metal; the blanks were precut with a laser before heading to the press. But still, having any 3D-printed tool stand up to metal opens up possibilities for rapid prototyping and short production runs.

No matter what material you make your tooling out of, there’s a lot to know about bending metal. Check out the basics in our guide to the art and science of bending metal.

Continue reading “3D-Printed Punch And Die Stand Up To Steel”

Building An Arduino Smart IC Tester For $25

There’s no question that you can get a lot done with the classic multimeter; it’s arguably the single most capable tool on your bench. But the farther down the rabbit hole of hacking and reverse engineering you go, the more extravagant your testing and diagnostic gear tends to get. For some of us that’s just an annoying reality of the game. For others it’s an excuse to buy, and maybe even build, some highly specialized equipment. We’ll give you one guess as to which group we fall into here at Hackaday.

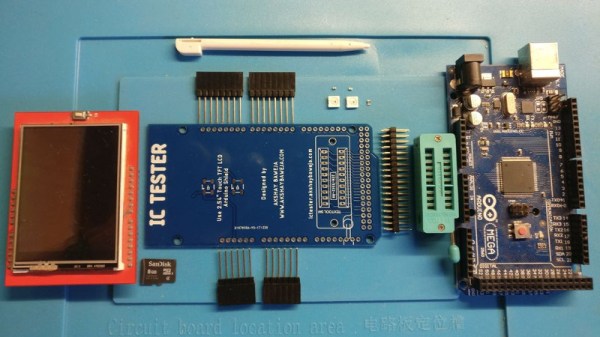
[Akshay Baweja] is clearly a member of the second group. He’s recently published a guide on building a very slick intelligent Integrated Circuit tester with a total cost of under $25 USD. Whether you’re trying to identify an unknown chip or verifying your latest parts off the slow-boat from China actually work before installing them in your finished product, this $25 tool could end up saving you a lot of time and aggravation.

[Akshay] walks readers through the components and assembly of his IC tester, which takes the form of a Shield for the Arduino Mega 2560. The custom PCB he designed and had manufactured holds the 20 Pin ZIF Socket as well as the 2.4 inch TFT touch screen. The screen features an integrated micro SD slot which is important as you need the SD card to hold the chip database.

With an IC to test inserted into the ZIF socket, the user can have the tester attempt to automatically ID the chip or can manually enter in a part number to lookup. The source code for the Arduino as well as the chip ID database is up on GitHub for anyone looking to add some more hardware to the device’s testing repertoire.

The importance of good test equipment simply cannot be overstated. Between highly specialized gear like this IC tester to classic instruments such as the oscilloscope, your bench is going to be full of weird and wonderful pieces of equipment before too long.

Continue reading “Building An Arduino Smart IC Tester For $25”

What’s Coming In KiCad Version 5

Way back in the day, at least five years ago, if you wanted to design a printed circuit board your best option was Eagle. Now, Eagle is an Autodesk property, the licensing model has changed (although there’s still a free version, people) and the Open Source EDA suite KiCad is getting better and better. New developers are contributing to the project, and by some measures, KiCad is now the most popular tool to develop Open Source hardware.

At FOSDEM last week, [Wayne Stambaugh], project lead of KiCad laid out what features are due in the upcoming release of version 5. KiCad just keeps improving, and these new features are really killer features that will make everyone (unjustly) annoyed with Eagle’s new licensing very happy.

Although recent versions of KiCad have made improvements to the way part and footprint libraries are handled, the big upcoming change is that footprint libraries will be installed locally. The Github plugin for library management — a good idea in theory — is no longer the default. Spice simulation is also coming to KiCad. The best demo of the upcoming Spice integration is this relatively old video demonstrating how KiCad turns a schematic into graphs of voltage and current.

The biggest news, however, is the new ability to import Eagle projects. [Wayne] demoed this live on stage, importing an Eagle board and schematic of an Arduino Mega and turning it into a KiCad board and schematic in a matter of seconds. It’s not quite perfect yet, but it’s close and very, very good.

There are, of course, other fancy features that make designing schematics and PCBs easier. Eeschema is getting a better configuration dialog, improved bus and wire dragging, and improved junction handling. Pcbnew is getting rounded rectangle and complex pad shape support, direct export to STEP files, and you’ll soon be able to update the board from the schematic without updating the netlist file. Read that last feature again, slowly. It’s the best news we’ve ever heard.

Additionally, this is one of the rare times you get to hear [Wayne] speak. This means the argument over the pronunciation of KiCad is over. It’s ‘Key-CAD‘ not ‘Kai-CAD‘. You can check out the entirety of [Wayne]’s State of the KiCad talk below.

Continue reading “What’s Coming In KiCad Version 5”

Custom Parts Feeder Aims To Keep Pace With Pick And Place

When your widgets have proven so successful that building them gets to be a grind, it might be time to consider a little mechanical help in the form of a pick and place machine (PnP). If you’re going to roll your own though, there’s a lot to think about, not the least of which is how to feed your beast with parts.

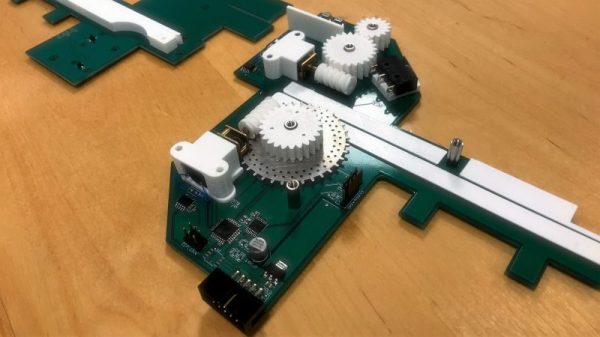
Managing the appetite of a PnP is the idea behind this custom modular parts feeder, but the interesting part of [Hans Jørgen Grimstad]’s work-in-progress project has more to do with the design process. The feeders are to support a custom PnP being built in parallel, and so the needs of one dictate the specs of the other. Chief among the specs are the usual big three: cheap, fast, and reliable. But size is an issue too insofar that the PnP could be working with dozens of component reels at once. Flexibility was another design criteria, so that reels of varied width can be accommodated.

With all that in mind, [Hans] and company came up with a pretty slick design. The frame of the feeder is made out of the PCBs that house the motors for handling the tape, and the ATmega168 that controls everything. Tapes are driven by a laser-cut sprocket driven by 3D-printed worm gears. The boards have fingers that mate up to the aluminum extrusion that the PnP will be built from, and at only a few millimeters wider than the tape, lots of feeders can be nestled together. The video below shows the feeder undergoing some tests.

Alas, this build isn’t quite done, so you’ll have to check back for the final schematics and PCB files if you want to build one for yourself. While you’re waiting, you might want to build your own pick and place.

Continue reading “Custom Parts Feeder Aims To Keep Pace With Pick And Place”