Repairs You Can Print: 3D Printing Is For (Solder) Suckers

[Joey] was about to desolder something when the unthinkable happened: his iconic blue anodized aluminium desoldering pump was nowhere to be found. Months before, having burned himself on copper braid, he’d sworn off the stuff and sold it all for scrap. He scratched uselessly at a solder joint with a fingernail and thought to himself: if only I’d used the scrap proceeds to buy a backup desoldering pump.

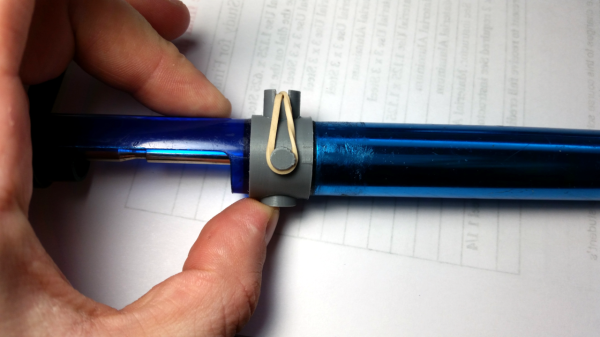
Determined to desolder by any means necessary, [Joey] dove into his junk bin and emerged carrying an old pump with a broken button. He’d heard all about our Repairs You Can Print contest and got to work designing a replacement in two parts. The new button goes all the way through the pump and is held in check with a rubber band, which sits in a groove on the back side. The second piece is a collar with a pair of ears that fits around the tube and anchors the button and the rubber band. It’s working well so far, and you can see it suck in real-time after the break.

We’re not sure what will happen when the rubber band fails. If [Joey] doesn’t have another, maybe he can print a new one out of Ninjaflex, or build his own desoldering station. Or maybe he’ll turn to the fire and tweezers method.

Continue reading “Repairs You Can Print: 3D Printing Is For (Solder) Suckers”

Repairs You Can Print: Broken Glue Gun Triggers Replacement

Picture this: you need to buy a simple tool like a glue gun. There’s usually not a whole lot going on in that particular piece of technology, so you base your decision on the power rating and whether it looks like it will last. And it does last, at least for a few years—just long enough to grow attached to it and get upset when it breaks. Sound familiar?

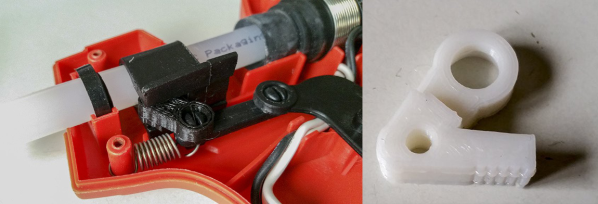
[pixelk] bought a glue gun a few years ago for its power rating and its claims of strength. Lo and behold, the trigger mechanism has proven to be weak around the screws. The part that pushes the glue stick into the hot end snapped in two.

It didn’t take much to create a replacement. [pixelk] got most of the measurements with calipers and then got to work in OpenSCAD. After printing a few iterations, it fit well enough, but [pixelk] saw a chance to improve on the original design and added a few teeth where the part touches the glue stick. The new part has been going strong for three months.

We think this entry into our Repairs You Can Print contest is a perfect example of the everyday utility of 3D printers. Small reproducible plastic parts are all around us, just waiting to fail. The ability to not only replace them but to improve on them is one of the brightest sides of our increasingly disposable culture.

Still haven’t found a glue gun you can stick to? Try building your own.

Repairs You Can Print: Take A Deep Breath Thanks To A 3D Printed Fume Extractor

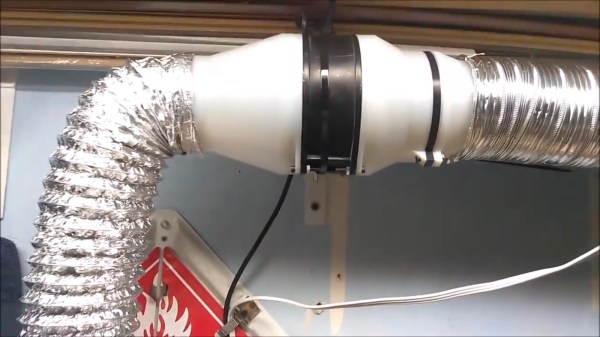
If you are a maker, chances are that you will be exposed to unhealthy fumes at some point during your ventures. Whether they involve soldering, treating wood, laser cutting, or 3D printing, it is in your best interest to do so in a well ventilated environment. What seems like sound advice in theory though is unfortunately not always a given in practice — in many cases, the workspace simply lacks the possibility, especially for hobbyists tinkering in their homes. In other cases, the air circulation is adequate, but the extraction itself could be more efficient by drawing out the fumes right where they occur. The latter was the case for [Zander] when he decided to build his own flexible hose fume extractor that he intends to use for anything from soldering to chemistry experiments.

Built around not much more than an AC fan, flex duct, and activated carbon, [Zander] designed and 3D printed all other required parts that turns it into an extractor. Equipped with a pre-filter to hold back all bigger particles before they hit the fan, the air flow is guided either through the active carbon filter, or attached to another flex duct for further venting. You can see more details of his build and how it works in the video after the break.

Workspace safety is often still overlooked by hobbyists, but improved air circulation doesn’t even need to be that complex for starters. There’s also more to read about fumes and other hazardous particles in a maker environment, and how to handle them.

Continue reading “Repairs You Can Print: Take A Deep Breath Thanks To A 3D Printed Fume Extractor”

3D Printed Battery Pack Keeps Old Drill Spinning

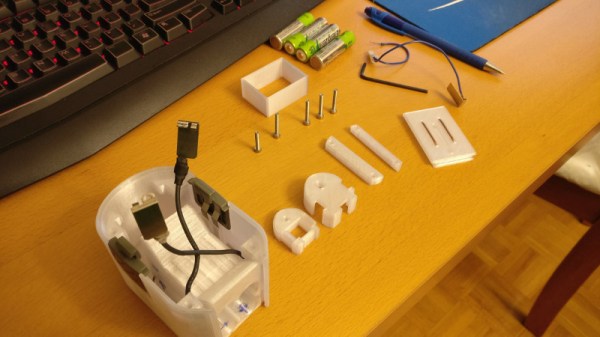
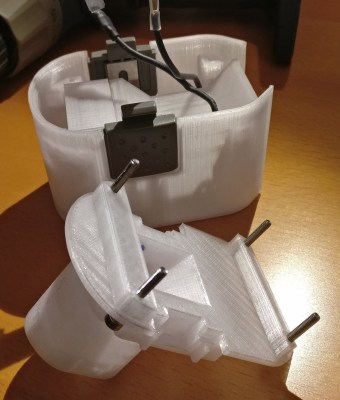
The greatest enemy of proprietary hardware and components is time. Eventually, that little adapter cable or oddball battery pack isn’t going to be available anymore, and you’re stuck with a device that you can’t use. That’s precisely what happened to [Larry G] when the now antiquated 7.2V NiCd batteries used by his cordless drill became too hard to track down. The drill was still in great shape and worked fine, but he couldn’t power the thing. Rather than toss a working tool, he decided to 3D print his own battery pack.

The 3D modeling on the battery pack is impeccable

He could have just swapped new cells into his old pack, but if you’re going to go through all that trouble, why not improve on things a little? Rather than the NiCd batteries used by the original pack, this new pack is designed around readily available AA NiMH batteries. For the light repairs and craft work he usually gets himself into, he figures these batteries should be fine. Plus he already had them on hand, and as we all know, that’s half the battle when putting a project together.

Interestingly, the original battery pack was wired in such a way that it provided two voltages. In older tools such as this one, this would be used for rudimentary speed control. Depending on which speed setting the drill is on, it would either connect to 4 or 6 cells in the original pack. [Larry] didn’t want to get involved with the extra wiring and never used the dual speeds anyway, so his pack only offers the maximum speed setting. Though he does mention that it may be possible to do PWM speed control in the battery itself via a 555 timer if he feels like revisiting the project.

[Larry] tells us the pack itself was rendered completely from scratch, using only the original battery pack and trial-and-error to get the fit perfect. He reused the side-mounted release buttons to save time, but otherwise everything is 3D printed in PETG for its strength and chemical resistance.


This is an entry in Hackaday’s

Repairs You Can Print contest

The twenty best projects will receive $100 in Tindie credit, and for the best projects by a Student or Organization, we’ve got two brand-new Prusa i3 MK3 printers. With a printer like that, you’ll be breaking stuff around the house just to have an excuse to make replacement parts.

Optical Tach Addresses The Need For Spindle Speed Control

With CNC machines, getting the best results depends on knowing how fast your tool is moving relative to the workpiece. But entry-level CNC routers don’t often include a spindle tachometer, forcing the operator to basically guess at the speed. This DIY optical spindle tach aims to fix that, and has a few nice construction tips to boot.

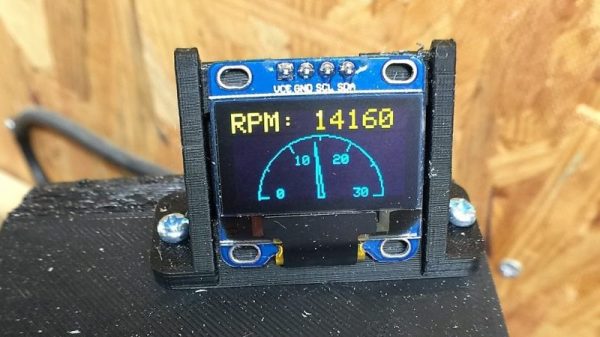
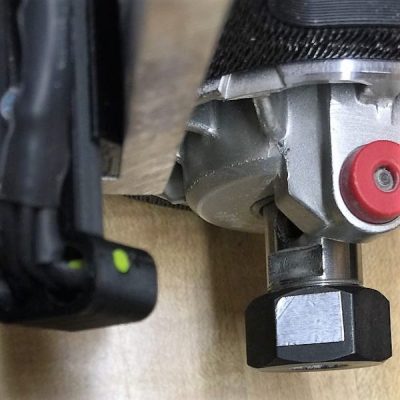
The CNC router in question is the popular Sienci, and the 3D-printed brackets for the photodiode and LED are somewhat specific for that machine. But [tmbarbour] has included STL files in his exhaustively detailed write-up, so modifying them to fit another machine should be easy. The sensor hangs down just far enough to watch a reflector on one of the flats of the collet nut; we’d worry about the reflector surviving tool changes, but it’s just a piece of shiny tape that’s easily replaced.  The sensor feeds into a DIO pin on a Nano, and a small OLED display shows a digital readout along with an analog gauge. The display update speed is decent — not too laggy. Impressive build overall, and we like the idea of using a piece of PLA filament as a rivet to hold the diodes into the sensor arm.
Want to measure machine speed but don’t have a 3D printer? No worries — a 2D-printed color-shifting tach can work too.

Continue reading “Optical Tach Addresses The Need For Spindle Speed Control”

Make Your Own Current Clamp Probe

If you want to measure AC or DC current with an oscilloscope, a current clamp is a great way to do it. The clamp surrounds the wire, so you don’t need to break the connection to take your measurements. These used to be expensive, although we’ve seen some under $100, if you shop. We don’t know if it was cost or principle that motivated [Electronoobs] to build his own current clamp, but he did.

This probe design is little more than a 3D printed case, an old power supply toroid, and a conventional alligator clamp to make the business end. The sensor uses a ferrite core and a hall effect sensor. The ferrite toroid is split in half, one half in each side of the clamp. An opamp circuit provides a gain of 100 to boost the hall effect sensor’s output.

In addition to building a homebrew probe, the video also shows a teardown of a Hantek current probe and explains the theory behind the different kinds of current probes, including some tricks like using a compensation winding to prevent core magnetization.

Does it work? You bet. After calibration, it did just fine. It’s not as pretty as a $100 unit, but beauty is in the eye of the beholder, and we are suckers for homebrew gear so we will say it is certainly more interesting. If you have a fair junk box (and a 3D printer), this probe could be made very inexpensively. The hall effect and a BNC connector are likely to be the most expensive parts. Even if you bought everything and used a non-printed case, we would be hard-pressed to think you’d spend more than $25.

If you want to see how the big boys do it, Keysight had a good break down last year. We’ve seen other homebrew builds for current probes and some of them are very accurate.

Continue reading “Make Your Own Current Clamp Probe”

Indexing Chuck Not Required

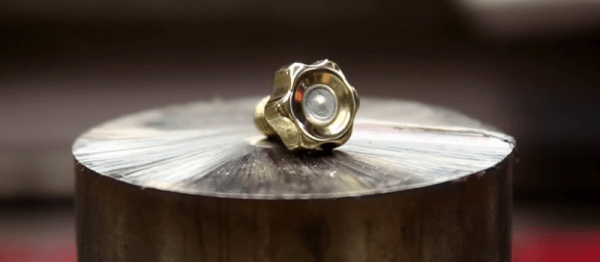
Becoming accomplished with a lathe is a powerful skillset, but it’s only half of the journey. Being clever comes later, and it’s the second part of the course. Patience is in there somewhere too, but let’s focus on being clever. [TimNummy] wants a knobbed bolt with critical parameters, so he makes his own. After the break, there is a sixty-second summary of the linked video.

Making stock hardware is a beginner’s tasks, so custom hardware requires ingenuity or expensive machinery. Adding finger notches to a bolthead is arbitrary with an indexing chuck, but one isn’t available. Instead, hex stock becomes a jig, and the flat sides are utilized to hold the workpiece at six intermittent angles. We can’t argue with the results which look like a part that would cost a pretty penny.

Using material found in the workshop is what being clever is all about. Hex brass stock comes with tight tolerances on the sides and angles so why not take advantage of that?

[TimNummy] can be seen on HaD for his Jeep dome light hack and an over-engineered mailbox flag. Did you miss [Quinn Dunki]’s piece on bootstrapping precision machine tools? Go check that out!

Continue reading “Indexing Chuck Not Required”