Messing about in boats has always held a curious appeal for the hardware hacker. Perhaps that’s because it remains an approachable way to make something that moves under its own power with a bit of speed, and barring calamities, the worst that can happen to the unwary boater is a soaking. [NASAT Channel] is a Vietnamese hacker who is a serial producer of small motorised boats, and one of his latest is a particularly impressive example.
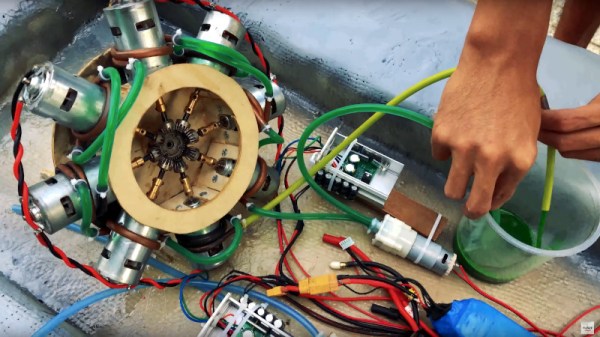
The boat itself is a relatively conventional expanded polystyrene hull covered with fiberglass, but the motive power is something a little special. He’s taken eight of the ubiquitous 775 DC brushed motors and used them in a star configuration with beveled gears, which in turn drives a flexible shaft which goes straight to a propeller under the craft. Each motor shares a water cooling pipe serviced by a small pump, and the drive comes from a pair of cheap PWM motor controllers. We see him zipping up and down a stretch of river next to some moored boats, and if we’re honest, we wouldn’t mind a go ourselves.
We’re not entirely convinced such a rough-and-ready eight-way gearbox will be reliable for long-term use, and we’d be interested to know just how equally so many motors are actually sharing the load. But we like it for its sheer audacity, and we think you will too. Take a look at the video below the break, and if you’re inspired then grab a hammock, some friends, and have a go.