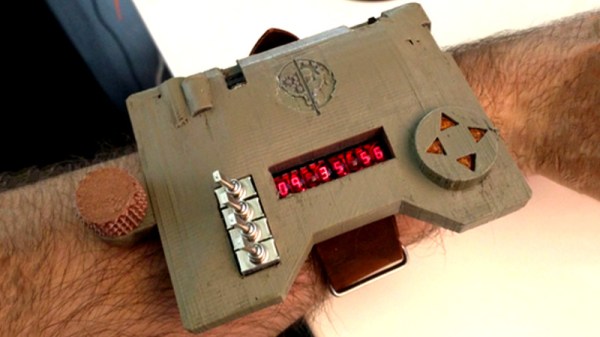
Wireless Protocol Reverse Engineered To Create Wrist Wearable Mouse

We’ve seen a few near-future sci-fi films recently where computers respond not just to touchscreen gestures but also to broad commands, like swiping a phone to throw its display onto a large flat panel display. It’s a nice metaphor, and if we’re going to see something like it soon, perhaps this wrist-mounted pointing device will be one way to get there.

The video below shows the finished product in action, with the cursor controlled by arm movements. Finger gestures that are very much like handling a real mouse’s buttons are interpreted as clicks. The wearable has a Nano, an MPU6050 IMU, and a nRF24L01 transceiver, all powered by some coin cells and tucked nicely into a 3D-printed case. To be honest, as cool as [Ronan Gaillard]’s wrist mouse is, the real story here is the reverse engineering he and his classmate did to pull this one off.

The road to the finished product was very interesting and more detail is shared in their final presentation (in French and heavy with memes). Our French is sufficient only to decipher “Le dongle Logitech,” but there are enough packet diagrams supporting into get the gist. They sniffed the packets going between a wireless keyboard and its dongle and figured out how to imitate mouse movements using an NRF24 module. Translating wrist and finger movements to cursor position via the 6-axis IMU involved some fairly fancy math, but it all seems to have worked in the end, and it makes for a very impressive project.

Is sniffing wireless packets in your future? Perhaps this guide to Wireshark and the nRF24L01 will prove useful.

Continue reading “Wireless Protocol Reverse Engineered To Create Wrist Wearable Mouse”

Membership Ring Of The Electronic Illuminati

When the cabal of electronic design gurus that pull the invisible strings of the hardware world get together, we imagine they have to show this ring to prove their identity. This is the work of [Zach Fredin], and you’re going to be shocked by the construction and execution of what he calls Cyborg Ring.

The most obvious feature of the Cyborg Ring is the collection of addressable LEDs that occupy the area where gems would be found on a ring. What might not be so obvious is that this is constructed completely of electronic components, and doesn’t use any traditional mechanical parts like standoffs. Quite literally, the surface mount devices are structural in this ring.

They are also electrical. Here you can see a detail of how [Zach] pulled this off. We are looking at the underside of the ring, the part that goes below your knuckle. One of the two PCBs that are sized to fit your finger has been placed in a Stick Vise while the QFN processor is soldered on end, and the pairs of SMD resistors are put in place.

The precise measurements of each part make it possible to choose components that will perfectly span the gap between the two boards. In the background of the image you can see SMD resistors on their long ends — a technique he used to allow the LEDs themselves to span between one resistor on each of the two PDBs to complete the circuit. Incredible, right?

But it gets better. [Zach] ended up with a working prototype, but has continued to forge ahead with new design iterations. These updates are a delight to read! Make sure you follow his project and check in regularly; if you’ve already looked at this now’s the time to go back and see the new work. The gold pads for the minuscule coin cells which power the ring are being reselected as the batteries didn’t fit well on the original. Some layout problems are being tweaked. And the new spin of boards should be back from fab in a week or so.

Don’t miss the demo video found below. We really like seeing projects that build within the wearble ring form factor. It’s an impressive constraint which [Zach] seems to have mastered. Another favorite of ours is [Kevin’s] Arduboy ring.

Continue reading “Membership Ring Of The Electronic Illuminati”

Beating Life-Force Amulet

It’s one thing to see science-fiction slowly become reality, but quite another to take that process into your own hands. Inspired by a movie prop, [Eric Strebel] decided to build himself a 21st science-fiction artifact: a pulsing, life-force amulet.

At the — aheam — heart of this amulet is a blinking LED circuit which [Strebel] modified into a slow pulse with the help of his friends. To add to the surreal quality of the amulet, he sourced a stone from a local gem show, bringing his circuit along to get an idea of what the final product would look like. Once [Strebel] had shaped the stone to a more manageable size, he took a polyester filler mold of its rear face to use as a base from which to cast a durable resin housing for the circuit.

[Strebel] is using a pair of coin cell batteries which fit snugly behind the glowing LED, and in case he ever needs to get inside the amulet, he’s attached the stone to the rear with sew-on straps — super-gluing them to each piece. He went for a bit of an industrial look for the necklace — a braided oil line with a modified quick-release clasp that works like a charm.

How does this amulet stack up to one from the 23rd century? You be the judge!

Be The Electronic Chameleon

If you want to work with wearables, you have to pay a little more attention to color. It is one thing to have a 3D printer board colored green or purple with lots of different color components onboard. But if it is something people will wear, they are going to be more choosy. [Sdekon] shows us his technique of using Leuco dye to create items that change color electrically. Well, technically, the dye is heat-sensitive, but it is easy to convert electricity to heat. You can see the final result in the video, below.

The electronics here isn’t a big deal — just some nichrome wire. But the textile art processes are well worth a read. Using a piece of pantyhose as a silk screen, he uses ModPodge to mask the screen. Then he weaves nichrome wire with regular yarn to create a heatable fabric. Don’t have a loom for weaving? No problem. Just make one out of cardboard. There’s even a technique called couching, so there’s lots of variety in the textile arts used to create the project.

Continue reading “Be The Electronic Chameleon”

Weaving With Light: An OLED Fibre Fabric Display

If you think of wearable electronic projects, in many cases what may come to mind are the use of addressable LEDs, perhaps on strips or on sewable PCBs like the Neopixel and similar products. They make an attractive twinkling fashion show, but there remains a feeling that in many cases once you have seen one project, you have seen them all.

So if you are tiring of static sewable LED projects and would like to look forward to something altogether more exciting, take a look at some bleeding-edge research from a team at KAIST, the Korean Advanced Institute of Science & Technology. They have created OLED fibres and woven them into fabric in a way that appears such that they can be lit at individual points to create addressable pixels. In this way there is potential for fabrics that incorporate entire LED displays within their construction rather than in which they serve as a substrate.

The especially interesting feature of the OLED fibres from the KAIST team is that their process does not require any high temperatures, meaning that a whole range of everyday textile fibres can be used as substrates for OLEDs. The results are durable and do not lose OLED performance under tension, meaning that there is the possibility of their becoming practical fabrics for use in garments.

While this technology is a little way away from a piece of clothing you might buy from a store, the fact that it does not rely on special processes during weaving means that when the fibres become commercially available we are likely to see their speedy adoption. Meanwhile you can buy conductive fabric, but you might have to take a multimeter to the store to find it.

Via EENewsLED, and thank you [Carl] for the tip.

Color Organ Dress, A Wearable With Audio Feedback

There is a huge amount of interest among our community in wearable electronics, but it is fair to say that it is a technology that has a way to go at our level in terms of its application. Some twinkly LEDs are all very well, but unless you have the arrived-on-a-spaceship-from-the-future aesthetic of someone like [Naomi Wu] to carry them off they get old rather quickly.

What the sew-on LED sector of wearable electronics is waiting for are some applications, wearable lights that do something rather than just look pretty. And [Moko] has a project that takes them in that direction, with her color organ dress, a garment whose LEDs react to ambient sound with the aid of a MEMS microphone and an Adafruit Gemma M0 microcontroller board. The LEDs form a color wheel which rotates, and stops at a point proportional to the sound level at the time.

The write-up is an interesting one, going into a little detail as it does in the images on the construction of an electronically-enhanced piece of clothing. Wiring everything up is one thing, but there are other considerations such as the incorporation of extra panels to protect them from mechanical stress, and from sweat. From a dressmaker’s perspective it’s a well constructed garment in its own right with an attractive PCB-style pattern (Where did she get that fabric? Or did she print it herself?) and it appears that she’s the fortunate owner of a serger (overlocker).

Well-assembled clothing has made it here before, for example an impressive jellyfish skirt or this laser-cut arcsin dress. And should you wish to make a garment for your next wearable project, you’ll be sure to need a well-stocked textile bench.

Star Chart Watch Is A Romantic Tragedy

It’s becoming abundantly clear that [Colin Merkel] doesn’t know the definition of “good enough”. Not only has he recently completed his third (and most impressive) wristwatch build, but he also managed to put together one of the most ridiculously romantic gifts ever conceived. While some of us are giving our significant others a gift card to Starbucks, he made his girlfriend a watch with a chart on the face representing the position of the stars at the time and place of their first meeting.

As per his usual style, the documentation on this build is phenomenal. If paging through his gallery of build images doesn’t make you want to get a lathe and start learning metal working, nothing will. A chunk of stainless steel rod miraculously becomes a gorgeous wrist watch over the course of a few dozen images, perfectly encapsulating that old adage of “making it look easy”.

All you have to do is turn this into that. Easy.

Certainly the highlight of this build is the star chart on the face. To make it, he used PyEphem to plot the position of the brightest stars that were visible at the time and place of their first meeting. He then wrote a script to take those stars and convert their positions to G-Code the CNC could use to drill holes in the appropriate locations. The depth of the hole even corresponds to the magnitude (brightness) of each star, giving the chart a subtle 3D effect.

Unfortunately, [Colin] made a couple of mistakes during this build, to the point that he’s not exactly sure how to proceed. He mentions he might even be forced to start over from scratch. It’s hard to imagine how something that looks this good could ever end up being a failure, but the world of watch making is unkind.

To start with, he used 304 stainless instead of 303. This made machining the case much more difficult, and from his very first cut he realized it was going to be a problem. While it was an annoyance he mentions a couple times during the build log, he was at least was able to work through it.

The real problem came at the end, when he put the watch together. He originally made his designs assuming a front glass which was 0.5 mm thick, but in actuality used a piece that is 0.8 mm thick. This slight difference is just enough to cause the seconds hand to rub up on the glass, putting drag on the movement. The end result is that the battery dies extremely quickly, effectively rendering the watch useless.

We can’t imagine the heartbreak [Colin] felt when he realized what happened; we felt bad just reading about it. But given his track record, we have no doubt he’ll get the issue sorted out. It would be a shame to start over completely, but there’s some consolation in knowing it’s part of the learning process: you don’t become a master of your craft without making a couple mistakes along the way.

The predecessor to this watch was covered here at Hackaday last year, and made quite an impression. It’s interesting to see the improvements made between the two, and we’re certainly excited to see his next build.