Fritzing diagram of connections between the Wemos D1 board, the TP4056 board, the pushbutton and the LiIon battery

Battery-Powered ESP8266 Sensor? Never Been Simpler

Say, you’re starting your electronics journey with a few projects in mind. You have an ESP8266 board like the Wemos D1, a Li-Ion battery, you want to build a small battery-powered sensor that wakes up every few minutes to do something, and you don’t want to delve into hardware too much for now. Well then, does [Mads Chr. Olesen] have a tutorial for you! Here, you’ll learn the quick and easy way to get your sensor up and running, learn a few tricks for doing sleep Arduino environment, and even calculate how long your specific battery could last. Continue reading “Battery-Powered ESP8266 Sensor? Never Been Simpler”

Supercon 2022: Mooneer Salem Goes Ham With An ESP32

After being licensed as a ham radio operator since the early 2000s, you tend to start thinking about combining your love for the radio with other talents. In a 20-minute talk at Hackaday Supercon 2022, [Mooneer Salem] tells the story of one such passion project that combined software and radio to miniaturize a digital ham radio modulator.

[Mooneer] works as a software developer and contributes to a project called FreeDV (free digital voice), a digital voice mode for HF radio. FreeDV first compresses the digital audio stream, then converts it into a modulation scheme sent out over a radio. The appeal is that this can be understandable down to very low signal-to-noise ratios and includes metadata and all the other niceties that digital signals bring.

Traditionally, this has required a computer to compress the audio and modulate the signal in addition to two sound cards. One card processes the audio in and out of your headset, and another for the audio coming in and out of the radio. [David Rowe] and [Rick Barnich] developed the SM1000, a portable FreeDV adapter based around the STM32F4 microcontroller. However, flash space was running low, and the cost was more than they wanted. Continue reading “Supercon 2022: Mooneer Salem Goes Ham With An ESP32”

Connecting Commercial 433 MHz Sensors To MQTT And Home Assistant With RTL-SDR

When [Elixir of Progress] was looking at setting up environmental sensors around their home to keep track of temperature, humidity and such, the obvious ideas of using WiFi-connected sensors didn’t work due to lack of WiFi range. Although Zigbee (Z-wave) sensors have longer range than WiFi, they are decidedly more expensive, proprietary and require a special transceiver hub. That’s where 433 MHz sensors for weather stations come into the picture.

The idea is simple: virtually all of those sensors – many of them rated for outdoor use – use the unlicensed 433 MHz spectrum that can easily be captured using cheap RTL-SDR (software defined radio) USB dongles. With the data stream from these sensors captured, the open source rtl_433 project enables automatic decoding of these data streams for a wide range of supported sensors.

While Realtek RTL2832-based and other RTL-SDRs can be found for quite cheap, it should be noted that these can run quite hot. Rather than heatsinking the IC, for this project it was elected to only listen sporadically and allow the RTL-SDR receiver to cool down in between listening sessions.

Getting the data from there into Home Assistant, InfluxDB or similar is easy, as rtl_433 can output the decoded data directly to an Influx database, MQTT broker as well as other formats. In this case, the data was sent via MQTT with the Home Assistant instance configured to treat these MQTT topics as sensors. With each sensor’s location carefully registered, this allows for setting up a dense, very low-power network of 433 MHz sensors for monitoring and home automation purposes.

This WiFi Signal Strength Meter Ain’t Afraid Of No Ghosts

The original Ghostbusters movie is a classic that’s still delivering nearly 40 years after its release — just let that sink in for a minute. Almost every aspect of the film, from hand props to quotes, is instantly recognizable, even to people who haven’t based their lives on the teachings of [Venkman], [Stantz], and [Spengler]. To wit, we present this PKE meter-style WiFi scanner.

Of course, [Kevin McAleer]’s project is strictly in the “Just for Fun” category. But that doesn’t mean it’s not at least somewhat useful. The design is pretty close to the original PKE meter, with a little bit of creative license taken to make it easier to build. Guts include a Raspberry Pi Pico W and a generous 320×240 LCD display. The body of the meter is entirely 3D printed; design files are of course available. The meter’s arms are geared together to move with a single hobby servo.

On the software side, [Kevin]’s GUI lets users see a list of WiFi hotspots in the area and select one from the list. From there, the position of the arms is determined by the RSSI for the hotspot, similar to how the prop was supposed to indicate the proximity to a spook, specter, or ghost. There’s perhaps a bit of a missed opportunity by not adding LEDs to the arms, but we’ll let that slide.

The video below has full design and build details, but fair warning that it’s a bit on the long side. That’s probably just a reflection of how much work [Kevin] put into this, though. Of course, you may rather build a PKE meter that “actually” detects ghosts, in which case we’ve got you covered.

Continue reading “This WiFi Signal Strength Meter Ain’t Afraid Of No Ghosts”

Giving Your Pets A Digital Squeak

A pet tracker has a particularly grueling set of requirements: small, light, rugged, incredibly long battery life, safe for the pet, and cheap. [Mihai Cuciuc] was looking at the options and wasn’t thrilled with any of them. So as any hacker would, he rolled his own, dubbed Squeak.

It uses an RN2483 module as it is a LoRAWAN module with publically available firmware from Microchip itself. This means [Mihai] could add his code and keep the modem code without having to reverse engineer everything or add a second microcontroller. In addition to the modem, there’s a GPS unit connected via UART. The clever part is the dual voltage regulators — the one powering the GPS is enabled or disabled by the RN2483. In addition, the RAM V_BACKUP line is always powered, which means the RN2483 can power up the GPS and let it get a quick fix (thanks to the RAM backup line).

To maximize the chances of a packet making it through, he made them only have the bare essentials. There are return packets to change the tracker’s mode (such as uplink interval or how often to capture GPS). With some cloud support, [Mihai] created infrastructure to capture the packets and relay them to Telegram. He can request the last location, receive updates, and change modes.

We’ve got you covered if you’re interested in tracking some of your dog’s other habits.

Roll Your Own WiFi Driver For The Pico W

The Raspberry Pi Pico is a handy little microcontroller that has become a widespread addition to many hackers’ workbench. The Pico W has a CYW4342W module (just like the Pi Zero W) to add WiFi capabilities and [Jeremy Bentham] ported his bare-metal WiFi driver to the Pico W.

The CYW43438 is an SDIO interface, so most of the code ported over from his Zerowi project, but there were a few notable tweaks along the way. Given that the Pi Pico SDK has the complete source code to drive the CYW43439 with an open source TCP/IP stack (lwIP) and the datasheets from Infineon are pretty detailed, why create your own driver?

The short answer is…because why not. But a second answer is to tweak it just how you like it. With his own implementation, [Jeremy] can focus on maximizing throughput and making WiFi a little easier to debug. He deeply delves into the hardware, scope traces, and code samples. It’s a tremendous five-part read over lunch. Some highlights include writing some code for the PIO (Programmable I/O) to interface with the SPI interface, bank switching in the WiFi RAM, handling the 140 different events, connecting to a network, and sending pings.

The PicoWi code is available on GitHub. Perhaps it can be integrated with this PCMIA interface to offer outstanding performance to an older laptop.

A home-made wireless game controller

ColecoVision Barn Find Gets Wireless Makeover

Few things are more satisfying than finding an old, forgotten piece of technology somewhere and bringing it back to life. And while it’s great to see a rare sports car or an Apollo Flight Computer being restored, even not-very-successful game consoles from the 1980s can make for some great repair stories. Just look at how [Discreet Mayor] describes his restoration and modification efforts on a ColecoVision that he literally found in a barn.

Given that the ColecoVision was on the market between 1982 and 1985, we can assume that [Discreet Mayor]’s console had been sitting on a shelf for at least three decades, and the machine was definitely showing its age. Several components had failed due to corrosion, including the clock crystal, a 7400 series logic chip and a capacitor in the power supply, but since these are all standard components it was rather straightforward to replace them.

The controllers however were sadly beyond repair. Replacing them with standard joysticks wasn’t really an option because the ColecoVision controllers included a numeric keypad, which was mainly used to select game options. Making something completely new was the way to go, and [Discreet Mayor] decided to go for a wireless system while he was at it. After all, he had already developed a modular wireless IoT system based on the IEEE 802.15.4 standard, which turned out to be a perfect fit for this system.

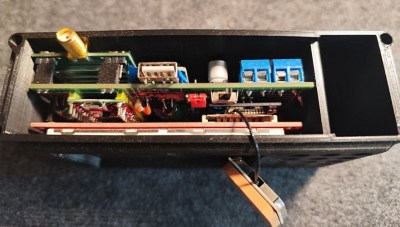
The splash screen of ColecoVision's Venture[Discreet Mayor] built a simple joystick-plus-fire-button setup on a piece of MDF and equipped it with his IoT transmitter. Instead of adding a replacement numeric keypad he decided to use the joystick to simulate the most commonly-used buttons: “right” for “1”, “down” for “2” and so on. The receiver module uses digital switches to mimic keypresses to the console’s input port. The end result might look a bit hacky, but the console is fully functional again and runs its games just like it did over thirty years ago.

We’ve seen several projects that add wireless controllers to a variety of classic consoles. If you’ve got a ColecoVision that turns out to be beyond salvaging, you can always just build your own from scratch.