Building Keyboards With Resin Printers

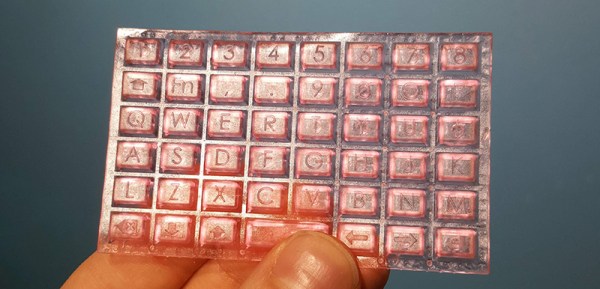
Aside from putting a whole lot of tact switches on a board, no one has quite figured out how to make very small keyboards for wearable projects. [Madaeon] might have the answer, and it’s using a resin-based 3D printer to create a flexible keyboard without silicone.

The world of small keyboards is filled with what are effectively the squishy parts of a remote control. This uses a piece of silicone and tiny carbon ‘dots’ on the underside of each button. Press the button, and these carbon dots bridge two traces on a PCB, closing a switch. No one has yet mastered home-casting silicone, although the people behind the ESP32 WiPhone have been experimenting with aluminum molds.

Instead of going down the path of casting and curing silicone, [Madaeon] decided to use 3D printing, specifically resin 3D printing, using a very flexible resin. The build process is what you would expect — just some button-shaped objects, but this gets clever when it comes to bridging the connections on the keyboard matrix. This is done with conductive paint, carefully applied to the underside of each button.

Right now this is a viable means of getting a tiny keyboard easily. The color is a garish pink, and the labels on each button aren’t quite as visible as anyone would like, but the latter can be fixed with silkscreening, just like how it’s done on the silicone buttons for remote controls.

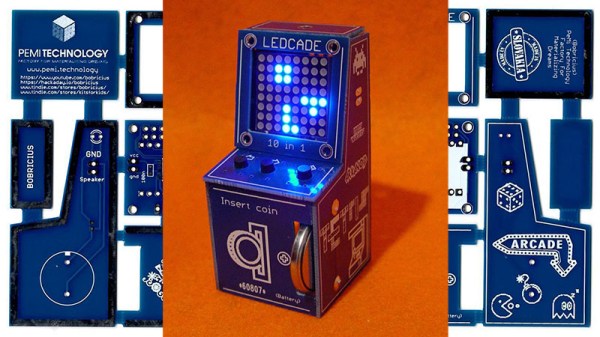
Insert Coin (Cell) To Play LedCade

In this era of 4K UHD game console graphics and controllers packed full of buttons, triggers, and joysticks, it’s good to occasionally take a step back from the leading edge. Take a breath and remind ourselves that we don’t always need all those pixels and buttons to have some fun. The LedCade is a μ (micro) arcade game cabinet built by [bobricius] for just this kind of minimalist gaming.

Using just three buttons for input and an 8×8 LED matrix for output, the LedCade can nevertheless play ten different games representing classic genres of retro arcade gaming. And in a brilliant implementation of classic hardware hacking humor, a player starts their game by inserting not a monetary coin but a CR2032 coin cell battery.

Behind the screen is a piezo speaker for appropriately vintage game sounds, and an ATmega328 with Arduino code orchestrating the fun. [bobricius] is well practiced at integrating all of these components as a result of developing an earlier project, the single board game console. This time around, the printed circuit board goes beyond being the backbone, the PCB sheet is broken apart and reformed as the enclosure. With classic arcade cabinet proportions, at a far smaller scale.

If single player minimalist gaming isn’t your thing, check out this head-to-head gaming action on 8×8 LED arrays. Or if you prefer your minimalist gaming hardware to be paper-thin, put all the parts on a flexible circuit as the Arduflexboy does.

Low Power Weather Station Blows The Competition Away

Building a weather station isn’t too tall of an order for anyone getting into an electronics project. There are plenty of plans online, and you can even put your station on Weather Underground if it meets certain standards. These usually have access to a reliable source of power, though, and like any electronics project can get challenging quickly once it needs to work reliably in a remote location. The weather station from [Tegwyn☠Twmffat] has met this challenge though, and has been working reliably for three years now.

Getting that sort of reliability from any circuit that has to be powered by an unreliable source (solar, wind, etc.) and a battery is quite a challenge. Not only do you need to sort out the power management and make sure that you can get enough sun in the winter for your application, but you’ll need to do some extreme low power modifications to your circuitry as well. This weather station accomplishes all of that, helped by using LoRa for communication, and also comes complete with a separate hardware watchdog timer that can reboot the weather station if it loses power or hangs up for some reason.

If you’ve been looking for a weather station to build, this is a great place to start. [Tegwyn☠Twmffat] also goes through the assembly of the weather station, complete with a guy-wire-supported platform to mount it on. There are other weather stations out there too, if you need even more ideas about saving power in remote areas.

A Mainframe Tape Drive Emulator

Retro computer fans come in all shapes and sizes. Some like the big name machines from the dawn of the home computer era, others like collecting quirky pieces like early laptops and handheld devices. Even more obscure are those who choose to collect old mainframe hardware. This can be challenging, due to its relative obscurity and the limited resources available. [skaarj] is just one such fanatic, however, and has begun creating a PERTEC tape drive emulator for his Cold War era mainframe.

For those of us who didn’t work in industrial computing back in the 1980s, the PERTEC interface is an unfamiliar beast. It became somewhat of a defacto standard for connecting tape drives to mainframes. [skaarj] aims to understand and emulate this interface, creating a device with a full suite of capabilities. The PERTEC Whisperer is intended to be capable of reading and writing from PERTEC tape drives, including dumping tapes to an integrated SD card. The device will also be able to emulate a drive when connected to a mainframe.

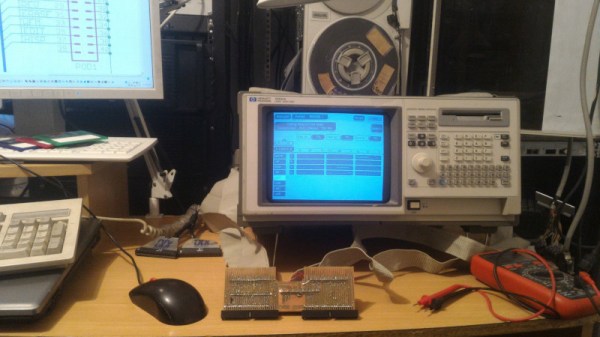
Thus far, the adventure has already netted some successes. [skaarj] learned useful tricks, like rewinding a 9-track Qualstar 1260 with VHS tape, and how to pull apart the protocols involved using an old-school HP1662 logic analyzer. We can’t wait to see where the project goes next, and it might just have us hunting for a mainframe to call our very own.

Jumbo LEDs Make For A Handy ATtiny Beacon

Inspiration can come from anywhere. Sometimes it’s just a matter of seeing an interesting part that you want to fiddle around with badly enough that you end up developing a whole idea, and potentially product, around it. That’s how [Bobricius] found himself creating this very slick little warning beacon, and looking at the end result, we think he made the right decision.

The Kingbright DLC-6SRD “jumbo” LED is actually six individual emitters built into a plastic diffuser. Interfacing with the device is simple enough; each LED has its normal anode and cathode leg, all you need to do is power them up. What [Bobricius] has created is a simple PCB design that the DLC-6SRD can plug right into, complete with a 2032 coin cell holder on the opposite side.

Of course, just lighting up all six elements at the same time wouldn’t be very interesting. [Bobricius] is controlling them individually right off of the digital pins of an ATtiny10 with the help of some Charlieplexing. This makes all kinds of interesting patterns possible, and as demonstrated in the video after the break, the current iteration of the project uses some very simple code to “rotate” the LED as if it was the flasher on an emergency vehicle.

The addition of a few blinking LEDs can make a world of difference in terms of nighttime visibility, so a cheap stick-on module that adds such a distinctive light pattern could be a very important safety device. It could also be useful for UAVs, following the FAA’s new rules which would mandate anti-collision lights for night flying.

Continue reading “Jumbo LEDs Make For A Handy ATtiny Beacon”

A Stylish Low Part Count Non-Contact Thermometer

A non-contact thermometer is a pretty common tool these days, and one that most of us probably have kicking around the lab. You can grab them online for as little as $10 USD, and while they’re nowhere near as capable as a thermal camera, they certainly have their uses. But even with their increased availability, there are at least two safe assumptions we can make about owners of said gadgets: they didn’t make it themselves, and they are probably pretty ambivalent about its aesthetics.

Which makes this project by [Ijon Tichy] particularly interesting. Not only is this a non-contact infrared thermometer that’s extremely easy to build should you be so inclined, but it’s actually quite attractive. In fact, if it wasn’t for the video of it in operation after the break, we would have assumed it was some kind of faux-retro cosplay prop. Even if you don’t have any use for an IR thermometer, you might just want to add one of these to your toolbox on principle.

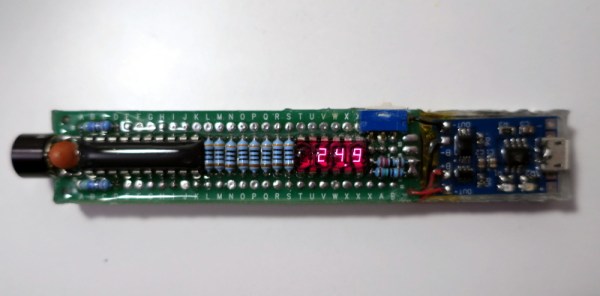
The main components of the thermometer are a MLX90614 sensor, a gorgeous HP QDSP-6040 bubble display, and a ATtiny2313 microcontroller to tie it all together. The rest are passive components, with the exception of the TP4056 charging module that got tacked on to handle the 200 mAh lithium-ion battery. All of the components are arranged neatly in a line down the length of the thermometer, which is assembled on a piece of perfboard. Rather than go with a 3D printed enclosure that would cover it all up, [Ijon] decided to encapsulate everything in a clear epoxy resin. It looks fantastic, though you’re going to want to triple check all those solder joints before pouring on your “enclosure”.

[Ijon] has provided the diagrams and source code you need to build your own version of this artisanal thermometer, but we think with a custom PCB and perhaps a less liquid enclosure that still shows off the goods, this could be a very popular gadget for the discerning hacker. As we’ve seen, even the most basic of tools can benefit from a stylish makeover.

Continue reading “A Stylish Low Part Count Non-Contact Thermometer”

ESP32 Adds Bluetooth To GameCube Controllers

While it might not be the most traditional design, there’s no debating that Nintendo created something truly special when they unleashed the GameCube controller on an unsuspecting world back in 2001. Hardcore fans are still using the controller to this day with current-generation Nintendo consoles, and there’s considerable interest in adding modern conveniences like USB support to the nearly 20-year-old design.

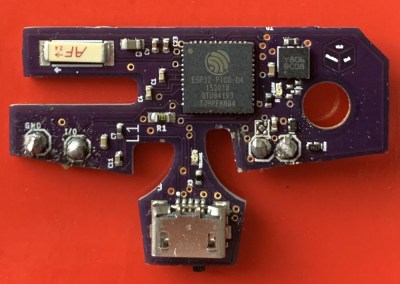
One particularly promising project is the BlueCubeMod created by [Nathan Reeves]. He’s developed a small custom PCB that can be installed into an official GameCube controller to turn it into a Bluetooth device. You do have to sacrifice the original cord and force feedback for this mod, but we think many will see the ability to use this iconic controller with their computer or phone as a pretty fair trade.

The PCB holds an ESP32-PICO-D4 which is operating as a standard Bluetooth HID controller for maximum compatibility with modern systems. Control signals are pulled directly from the controller’s original PCB with just two wires, making the installation very simple. Wondering where the power comes from? As the rumble motor isn’t supported anyway, that gets tossed and in its places goes a 700 mAh battery which powers the controller for up to six hours. Overall it’s a very clean modification that [Nathan] believes even beginners will be capable of, and he ultimately plans to turn this design into a commercial kit.

Currently you still need a receiver if you want to use the BlueCubeMod with the Nintendo Switch, but [Nathan] says he’s working on a way to get around that requirement by potentially switching out the ESP32 for a STM32 with a CC256x radio. He says this will give him more direct control over the Bluetooth communications, which should allow him to take into tackle the intricacies of talking to the Switch directly.

Of course, the GameCube did have an official wireless controller back in the day. We’ve seen modifications to get the WaveBird to get it talking to modern systems as well, but there’s something to be said for slimmer form factor of the original edition.

Continue reading “ESP32 Adds Bluetooth To GameCube Controllers”