3D Printing Compressed Air Tanks

Using PVC pipe as a pressure vessel for compressed air can be a fun and enjoyable hobby. It’s safe, too: while there are are reports of PVC pipe being the cause of accidents, these accidents include a black powder potato gun[1], and welding too close to a PVC pipe containing compressed air[2]. Compressed air stored in a PVC pipe is never a proximal cause in any accident, and the OSHA’s Fatality and Catastrophe Investigation Summaries bear this out; there was no industrial or occupational accident recorded in these summaries where a pressure vessel made out of PVC was the cause of any injury or death[3].

Although PVC pipe can be a perfectly safe, effective, and cheap pressure vessel for hobby applications, it’s not always the best choice. A group of students in Renens, Switzerland are building autonomous robots for the Eurobot competition, and this year’s robot uses pneumatics. That means compressed air, and that means a pressure vessel. Since just about everything else on this robot is 3D printed, they asked the obvious question. Is it possible to 3D print a tank for compressed air?

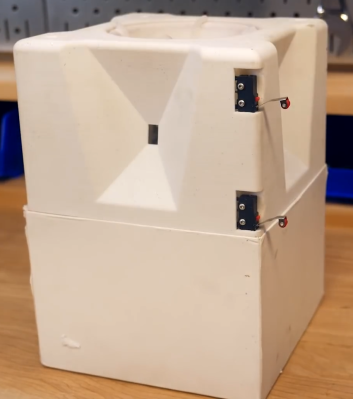
The tank for this robot would only be used up to about 4 bar (400kPa), and after a few quick calculations, the team discovered the wall thickness – even in a pressure vessel with corners – would be pretty low. The first prototype, a 40mm cube with 20% infill and a hole drilled in the side, held 6.5 bar (650kPa) for an hour. This success didn’t last, though: he second prototype, a 65x40x80mm rectangular prism printed without as much infill, exploded at 5.5bar (550kPa).

The third time’s the charm, and with filleted ribs inside the tank, the third prototype was able to hold pressure up to 6.5 bar. Of course no 3D print is perfect, and the third prototype did leak, but a bit of acrylic spray paint applied to the outer surfaces held the air in.

While it’s not as fun, easy, cheap, rewarding, or safe as using PVC pipe as a pressure vessel, the team did manage to build a 3D printed pressure vessel with a custom shape. You can’t do that very easily with round pipe. And 3D printing opens up all manner of internal structure to experiment with. We’d like to see this developed even further!

Sources: [1], [2], [3]

Hacklet 109 – Complex 3D Printed Projects

If you can’t tell, we’re on a roll with 3D printers and printed projects this month. So far, we’ve covered printers, and simple functional 3D prints. This week we’re taking a look at some of the awesome complex 3D printed projects on Hackaday.io.

Complex 3D printed projects are things like robots, quadcopters, satellite tracking systems, and more. So let’s jump in and look at some of the best complex 3D printed projects on Hackaday.io!

dtto2We start with [Alberto] and Dtto v1.0 Modular Robot. Dtto is [Alberto’s] entry in the 2016 Hackaday Prize. Inspired by Bruce Lee’s famous water quote, Dtto is a modular snake-like robot. Each section of Dtto is a double hinged joint. When two sections come together, magnets help them align. A servo controlled latch solidly docks the sections, which then work in unison. Dtto can connect and separate segments autonomously – no human required. [Alberto] sees applications for a robot like [Dtto] in search and rescue and space operations. Continue reading “Hacklet 109 – Complex 3D Printed Projects”

Hacklet 108 – Simple Functional 3D Prints

We featured 3D printer projects on last week’s Hacklet. This week, we’re looking at a few awesome projects created with those printers. Trying to pick great 3D printed projects on Hackaday.io is a bit like staring at the sun. There are just way too many to choose from. To make things a bit easier, I’ve broken things down into categories. There are artistic prints, complex mechanical or electronic prints, and then there are simple functional prints, which is the topic we’re featuring today. Simple functional prints are designs which perform some function in the world. By simple, I mean they have only a few moving parts or electronic components. Let’s get right to it!

cornersWe start with [Scott] and L Extrusion Endcaps. Every Home Depot, Lowes, or hardware store has a selection of extruded aluminum. Typically there are a few flat bars, and some L brackets. L brackets are great, but they can be a pain to work with. Most of us don’t have the skills or the tools to weld aluminum, so nuts and bolts are the only way to go. [Scott’s] given us another option. He’s designed a set of 3D printable brackets that slip onto the ends of the brackets. The brackets make quick work of building boxes, racks, or anything with 90° or 45° angles.


earbudNext up is [Joe M] with 3D Printed Molds: Custom Silicone Earbuds. [Joe] had a set of Bluetooth earbuds he enjoyed, but the rubber tips left a bit to be desired. Not a problem when you have a 3D printer on hand. [Joe] measured the plastic part of his earbuds and the rubber tips from a different set he liked. A bit of CAD magic later, and he had a model for the perfect earbud tip. While he could have directly printed the tip in a flexible filament like NinjaFlex, [Joe] opted for a pure silicone tip. He printed molds, then mixed silicone caulk with cornstarch (as a catalyst). The resulting earbuds sound and feel great!

coil2Next we have [Jetty] with Highly Configurable 3D Printed Helmholtz Coil. Helmholtz coils are used to create uniform magnetic fields. Why would you want to do that? It could be anything from measuring magnets to cancelling out the effect of the earth’s magnetic field on a device being tested. [Jetty’s] wrote an OpenScad program which allows the user to enter parameters for their coil. [Jetty’s] program then calculates the coil’s magnetic properties, and outputs a printable .stl file. Building the coil is as simple as printing it and wrapping some copper wire. [Jetty] found that his coil was within 60nT (nanoTesla) of the expected value. Not bad for a bit of plastic and wire!


scope1Finally we have StickScope,  [SUF’s] entry in the 2016 Hackaday Prize. Like many of us, [SUF] loves his StickVise. Sometimes you need a bit of magnification to see those tiny 0201 resistors though. [SUF] had a cheap USB microscope on hand, so he designed StickScope, a USB microscope mount designed especially for the StickVise. Two 6mm steel rods are the backbone of the design. 3D printed clamps hold the system together like a miniature boom microscope. This is actually the third revision of the design. [SUF] found that the original design couldn’t be used with parts close to the bar which holds the microscope. A small jaw extender was the perfect tweak.


If you want to see more simple functional 3D printed projects, check out our new simple functional 3D prints list! If I missed your project, don’t be shy, just drop me a message on Hackaday.io. That’s it for this week’s Hacklet. As always, see you next week. Same hack time, same hack channel, bringing you the best of Hackaday.io!

Hackaday Prize Entry: ForEx Display Is A Well Executed Hack

[Stefan] works in a place where knowing the exact state of the foreign-exchange market is important to the money making schemes of the operation. Checking an app or a website was too slow and broke him out of his workflow. OS desktop widgets have more or less departed this earth for the moment. The only solution then, was to build a widget for his actual desk.

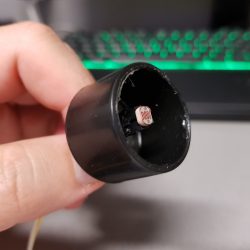
The brains of the device is a ESP8266 board, some peripherals and a small backlit TFT display. The device can run off battery or from a wall wart. [Stefan] even added some nice features not typically found in hacks like this, such as a photocell that detects the light level and dims the screen accordingly.

The software uses an interesting approach to get the latest times and timezones. Rather than use a chart or service made for the task, he uses an open weather API to do the task. Pretty clever.

The case is 3D printed and sanded. To get the nice finish shown in the picture [Stefan] spray-painted the case afterwards. All put together the device looks great and gives him the desktop widget he desired.

The HackadayPrize2016 is Sponsored by:

Teaching A CNC New Tricks

Computer Numeric Control technology has been around for a long time. It’s at the heart of our 3D printers, laser cutters / etchers and CNC milling machines. They all work the same way — you begin with a CAD program and make some type of design. Then the computer converts the file into a set of XYZ coordinates and moves a tool head accordingly. Now let us pose to ourselves a most interesting question. What if you reversed the process? What if you could take a CNC’d object and convert it into XYZ coordinates?

This is precisely what [dave] is attempting to do. He’s made a basic CNC outfit and installed encoders on the steppers. He then manually moves the tool head to trace out an object. At the same time, the encoders are feeding the coordinates to a computer for recording. The idea is to replay the coordinates to see if the CNC can replicate the object.

Judging from the video below, the project is a success!

Continue reading “Teaching A CNC New Tricks”

This Is My 3D Printed Brain!

This hack is a strange mixture of awesome and ghoulish. [Andrew Sink] created a 3D printed version of his brain. He received a CD from an MRI session that contained the data obtained by the scan. Not knowing what to do with it he created a model of his brain.


Out of a number of images, some missing various parts of his head, he selected the one that was most complete. This image he brought into OisriX, a Mac program for handling DICOM files. He worked on the image for an hour dissecting away his own eyes, skull, and skin. An STL file containing his brain was brought over to NetFabb to see how it looked. There was still more dissection needed so [Andrew] turned to Blender. More bits and pieces of his skull’s anatomy were dissected to pare it down to just the brain. But there were some lesions at the base of the brain that needed to be filled. With the help of [Cindy Raggio] these were filled in to complete the 3D image.

The usual steps sent it to the 3D printer to be produced at 0.2 mm resolution. It only took 49 hours to print at full-size. This brain was printed for fun, but we’ve seen other 3D printed brain hacks which were used to save lives. How many people do you know that have a spare brain sitting around?

The Hovalin: Open Source 3D Printed Violin Sounds Great

[Matt and Kaitlin Hova] have created The Hovalin, an open source 3D-printed violin. Yes, there have been 3D-printed instruments before, but [The Hovas] have created something revolutionary – a 3D printed acoustic instrument that sounds surprisingly good. The Hovalin is a full size violin created to be printed on a desktop-sized 3D printer. The Hovas mention the Ultimaker 2, Makerbot Replicator 2 (or one of the many clones) as examples. The neck is one piece, while the body is printed in 3 sections. The Hovalin is also open source, released under the Creative Commons Attribution Non-Commercial Share Alike license.

A pure PLA neck would not be stiff enough counter the tension in the strings, so [The Hovas] added two carbon fiber truss rods. A handful of other components such as tuners, and of course strings, also need to be purchased. The total price is slightly higher than a $60 USD starter violin from Amazon, but we’re betting the Hovalin is a better quality instrument than anything that cheap.

The Hovalin was released back in October. There are already some build logs in the wild, such as this one from [Emulsifide]. Like any good engineering project, the Hovalin is a work in progress. [Matt and Kaitlin] have already released version 1.0.1, and version 2.0 is on the horizon. Hearing is believing though, so click past the break to hear [Kaitlin] play her instrument.

Continue reading “The Hovalin: Open Source 3D Printed Violin Sounds Great”