Custom Soldering Fume Fan Doesn’t Skimp On Features

Prolific maker [sjm4306] tells us the first iteration of his soldering fan was little more than some cardboard, electrical tape, and a hacked up USB cable. But as we all know, these little projects have a way of evolving over time. Fast forward to today, and his custom fan is a well-polished piece of kit that anyone with a soldering iron would be proud to have on their workbench.

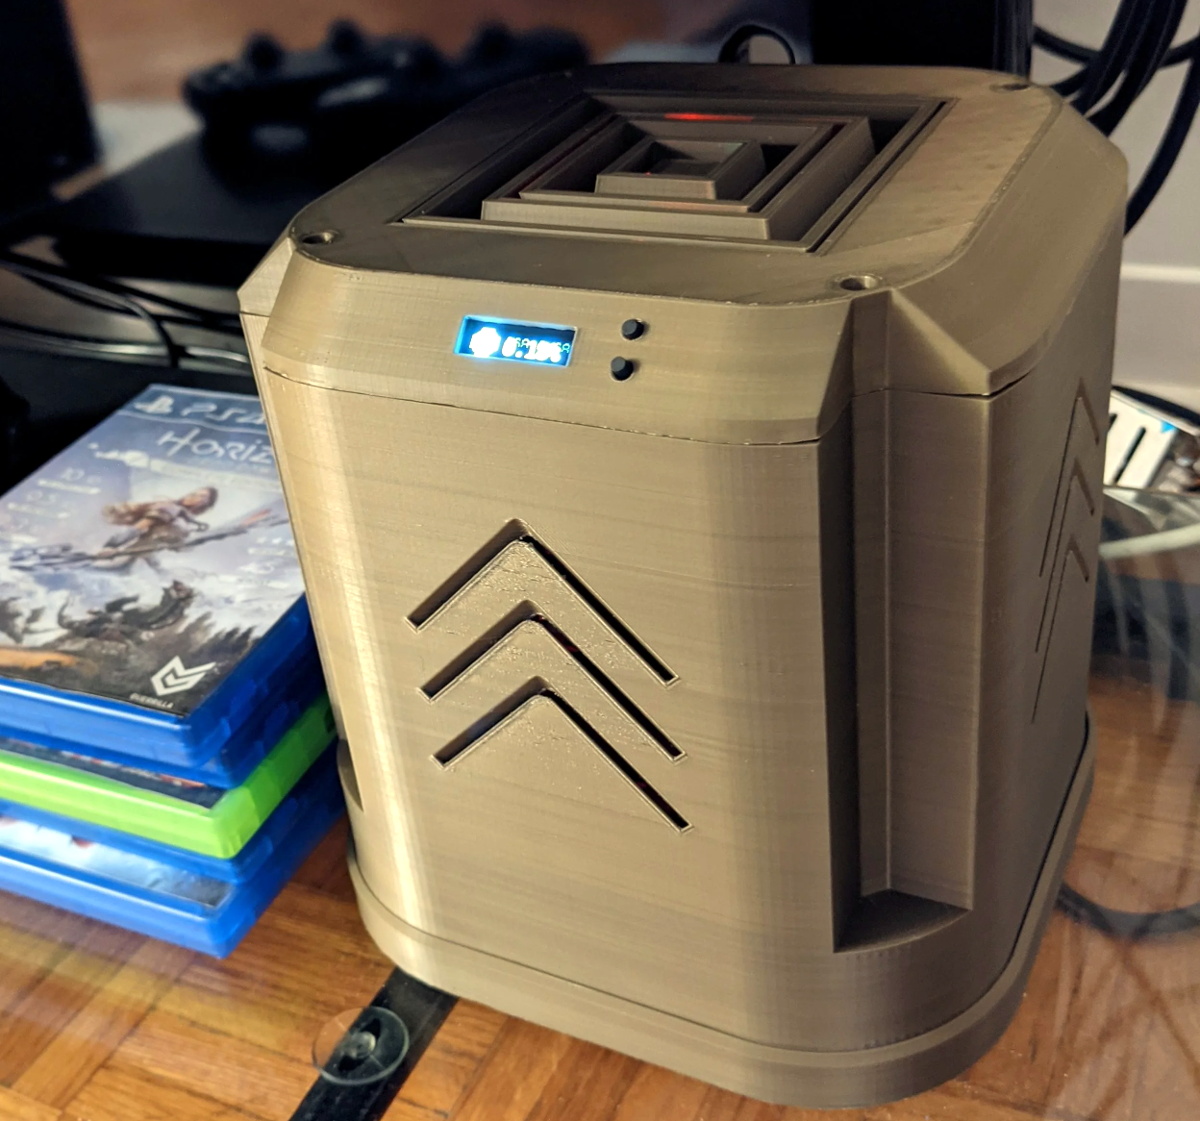
Cardboard has given way to a 3D printed enclosure that holds the fan, electronics, a pair of 18650 cells, and a easily replaceable filter. Between the marbled filament, debossed logo, properly countersunk screw holes, and rounded corners, it’s really hard to overstate how good this case looks. We’ve shamefully produced enough boxy 3D printed enclosures to know that adding all those little details takes time, but the end result really speaks for itself.

Fan internals, with a look at the custom PCB.

The user interface running on the OLED is also an exceptionally nice touch. Sure the fan doesn’t need a graphical display, and [sjm4306] could have saved a lot of time and effort by using a turn-key speed controller, but the push-button configuration complete with graphical indications of fan speed and battery life really give the final product a highly professional feel.

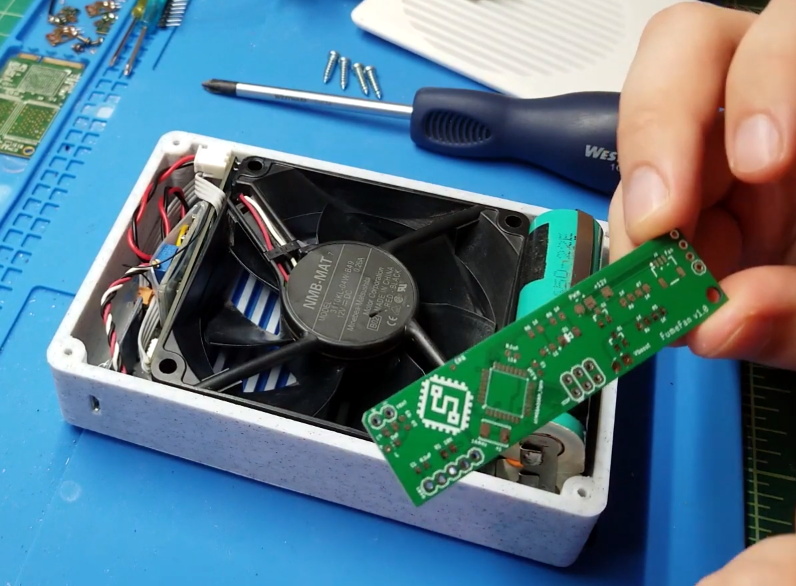
In the video below, [sjm4306] reveals that while the finished product might look great, there were a few bumps in the road. Issues with clearance inside the case made him rethink how things would be wired and mounted, leading to a far more cramped arrangement than he’d anticipated. Part of the problem was that he designed the case first and tried to integrate the electronics later, rather than the other way around; a common pitfall you’d be wise to watch out for.

It’s been proven that, without some external input, solder smoke is going to go right in your face. Whether or not you need to do something this complex is naturally up for debate, but if you want to keep all that nasty stuff out of your lungs, you’d do well to outfit your workbench with some kind of fan.

Continue reading “Custom Soldering Fume Fan Doesn’t Skimp On Features”

Modern Tape Echo Made Easy

Modern popular music increasingly relies on more and more complicated and intricate equipment and algorithms to generate catchy tunes, but even decades ago this was still the case. The only difference between then and now was that most of the equipment in the past was analog instead of digital. For example, the humble tape echo was originally made by running a loop of magnetic tape over a recording head and then immediately playing it back. Old analog machines from that era are getting harder and harder to find, so [Adam Paul] decided to make his own.

At first, [Adam] planned to use standard cassette tapes in various configurations in order to achieve the desired effect, but this proved to be too cumbersome and he eventually switched his design to using the cassette internals in a custom tape deck. The final design includes a small loop of tape inside of the enclosure with a motor driving a spindle. The tape is passed over a record head, then a read head, and then an erase head in order to achieve the echo sound. All of this is done from inside of the device itself, with 1/4″ jacks provided so that the musician can plug in their instrument of choice just like a standard effects pedal would be configured.

The entire build is designed to be buildable and repairable using readily-available parts as well, which solves the problem of maintaining (or even finding) parts from dedicated tape echo machines from decades ago. We like the sound from the analog device, as well as the fact that it’s still an analog device in a world of otherwise digital substitutes. Much like this magnetic tape-based synthesizer we featured about a year ago.

Continue reading “Modern Tape Echo Made Easy”

Handheld Hackintosh Runs Mac OS On LattePanda

We’ve seen a huge influx of bespoke portable computers over the last couple of years thanks to availability of increasingly powerful single-board computers. The vast majority of these have been ARM powered using something like the Raspberry Pi 4, and naturally, run Linux. Only a handful have run on x86 hardware, usually because whoever built it wanted to be able to run Windows.

But this handheld x86 Hackintosh running the latest Mac OS on the LattePanda Alpha is truly something unique. Creator [iketsj] claims it to be a world’s first, and after a bit of searching, we’re inclined to agree. While others have installed Mac OS on the LattePanda to create Hackintosh laptops, this would indeed appear to be the first handheld computer to utilize this particular hardware and software blend.

Like other custom portables we’be seen, this one starts with a 3D printed enclosure. The overall design reminds us a bit of the YARH.IO we covered last year, and even borrows the trick of reusing the membrane and PCB of one of those miniature keyboard/pointer combos. Which in this case ends up being especially important, as in keeping with Apple’s own portable Mac OS machines, the screen on this handheld doesn’t support touch.

We especially like how the integrated Arduino on the LattePanda is being used in conjunction with some MOSFETs to control power to the handheld’s LCD, keyboard, and fans. While it sounds like the fans are currently running at full throttle, [iketsj] mentions he does intend on adding automatic speed control in the future. A dedicated “chassis controller” like this makes a lot of sense, and is something we imagine will only become more common as these portable builds become increasingly complex.

Now that we’ve seen a custom portable computer running Mac OS, are we due to see a whole new wave of cyberdecks sporting Cupertino’s software in the future? Maybe not. As [iketsj] points out at the end of this video, Apple’s switch from x86 to their own in-house silicon will almost certainly mean the death of the Hackintosh project within the next few years, bringing a fascinating era of computer hacking to a close.

Continue reading “Handheld Hackintosh Runs Mac OS On LattePanda”

3D Printed Terminal Takes Computing Back In Time

It’s hard to look at today as anything but the golden age of computing. Even entry level machines have quad-core processors and a terabyte or more of storage space, to say nothing of the incredible amount of tech packed into the modern smartphone. But even so, there’s something to be said for the elegant simplicity of early desktop computers.

Looking to recreate the feeling of those bygone days, [Pigeonaut] created the Callisto II. Its entirely 3D printed case snaps together without glue or screws, making it easy to assemble, and the parts have been sized so they’ll be printable even on smaller machines like the Prusa Mini. Inside you’ll find a 1024×768 Pimoroni HDMI 8″ IPS LCD, 60% mechanical keyboard, four-port USB 3 hub, Raspberry Pi 4, and a 22 watt USB power supply to run it all.

The internal components can be easily accessed with the hatch on the rear of the case, and there’s plenty of room inside to add new hardware should you want to toss in a hard drive or even swap out the Pi for a different single-board computer.

To really drive home the faux-retro concept of the Callisto II, [Pigeonaut] has created a website for the fictional computer company behind the machine, replete with all the trappings you’d expect from the early web. There’s even a web-based “operating system” you can use to show off your freshly printed Callisto II.

Incidentally the II suffix isn’t just part of the meme, there really was a Callisto before this one. We covered the earlier machine back in 2019, and while we’re a bit sad to see that the functional 3.5 inch floppy drive has been deleted, we can’t deny the overall aesthetics have been greatly improved in the latest version.

Continue reading “3D Printed Terminal Takes Computing Back In Time”

Tightly Packed Raspberry Pi Tricorder Impresses

We’ll say upfront that we don’t have nearly as much information about this 3D printed Star Trek: The Next Generation tricorder as we’d like. But from the image galleries [Himmelen] has posted we know it’s running on the Raspberry Pi Zero W, has a color LCD in addition to a monochrome OLED, and that it’s absolutely packed with gear.

So far, [Himmelen] has fit an NESDR RTL-SDR dongle, a GPS receiver, an accelerometer, and the battery charging circuitry in the top half of the case. Calling it a tight fit would be something of an understatement, especially when you take into account all the wires snaking around in there. But as mentioned in the Reddit thread about the device, a custom PCB backplane of sorts is in the works so all these modules will have something a little neater to plug into.

There are a lot of fantastic little details in this build that have us very excited to see it cross the finish line. The female USB port that’s been embedded into the top of the device is a nice touch, as it will make it easy to add storage or additional hardware in the field. We also love the keyboard, made up of 30 individual tact switches with 3D printed caps. It’s hard to imagine what actually typing on such an input device would be like, but even if each button just fired off its own program or function, we’d be happy.

Judging by the fact that the LCD shows the Pi sitting at a login prompt in all the images, we’re going to go out on a limb and assume [Himmelen] hasn’t gotten to writing much software for this little gadget yet. Once the hardware is done and it’s time to start pushing pixels though, something like Pygame could be used to make short work of a LCARS-style user interface that would fit the visual style of The Next Generation. In fact, off the top of our heads we can think of a few turn-key projects out there designed for creating Trek UIs, though the relatively limited computational power of the Pi Zero might be a problem.

We’ve seen several projects that tried to turn the iconic tricorder into a functional device. Some have focused on the arguably more recognizable Next Generation style such as this one, and others have targeted the more forgiving brick-shaped unit from Kirk and Spock’s era. The Wand Company is even working on a officially licensed tricorder that will supposedly be as close to we can get to the real thing with modern tech and a $250 USD price tag, though we’d wager COVID has slowed progress down on that one. In any event, whether you build it or buy it, the tricorder seems destined to become reality before too long.

An Open Source Smart Watch You’d Actually Wear

We’ve seen a number of open source smart watches over the years, and while they’ve certainly been impressive from a technical standpoint, they often leave something to be desired in terms of fit and finish. Exposed PCBs and monochromatic OLED displays might be fine for a trip to the hackerspace, but it wouldn’t be our first choice for date night attire.

Enter the Open-SmartWatch from [pauls_3d_things]. This ESP32 powered watch packs a gorgeous circular 240×240 TFT display, DS323M RTC, BMA400 three-axis accelerometer, and a 450 mAh battery inside of a 3D printed enclosure that can be produced on your average desktop machine. WiFi and Bluetooth connectivity are a given with the ESP32, but there’s also an enhanced edition of the PCB that adds another 4 MB of RAM, a micro SD slot, and a Quectel L96 GPS receiver.

The GPS edition of the PCB

As it’s an open source project you’re free to download the PCB design files and get the board produced on your own, but [pauls_3d_things] has actually partnered with LILYGO to do a run of the Open-SmartWatch electronics which you can pick up on AliExpress right now for just $24 USD. You’ll still need to order the battery separately and 3D print your own case, but it still seems like a pretty sweet deal to us.

On the software front, things are pretty basic right now. The watch can update the time from NTP using a pre-configured WiFi network, and there’s a Bluetooth media controller and stopwatch included. Of course, as more people get the hardware in their hands (or on their wrists, as the case may be), we’ll likely start seeing more capabilities added to the core OS.

While getting our own code running on commercially produced smartwatches holds a lot of promise, the Open-SmartWatch is arguably the best of both worlds. The partnership with LILYGO brings professional fabrication to the open hardware project, and the GPLv3 licensed firmware is ripe for hacking. We’re very excited to see where the community takes this project, and fully expect to start seeing these watches out in the wild once we can have proper cons again.

Continue reading “An Open Source Smart Watch You’d Actually Wear”

Compute Module 4 NAS With Custom Carrier Board

At this point, we’ve seen more Raspberry Pi Network Attached Storage (NAS) builds than we can possibly count. The platform was never a particularly ideal choice for this task due to the fact it could only connect to drives over USB, but it was cheap and easy to work with, so folks made the best of it. But that all changed once the Compute Module 4 introduced PCIe support to the Raspberry Pi ecosystem.

If this impressive NAS built by [mebs] represents the shape of things to come, we’re more than a little excited. On the outside, with its 3D printed case and integrated OLED display to show system status, it might look like plenty of builds that came before it. But pop the top of this cyberpunk-styled server, and you realize just how much work went into it.

At the heart of this NAS is a purpose-built carrier board that [mebs] designed based on the KiCad files the Raspberry Pi Foundation released for their official CM4 IO Board. While not much larger than the CM4 itself, the NAS board breaks out the board’s PCIe, Ethernet, HDMI, and USB. There’s also a header for I2C, used primarily for the OLED display but naturally expandable to additional sensors or devices, and nine GPIO pins for good measure.

Of course, that alone doesn’t make a NAS. Into that PCIe port goes a four channel SATA controller card, which in turn is connected to the hard disk drives that are nestled into their respective nodes of the printed case. A central fan blows over the electronics at the core, and thanks to clever design and a few cardboard seals, pulls air over the drives by way of intake vents printed into the sides.

As impressive as this build is, not everyone will need this level of performance. If you don’t mind being limited to USB speeds, you can 3D print a NAS enclosure for the standard Raspberry Pi. Or you could always repurpose an old PC case if you’d like something a bit more substantial.