A 3D printed cat treat dispenser on a table with a laptop in the background and with a treat in it's tray and a cat on the left about to eat the treat.

Local IOT Cat Treat Dispenser

[MostElectronics], like many of us, loves cats, and so wanted to make an internet connected treat dispenser for their most beloved. The result is an ingenious 3D printed mechanism connected to a Raspberry Pi that’s able to serve treats through a locally run web application.

The inside of a 3d printed cat treat dispenser, showing the different compartments, shaft and wires running out the back.

From the software side, the Raspberry Pi uses a RESTful API that one can connect to through a static IP. The API is implemented as a Python Flask application running under a stand alone web server Python script. The web application itself keeps track of the number of treats left and provides a simple interface to dispense treats at the operators leisure. The RpiMotorLib Python library is used to control a 28BYJ-48 stepper motor through its ULN2003 controller module, which is used to rotate the inside shaft of the treat dispenser.

The mechanism to dispense treats is a stacked, compartmentalized drum, with two drum layers for food compartments that turn to drop treats. The bottom drum dispenses treats through a chute connected to the tray for the cat, leaving an empty compartment that the top drum can replenish by dropping its treats into through a staggered opening. Each compartmentalized treat drum layer provides 11 treats, allowing for a total of 22 treats with two layers stacked on top of each other. One could imagine extending the treat dispenser to include more drum layers by adding even more layers.

Source code is available on GitHub and the STL files for the dispenser are available on Thingiverse. We’ve seen cat electronic feeders before, sometimes with escalating consequences that shake us to our core and leave us questioning our superiority.

Video after the break!

Continue reading “Local IOT Cat Treat Dispenser”

DIY SpaceNavigator Brings The Freedom

[Pepijn de Vos] wanted a 6DOF HID. You know, a 6 Degrees Of Freedom Hardware Interface Device. Those are the fancy controllers for navigating in 3D space, for uses like Computer Aided Design, or Kerbal Space Program. And while we can’t speak to [Pepijn]’s KSP addiction, we do know that the commercially available controllers are prohibitively expensive. It takes some serious CAD work to justify the expenditure. [Pepijn] falls somewhere in-between, and while he couldn’t justify the expense, he does have the chops to design and 3D print his own.

Marvelously, he’s shared the design files for SpaceFox, linked above. It’s 6 spring-loaded potentiometers, supporting a floating printed Big Knob. The pots feed into an Arduino Pro Micro, which calculates the knob’s position on the fly and feeds in into the connected computer. On the computer side, the project uses the spacenavd driver to interface with various applications.

SpaceFox V1 is essentially a proof of concept, just asking for someone to come along and knock off the rough edges. [Pepijn] even includes a wishlist of improvements, but with the caveat that he’s satisfied with his working model. If this project really gets your 6DOF juices flowing, maybe try making an improved version, and share the improvements. And let us know about it!

Continue reading “DIY SpaceNavigator Brings The Freedom”

DIY Heat-Set Insert Press Says Complicated = Comfort

Heat-set inserts are a great way to embed mechanically-strong, threaded parts into a 3D print. For installation, all that is required is an economical soldering iron; something most of us already have.

The carriage and counterweight use a v-wheel gantry, GT2 belt, and other common hardware.

That’s fine for a handful of occasional inserts, but when a large number need to be inserted reliably and cleanly, something a little more refined is called for. That’s where [virchow]’s threaded insert press design comes in. It adds 3D-printed parts to an aluminum extrusion frame to create a press that smoothly lowers a soldering iron directly up and down, with minimal effort by the user.

The holder for the soldering iron is mounted to a small v-wheel gantry that rides along the vertical extrusion. The gantry features a counterweight to take care of resetting the position of the iron. [Virchow] admits that the design could be considered unnecessarily complicated (hence the “UC” in the name) but on the other hand, there’s nothing like doing a hundred or so inserts to make one appreciate every bit of comfort and stability.

Heat-set inserts aren’t difficult to use, but a little technique goes a long way. Spend a few minutes reading Joshua Vasquez’s guide on the optimal way to use them in 3D-printed parts to make sure yours not only go in straight but end up looking great as well.

Playdate Handheld Turned Typewriter

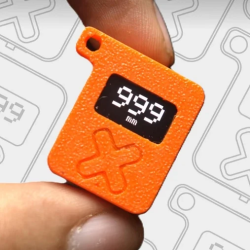
The Playdate is an interesting gaming system. It’s a handheld, has a black and white screen, and superficially reminds us a little bit of the original Game Boy, right down to the button layout. But the fact that it has a second controller that pops out of the side, that this controller is a crank, and that the whole system was made by the same people that made Untitled Goose Game, makes us quite intrigued. Apparently it has made an impact on others, too, because this project turns the gaming system into a typewriter.

The Playdate doesn’t have native support for USB accessories unless it’s plugged into this custom 3D printed dock. Inside of the dock is a Teensy 4.1 which handles some translation between the keyboard and the console. Once the dock is taken care of the text editor needs to be side-loaded to the device as well. The word processor has the ability to move the cursor around, insert and delete text, and the project’s creator, [t0mg], plans to add more features in future versions like support for multiple files, changing the font, and a few other things as well.

For anyone interested in recreating this project, all of the printable files, the text editor, and the schematics are all available in the GitHub repo. It’s an impressive project for a less well-known console that we haven’t seen many other hacks for, unless you count this one-off Arduboy project which took some major inspiration from the Playdate’s crank controller.

Automatic Flag Waver Lets You Show Your Loyalty Without Getting Tired

A flag is a great tool to show your loyalty to a country, a sports team or even a philosophical movement. But there’s not so much you can actually do with a flag: you can either hang it somewhere, or wave it around to attact others to your cause. [Mellow] found that waving quickly becomes tiresome, and decided to design a machine that automates this task for him.

A man holding a device that waves two small rainbow flagsNow there’s a bit more involved in designing a proper flag-waver than simply moving the flag back and forth. Ideally, the fabric should flow smoothly from side to side and show both sides equally, in the same way a human would do when waving a big flag around. After a bit of research [Mellow] decided on a design that generates a rather complex motion using just a single servo: the mast is tilted from left to right, while gravity ensures the flag rotates around its axis. It’s probably best demonstrated visually, as [Mellow] does in the video embedded below.

The flag-waving mechanism is designed in Fusion 360 and 3D printed using white filament. Inside a little square box is a Wemos D1 Mini, powered by a lithium battery scavenged from a vape pen, as well as a battery management system and a power switch. The servo sits on top of the box and holds the flag in a little socket that allows the mast to rotate freely. [Mellow] also went one step further and built a two-flag waver, which still uses only one servo but creates two opposite motions through a set of spur gears. Both waver types bring a lively atmosphere to their surroundings, and we can actually imagine them being useful in places like sports bars.

Automatic flag-wavers are still rare devices, and as far as we can tell this is only the second one we’ve seen, after this hat-mounted example. That is, if you don’t count the automatic “flag” on this mailbox.

Continue reading “Automatic Flag Waver Lets You Show Your Loyalty Without Getting Tired”

A 3D Printed Ratchet That Can Really Take The Torque

Printed tools aren’t exactly known for their durability, but [Gladius] shows us that with some thoughtful design, it’s possible to print a ratcheting wrench that can handle surprising amounts of torque.

Look closely, and you can see that the parts are almost entirely made up of perimeters (click to enlarge).

This particular wrench is inspired by NASA’s 3D printed ratcheting wrench, and also from an early 1900s design. It sports a 1/2 inch square socket into which modern adapters can be fitted, allowing those steel parts to do their job while the wrench itself delivers the muscle.

[Gladius] found that the strongest results came from slicing parts — especially the handle — so that they come out consisting almost entirely of perimeters, with virtually no traditional infill. Want to know more? There’s a discussion on reddit where [Gladius] goes into added detail about measurements and performance.

Over the years, we’ve seen our share of powerful prints. For example, what the Crimson Axlef*cker can do looks downright intimidating. Speaking of printing things that move, we want to remind you about this handy tip for easily and reliably joining motor shafts to printed parts by (mis)using jaw couplings.

Organizational Inspiration From The Discount Tool Company

When in need of any tool to get a job done quickly, or only for a small number of times, it’s great to have a local “discount tool” company locally for some working, yet often low-quality solution to whatever problem might arise. While there are some gems, most of these tools won’t last through heavy, sustained use like their more expensive counterparts will. On the other hand, there are other things to be had at these discount shops, such as inspiration for tackling a storage problem.

This particular storage system comes from Harbor Freight, and uses a set linked crosshairs, the center of which is hollowed out. A set of movable compartments sits on top with feet that can interlock inside the crosshairs. This allows much more efficient use of space within the toolboxes, but [Alan] wanted it to be useful for more that that. He designed and implemented the Storage Case Base Template (SCBT) which allows for a container of any size to be fitted with a similar crosshair network.

With this non-proprietary system implemented and printed, the original goal of reducing the clutter in [Alan]’s workspace was accomplished. The 3D printing files can be modified easily for any space, and are available both on Thingiverse and Printables. For some other ways of packing a lot into a small space, we featured this tiny workshop a while back that’s packed with storage hacks.