A Nintendo 64 controller with a USB adapter

Play N64 Games The Right Way With This Classic Controller Adapter

Game consoles typically support a limited number of input devices, meaning that console games are often completely optimized for the default controller supplied with that platform. Nintendo’s tendency to completely reinvent their controllers pretty much every generation can therefore become a little irritating, especially when they also enable their newer consoles to play games from their back catalog. So when [Robson Couto] found that using the Switch’s Joy-Cons was a bit awkward for playing emulated Nintendo 64 games, he decided to figure out how to connect real N64 controllers to a Nintendo Switch.

While you can buy modern N64-style controllers for the Switch, even straight from Nintendo themselves, [Robson] thought it would be way more interesting to reuse an old controller and implement the translation step from scratch. In the video (embedded below) he takes a deep dive into all the timing details of the N64 controller protocol, which is basically a 1-wire setup, and explains how to use an STM32F411 BlackPill board to read out the controller’s buttons and joystick.

Next, he explores how to map the resulting data to the USB HID protocol used by the Switch. Most of the buttons have a clear one-on-one mapping, but since the “minus”, “capture” and “home” buttons are missing on the N64 controller, he chose to map these to button combinations unlikely to be used during regular gameplay. [Robson] also ran into the common issue of the analog joystick having a poorly-defined maximum range, for which he added a rudimentary auto-calibration feature.

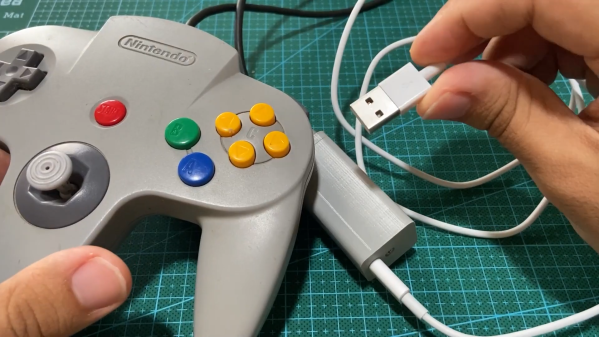
Finally, he designed and 3D-printed a neat enclosure for his system with an N64 controller port on one side and a USB port on the other. By 3D-printing the whole thing he also avoided having to either source the non-standard connector or permanently modify his hardware. The end result of [Robson]’s project is an unobtrusive gadget that connects classic controllers to modern hardware – but of course, the reverse process is very much possible, too. If you want, you can even play N64 games with a mouse and keyboard.

Continue reading “Play N64 Games The Right Way With This Classic Controller Adapter”

2023 Hackaday Prize: The Primordial Soup’s On With This Modified Miller-Urey Experiment

It’s a pretty sure bet that anyone who survived high school biology has heard about the Miller-Urey experiment that supported the hypothesis that the chemistry of life could arise from Earth’s primordial atmosphere. It was literally “lightning in a bottle,” with a mix of gases like methane, ammonia, hydrogen, and water in a closed-loop glass apparatus and a pair of electrodes to provide a spark to simulate lightning lancing across the early prebiotic sky. [Miller] and [Urey] showed that amino acids, the building blocks of protein, could be cooked up under conditions that existed before life began.

Fast forward 70 years, and Miller-Urey is still relevant, perhaps more so as we’ve extended our reach into space and found places with conditions similar to those on early Earth. This modified version of Miller-Urey is a citizen science effort to update the classic experiment to keep up with those observations, plus perhaps just enjoy the fact that it’s possible to whip up the chemistry of life from practically nothing, right in your own garage. Continue reading “2023 Hackaday Prize: The Primordial Soup’s On With This Modified Miller-Urey Experiment”

Listening To The ISS On The Cheap

Like any hobby, amateur radio has no upper bounds on what you can spend getting geared up. Shacks worth tens of thousands of dollars are easy to come by, and we’ll venture a guess that there are hams out there pushing six figures with their investment in equipment. But hands down, the most expensive amateur radio station ever has to be the one aboard theĀ  International Space Station.

So what do you need to talk to a $100 billion space station? As it turns out, about $60 worth of stuff will do, as [saveitforparts] shows us in the video below. The cross-band repeater on the ISS transmits in the 70-cm ham band, meaning all that’s needed to listen in on the proceedings is a simple “handy talkie” transceiver like the $25-ish Baofeng shown. Tuning it to the 437.800-MHz downlink frequency with even a simple whip antenna should get you some reception when the ISS passes over.

In our experience, the stock Baofeng antenna isn’t up to the job, so something better like the Nagoya shown in the video is needed. Better still is a three-element Yagi tuned down slightly with the help of a NanoVNA; coupled with data on when the ISS will be within line-of-sight, picking up the near-constant stream of retransmissions from the station as Earth-based hams work it should be a snap — even though [saveitforparts] only listened to the downlink frequency here, for just a bit more of an investment it’s also possible for licensed hams to uplink to the ISS on 145.900 MHz.

For those who want a slightly higher level of difficulty, [saveitforparts] also has some tips on automating tracking with an old motorized mount for CCTV cameras. Pitchfork notwithstanding, it’s not the best antenna tracker, but it has promise, and we’re eager to see how it pans out — sorry. But in general, the barrier to entry for getting into space communications is so low that you could easily make this a weekend project. We’ve been discussing this and other projects on the new #ham-shack channel over on the Hackaday Discord. You should pop over there and check it out — we’d be happy to see you there.

Continue reading “Listening To The ISS On The Cheap”

Crafting Ribbon Cables For Retro Hardware

Building a modern computer is something plenty of us have done, and with various tools available to ensure that essentially the only thing required of the end user is to select parts and have them delivered via one’s favorite (or least expensive) online retailer. Not so with retro hardware, though. While some parts can be found used on reselling sites like eBay, often the only other option is to rebuild parts from scratch. This is sometimes the best option too, as things like ribbon cables age poorly and invisible problems with them can cause knock-on effects that feel like wild goose chases when troubleshooting. Here’s how to build your own ribbon cables for your retro machines.

[Mike] is leading us on this build because he’s been working on an old tower desktop he’s calling Rosetta which he wants to be able to use to host five different floppy disk types and convert files from one type to another. Of course the old hardware and software being used won’t support five floppy disk drives at the same time so he has a few switches involved as well. To get everything buttoned up neatly in the case he’s building his own ribbon cables to save space, especially since with his custom cables he won’t have the extraneous extra connectors that these cables are famous for.

Even though, as [Mike] notes, you can’t really buy these cables directly anymore thanks to the technology’s obsolescence, you can still find the tools and parts you’d need to create them from scratch including the ribbon, connectors, and crimping tools. Even the strain relief for these wide, fragile connectors is available and possible to build into these projects. It ends up cleaning up the build quite nicely, and he won’t be chasing down any gremlins caused by decades-old degraded multi-conductor cables. And, even though [Mike] demonstrated the floppy disk drive cables in this build, ribbon cable can be used for all kinds of things including IDE drive connectors and even GPIO cables for modern electronics projects.

Continue reading “Crafting Ribbon Cables For Retro Hardware”

Using FreeCAD To Replace OEM Parts

As much as we might all like it if manufacturers supported their products indefinitely with software updates or replacement parts, this just isn’t feasible. Companies fail or get traded, technologies evolve, and there’s also an economic argument against creating parts for things that are extremely old or weren’t popular in the first place. So, for something like restoring an old car, you might have to resort to fabricating replacement parts for your build on your own. [MangoJelly] shows us how to build our own replacement parts in FreeCAD in this series of videos.

The build does assume that the original drawings or specifications for the part are still available, but with those in hand FreeCAD is capable of importing them and then the model scaling to match the original specs shown. This video goes about recreating a hinge on an old truck, so with the drawings in hand the part is essentially traced out using the software, eventually expanding it into all three dimensions using all of the tools available in FreeCAD. One of the keys to FreeCAD is the various workbenches available that all have their own sets of tools, and being able to navigate between them is key to a build like this.

FreeCAD itself is an excellent tool for anyone repairing old vehicles like this or those making 3D prints, designing floorplans for houses, or really anything you might need to model in a computer before bringing the idea into reality. It does have a steep learning curve (not unlike other CAD software) so it helps to have a video series like this if you’re only just getting started or looking to further hone your design skills, but the fact that it’s free and open-source make it extremely attractive compared to its competitors.

Continue reading “Using FreeCAD To Replace OEM Parts”

What Do You Want In A Programming Assistant?

The Propellerheads released a song in 1998 entitled “History Repeating.” If you don’t know it, the lyrics include: “They say the next big thing is here. That the revolution’s near. But to me, it seems quite clear. That it’s all just a little bit of history repeating.” The next big thing today seems to be the AI chatbots. We’ve heard every opinion from the “revolutionize everything” to “destroy everything” camp. But, really, isn’t it a bit of history repeating itself? We get new tech. Some oversell it. Some fear it. Then, in the end, it becomes part of the ordinary landscape and seems unremarkable in the light of the new next big thing. Dynamite, the steam engine, cars, TV, and the Internet were all predicted to “ruin everything” at some point in the past.

History really does repeat itself. After all, when X-rays were discovered, they were claimed to cure pneumonia and other infections, along with other miracle cures. Those didn’t pan out, but we still use them for things they are good at. Calculators were going to ruin math classes. There are plenty of other examples.

This came to mind because a recent post from ACM has the contrary view that chatbots aren’t able to help real programmers. We’ve also seen that — maybe — it can, in limited ways. We suspect it is like getting a new larger monitor. At first, it seems huge. But in a week, it is just the normal monitor, and your old one — which had been perfectly adequate — seems tiny.

But we think there’s a larger point here. Maybe the chatbots will help programmers. Maybe they won’t. But clearly, programmers want some kind of help. We just aren’t sure what kind of help it is. Do we really want CoPilot to write our code for us? Do we want to ask Bard or ChatGPT/Bing what is the best way to balance a B-tree? Asking AI to do static code analysis seems to work pretty well.

So maybe your path to fame and maybe even riches is to figure out — AI-based or not — what people actually want in an automated programming assistant and build that. The home computer idea languished until someone figured out what people wanted to do with them. Video cassette didn’t make it into the home until companies figured out what people wanted most to watch on them.

How much and what kind of help do you want when you program? Or design a circuit or PCB? Or even a 3D model? Maybe AI isn’t going to take your job; it will just make it easier. We doubt, though, that it can much improve on Dame Shirley Bassey’s history lesson.

3D Printing LEGO-like Blocks

LEGO are perhaps the perfect children’s toy, at least until you step on the errant brick while walking around the house. Available in all kinds of sets with varying themes and characters, they encourage building and creativity in kids like no other. Those with 3D printers might have considered creating their own specialty blocks, but the manufacturing of real LEGO blocks involves steel molds with extremely tight tolerances far outside the realm of most 3D printers. To print blocks capable of interconnecting in a similar way involves taking advantage of the characteristics of 3D printers and their materials instead, as [CNC Kitchen] demonstrates with these PrintABloks.

The PrintABlok was the idea of [Joe Larson] aka [3D Printing Professor] and is built around a one-unit base block, which has holes on all of its sides, paired with small connecting pieces which are placed in the holes to connect the various blocks to one another. Using your CAD software of choice (although they were originally built using Blender), the base block can be lengthened or widened for printing various different types of blocks, and the diamond-shaped hole can even be added to various prints that aren’t blocks at all. This means that a wide variety of parts can be made, all designed to interlock with the bricks or various other shapes. [Joe] even created an array of themed sets like robots, castles, and dinosaurs and although he sells these more complex models, he released his base set and interconnection mechanism for free and is available for anyone to use.

Another perk of the PrintABlok system is that they are scalable, mitigating safety risks for smaller children that might try to swallow some of the smaller parts. It’s an excellent way to put the 3D printer to work if there are any children around in the house. But this isn’t the only LEGO-inspired build we’ve ever seen, and they aren’t always going to be used to make children’s toys. [Ivan] recently used similar 3D-printed interlocking bricks more in the style of LEGO Technic to attempt to build a human-rideable go-kart.

Continue reading “3D Printing LEGO-like Blocks”