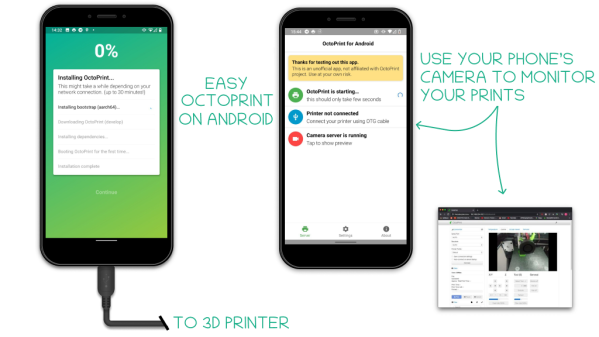
3D printer owners have for years benefitted from using Octoprint to help manage their machines, and most people run Octoprint on a Raspberry Pi. [Martijn] made it run on his PinePhone instead, which turned out to be a surprisingly good fit for his needs.
While [Martijn] was working out exactly what he wanted and taking an inventory of what Raspberry Pi components and accessories it would require, it occurred to him that his PinePhone — an open-source, linux-based mobile phone — would be a good candidate for his needs. It not only runs Linux with a touchscreen and camera, but even provides USB, ethernet, and separate DC power input via a small docking bar. It looked like the PinePhone had it all, and he was right. [Martijn]’s project page gives a walkthrough of the exact steps to get Octoprint up and running, and it even turns out to not be particularly difficult.
[Martijn] is no stranger to hacking his PinePhone to do various things; we’ve already seen him add thermal imaging to his PinePhone. For those of you who are intrigued by the idea but don’t own a PinePhone? Check out the octo4a project, which allows running Octoprint on Android phone hardware.

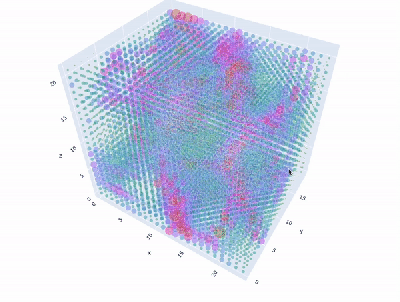 Granted, based as it is on the gantry of an old 3D printer, [Neumi]’s WiFi scanner has a somewhat limited work envelope. A NodeMCU ESP32 module rides where the printer’s extruder normally resides, and scans through a series of points one centimeter apart. A received signal strength indicator (RSSI) reading is taken from the NodeMCU’s WiFi at each point, and the position and RSSI data for each point are saved to a CSV file. A couple of Python programs then digest the raw data to produce both 2D and 3D scans. The 3D scans are the most revealing — you can actually see a 12.5-cm spacing of signal strength, which corresponds to the wavelength of 2.4-GHz WiFi. The video below shows the data capture process and some of the visualizations.