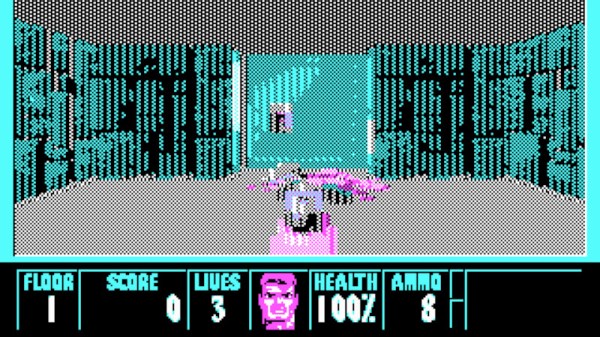
Bringing Up An Old Motherboard Is A Delicate Process

If you were around for the early days of the personal computer revolution, you’ll no doubt recall the excitement every time IBM announced a new version of its beige boxes. For a lot of us, the excitement was purely vicarious, for despite the “personal” moniker, mere mortals could rarely afford a branded IBM machine. But it was still cool to keep track of the latest releases, and dream of the days when cheap clones would make it possible to play.

[Anders Nielsen]’s recent find of an original IBM Model 5160 motherboard sort of echoes that long-ago excitement, but in a different way. This board, from a PC XT built in 1984, was in unknown condition upon arrival, so [Anders] set about a careful process to try to bring the board back to life. A quick visual inspection leaves one with a sense of both how much things have changed, and how much they’ve stayed the same. Aside from the big 40-pin DIP 8088 CPU and the BIOS ROMs, the board is almost completely populated with discrete logic chips, but at the same time, the basic footprint of a motherboard has changed very little.

The bring-up process in the video below includes checks of all the power rails for shorts, which ended up being a good call — drat those tantalums. After fixing that issue, [Anders] had a bit of trouble getting the board to POST, and eventually resorted to dumping the BIOS ROMs and inspecting the contents. One of the chips had picked up a case of the scramblies at some point, which was easy enough to fix thanks to images of the 5160 ROMs available online. We thought the trick of using a 64k ROM and just writing the BIOS image twice was pretty clever.

In the end, the board came up, although without video or keyboard — that’s for another day. Can’t find your own PC XT motherboard to play with? Then maybe you can just build one.

Continue reading “Bringing Up An Old Motherboard Is A Delicate Process”

Building Your Own 8088 XT Motherboard

There was a time when an XT-class motherboard — like the old IBM PC with an 8088 CPU — was a high-tech accomplishment. Now, something like that is easily within reach of the average hobby lab. [Homebrew8088] did it, and it looks surprisingly simple, especially compared to what passes for a motherboard these days.

The board will take an 8088 or one of the NEC chips and by default sports 512 K of RAM, a few ISA slots, a PC speaker, a USB hard drive, and a PS/2 keyboard connector. The board will fit in an ATX case. Not bad. You can see a video of the board below.

In fact, the channel has a lot of related videos and the main site has many interesting topics, like driving an 8088 or 8086 from a Raspberry Pi. The GitHub site has design files for KiCad along with a lot of other information. Some of this will be interesting even if you are just trying to repair an old motherboard or would like to design a new ISA card.

If you want to know why the PC used an 8088 instead of an 8086, we just covered that. What are you going to do with an old XT computer? How about IRC?

Continue reading “Building Your Own 8088 XT Motherboard”

How The IBM PC Went 8-Bit

If you were around when the IBM PC rolled out, two things probably caught you by surprise. One is that the company that made the Selectric put that ridiculous keyboard on it. The other was that it had an 8-bit CPU onboard.  It was actually even stranger than that. The PC sported an 8088 which was a 16-bit 8086 stripped down to an 8 bit external bus. You have to wonder what caused that, and [Steven Leibson] has a great post that explains what went down all those years ago.

Before the IBM PC, nearly all personal computers were 8-bit and had 16-bit address buses. Although 64K may have seemed enough for anyone, many realized that was going to be a brick wall fairly soon. So the answer was larger address buses and addressing modes.

Intel knew this and was working on the flagship iAPX 432. This was going to represent a radical departure from the 8080-series CPUs designed from the start for high-level languages like Ada. However, the radical design took longer than expected. The project started in 1976 but wouldn’t see the light of day until 1981. It was clear they needed something sooner, so the 8086 — a 16-bit processor clearly derived from the 8080 was born. Continue reading “How The IBM PC Went 8-Bit”

Translate Your CP/M Code To 8086, And Leave The 1970s Behind!

“Bring our home computing out of the 1970s and into the 1980s and beyond” is the irresistible promise made by the creator of 8088ify, a piece of software which translates CP/M executables from their 8080-based originals to assembler code that should run on an 8088 under MS/DOS. How can we resist such a futuristic promise here in 2021, even though the code wasn’t written to the sound of Donna Summer or the Village People back in the day but here in 2021 for PCjam, a celebration of the original IBM PC’s 40th anniversary.

As the writer of this code [ibara] points out that Intel intended the 8088 to be a ready upgrade path for the 8080, and designed its instruction set while not directly compatible, to make translation between the two a straightforward process. There was commercial software for the task at the time, but to this day there remained nothing with an open-source licence. It’s written in ANSI C for portability across platforms and compilers, and can even be compiled under CP/M itself.

PCjam is well worth a look, and if any of you fancy a go at writing for the earliest MS-DOS machines we’d like to suggest you create something for it. Meanwhile if you’d like to explore CP/M, you can run a bare metal emulator on the Raspberry Pi.

Header: Thomas Nguyen, CC BY-SA 4.0.

An NEC V20 For Two Processors In One SBC

In the days when the best an impoverished student could hope to find in the way of computing was a cast-off 1980s PC clone, one upgrade was to fit an NEC V20 or V30 processor in place of the Intel 8088 or 8086. Whether it offered more than a marginal advantage is debatable, but it’s likely that one of the chip’s features would never have been used. These chips not only supported the 8086 instruction set, but also offered a compatibility mode with the older 8080 processor. It’s a feature that [Just4Fun] has taken advantage of, with V20-MBC, a single board computer that can run both CP/M-86 and CPM/80.

If this is starting to look a little familiar then it’s because we’ve featured a number of [Just4Fun]’s boards before. The Z80-MBC2 uses the same form factor, and like this V20 version, it has one of the larger ATMega chips taking place of the acres of 74 chips that would no doubt have performed all the glue logic tasks of the same machine had it been built in the early 1980s. There is a video of the board in action that we’ve placed below the break, showing CP/M in ’80, ’86, and even ’80 emulated in ’86 modes.

The only time a V20 has made it here before, it was in the much more conventional home of a home-made PC.

Continue reading “An NEC V20 For Two Processors In One SBC”

Bootstrapping An MSDOS Assembler With Batch Files

You have a clean MSDOS system, and you need to write some software for it. What do you do? You could use debug, of course. But there are no labels so while you can get machine code from mnemonics, you’ll still need to figure out the addresses on your own. That wasn’t good enough for [mniip], who created an assembler using mostly batch files. There are a few .COM files and it looks as if the first time you use debug to create those, but there’s also source you can assemble on subsequent builds with the assembler.

Why? We aren’t entirely sure. But it is definitely a hack. The technique sort of reminded us of our own universal cross assembler — sort of.

Continue reading “Bootstrapping An MSDOS Assembler With Batch Files”

Universal Chip Analyzer: Test Old CPUs In Seconds

Collecting old CPUs and firing them up again is all the rage these days, but how do you know if they will work? For many of these ICs, which ceased production decades ago, sorting the good stuff from the defective and counterfeit is a minefield.

Testing old chips is a challenge in itself. Even if you can find the right motherboard, the slim chances of escaping the effect of time on the components (in particular, capacitor and EEPROM degradation) make a reliable test setup hard to come by.

Enter [Samuel], and the Universal Chip Analyzer (UCA). Using an FPGA to emulate the motherboard, it means the experience of testing an IC takes just a matter of seconds. Why an FPGA? Microcontrollers are simply too slow to get a full speed interface to the CPU, even one from the ’80s.

So, how does it actually test? Synthesized inside the FPGA is everything the CPU needs from the motherboard to make it tick, including ROM, RAM, bus controllers, clock generation and interrupt handling. Many testing frequencies are supported (which is helpful for spotting fakes), and if connected to a computer via USB, the UCA can check power consumption, and even benchmark the chip. We can’t begin to detail the amount of thought that’s gone into the design here, from auto-detecting data bus width to the sheer amount of models supported, but you can read more technical details here.

The Mojo v3 FPGA development board was chosen as the heart of the project, featuring an ATmega32U4 and Xilinx Spartan 6 FPGA. The wily among you will have already spotted a problem – the voltage levels used by early CPUs vary greatly (as high as 15V for an Intel 4004). [Samuel]’s ingenious solution to keep the cost down is a shield for each IC family – each with its own voltage converter.

Continue reading “Universal Chip Analyzer: Test Old CPUs In Seconds”