Building A Faux Retro Portable Computer

The modern laptop has its origins in the mid to late 1980s, when shrinking computer hardware and improvements to battery technology finally made mobile computing practical. But before the now iconic clamshell form factor became the standard, there was a market for so-called “portable” computers. These machines often resembled pieces of luggage with keyboards attached, and even at their peak, they were nowhere near as practical as today’s ultra-thin notebook computers. But for the more nostalgic among us, these vintage portables do have a special sort of charm about them.

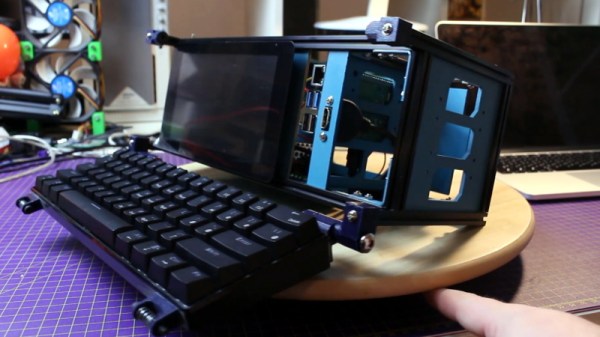
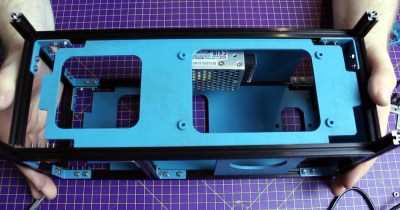
Looking to recapture some of that magic with modern components, [davedarko] has started working on his own Raspberry Pi portable computer. Just like those machines of yore, his build is designed to be a self-contained computing experience that you can lug around, but not exactly something you’d be popping open on the train. Its extruded aluminum frame holds the display, power supply, and audio hardware, with plenty of room to spare for additional hardware should he decide to pack in a couple hard drives or something more exotic.

The skeletal frame has plenty of room for activities.

We particularly like the 3D printed hinge and lock mechanism he designed that holds the keyboard closed against the front of the frame. Sufficiently old experienced readers will recall this particular feature being a defining characteristic of portables such as the Osborne 1 and Compaq Portable, and it’s great to see it included here. All it needs now is a leather handle on the side to complete the look.

[davedarko] still has some work ahead of him, as ultimately he’d like to completely enclose his computer’s frame with laser cut panels. But the build is certainly progressing nicely, and frankly, it’s already at the point where we’d have no problem pulling it out at the next hackerspace meetup. Between builds like this and the growing collection of cyberdecks we’ve covered recently, it looks as though 1980s design aesthetic is alive and well within the hacker community.

Continue reading “Building A Faux Retro Portable Computer”

A Real All-In-One Printer Should Have A Computer In It, Too

With printers generally being cheaper to replace than re-ink, there are plenty of cast-offs around to play with. They’re a great source for parts, but they’re also tempting targets for repurposing for entirely new uses. Sure, you could make a printer into a planter, but slightly more useful is this computer built into a printer that still prints.

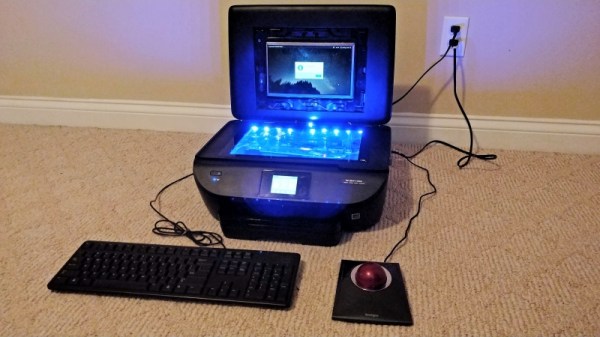
This build is [Mason Stooksbury]’s earlier and admittedly useless laptop-in-a-printer build, which we covered a few months back. It’s easy to see where he got his inspiration, since the donor printer’s flip-up lid is a natural for mounting a display, and the capacious, glass-topped scanner bed made a great place to show off the hybrid machine’s guts. But having a printer that doesn’t print didn’t sit well with [Mason], so Comprinter II was born. This one follows the same basic approach, with a Toshiba Netbook stuffed into an H-P ENVY all-in-one. The laptop’s screen was liberated and installed in the printer’s lid, the motherboard went into the scanner bay along with a fair number of LEDs. This killed the scanner but left the printer operational, after relocating a power brick that was causing a paper jam error.

[Mason]’s Comprinter II might not be the next must-have item, but it certainly outranks the original Comprinter on the utility spectrum. Uselessness has a charm of its own, though; from a 3D-printed rotary dial number pad to a useless book scanner, keep the pointless projects coming, please.

This Computer Mouse Houses A Mouse Computer

Everyone has heard of a computer mouse before, but what about a mouse computer?

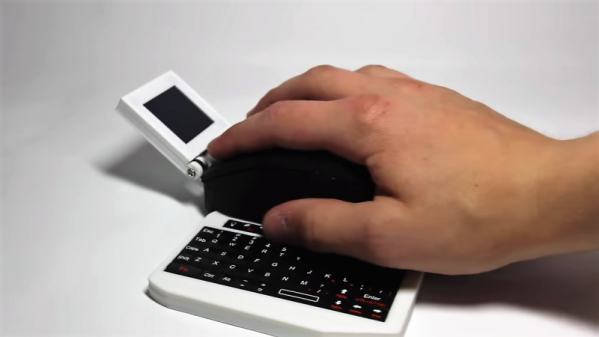
Granted, [Electronic Grenade]’s all-in-one computer in an oversized mouse-shaped case is almost without practical value. But that’s hardly the point, which was just to do something cool. Inspiration came from keyboards stuffed with a Raspberry Pi to make a mostly-all-in-one machine; this Rodent of Unusual Size is the next logical step. With a Pi Zero W and a LiPo battery alongside a mouse mechanism inside the 3D-printed case – alas, no real mouse currently on the market would house everything – the computer sports not only a tiny and nearly-usable LCD display, but also a slide-out Bluetooth keyboard. The ergonomics of a keyboard at right angles to the display gives us pause, but again, usability is not the point. And don’t expect much in the performance department – the rig barfs after a few seconds of playing Minecraft.

Still, for all its limitations, this mouse computer has a certain charm. We always enjoy “just because I can” projects, whether they be a Gameboy ukelele or a fire-breathing animatronic duck. Such projects are often valuable not for what they produce, but for pushing into areas where no one has gone before.

Continue reading “This Computer Mouse Houses A Mouse Computer”

Friend In Need Gets Junk Bin PC For Cramped Quarters

If you doubt the power of the Hackaday community, check this one out. Stalwart reader and tipster [starhawk] has pitched in to help a friend in need, someone he met through Hackaday.io. Seems this friend’s current living arrangements are somewhat on the cramped side, and while he’s in need of a PC, even a laptop would claim too much space.

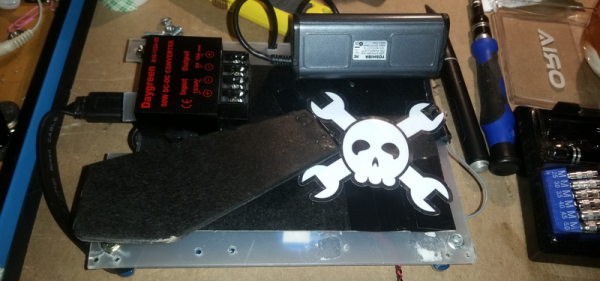
So with a quick trip to the store and a few items from the junk bin, [starhawk] whipped up an all-in-one PC the size of a tablet for his friend. As impressed as we are by the generosity, we’re more impressed by the quality of his junk bin. The heart of the compact machine is a motherboard from a Wintel CX-W8, scarcely larger than a Raspberry Pi model A. After the addition of a larger heatsink and fan, the board was attached via a sheet of plastic to the back of a 7-inch touchscreen, also a junk bin find. A cheap picture frame serves as the back of the all-in-one, complete with Jolly Wrencher, of course. Alas, the DC-DC converter was one of the only purchased items, bringing the cost for the build to all of $22, including the $15 for a wireless keyboard/touchpad on clearance from Walmart. After some initial power troubles, the fixes for which are described in this update, the machine was ready to ship.

Does this one seem familiar? It should — [starhawk] built a similar “laptop” for himself a while back when he was low on funds. Now it seems like he’s paying it forward, which we appreciate. For more details on how he pulled this all of, check out The Anytop, [starhawk’s] portable computer anyone can build. It was his 2017 Hackaday Prize entry!

Extreme Repair Of An All-in-One PC

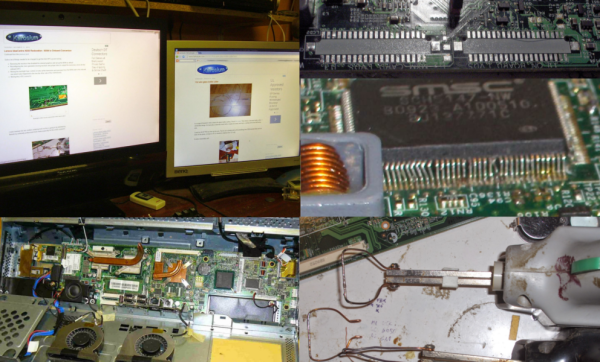
While browsing a local auction site, [Viktor] found himself bidding on a beat up Lenovo A600 all-in-one PC. He bid around $50 and won. Then came the hard part – actually making the thing work. The front glass was cracked, but the LCD was thankfully unharmed. The heat pipes looked like they had been attacked with monkey wrenches. The superIO chip’s pins were mangled, and worst of all, the MXM video card was dead.

The first order of business was to fix the superIO chip’s pins and a few nearby discrete components which had been knocked off their pads. Once that was done, [Viktor] was actually able to get the computer to boot into Linux from a USB flash drive. The next step was bringing up the display. [Viktor] only needed a coding station, so in addition to being dead, the video accelerator on the MXM wasn’t very useful to him. The Lenovo’s motherboard was designed to support video on an MXM card or internal video. Switching over meant changing some driver settings and moving a few components, including a rather large LVDS connector for the display itself. A difficult task, compounded by the fact that [Viktor’s] soldering tools were a pair of soldering guns that would be better suited to fixing the bodywork on a ’57 Chevy. He was able to fashion a hot wire setup of sorts, and moved the connector over. When he was done, only one tiny solder bridge remained!

The end result is a new coding battle station for [Viktor] and a computer which was a basket case is saved from the landfill. If you like this hack, check out [Viktor’s] low power PSU, or his 1 wire network!

Laptop To All-in-one PC Conversion

laptop2allinone

You probably have an old laptop shoved into a far, dark corner of your closet, gathering dust as it sits there alone and unwanted. Show it some love like [Oakkar7] and hack it into a desktop all-in-one PC. He had his work cut out for him, though: dead motherboard, busted case, worthless battery. [Oakkar7] starts by taking the case apart and removing the LCD screen. He removes the motherboard to discover two toasted capacitors in need of replacement. A short solder job later and the computer springs to life.

[Oakkar7] needs the LCD to face outwards while sitting against the rest of the laptop. The connecting cable doesn’t reach, so he carefully removes it, and flips it around to get the extra length needed. The final step is to fashion some aluminum support bars that attach to the bottom of the case, which mount onto another aluminum stand holding everything upright. At this point [Oakkar7] has tossed the battery, the keyboard, both the CD and floppy drive (yes it’s that old), and moved the speakers into the battery’s former home. For the finishing touch, a USB hub provides connections for the new keyboard, mouse and a Wifi dongle.

[Oakkar7] shared his project with us after reading [Elad’s] ground control station laptop conversion. Maybe these two projects can convince you to save a neglected laptop.

Separating A Working Scanner From Its Broken Printer

The laser printer portion of this all-in-one machine gave up the ghost and [Entropia] couldn’t get it working again. But the scanner was still functioning so he decided to separate the scanner from its dead printer module.

The model in question is a Samsung SCX-4200. The design is actually perfect for separation because the scanner sits on top of the out feed tray of the printer. It can even be lifted to allow more room for printed pages to pile up. All he has to do is separate the hinged connector and reroute the flat cables. But the real question in [Entropia’s] mind was whether or not the control board would work without the laser printer components connected to it.

He carefully disassembled the unit, spilling toner here and there which is left over from a catastrophic knock-off toner cartridge incident. A quick test showed him that although the drivers complain that the paper tray is open, the scanner does still work. He glued the controller board seen on the left to the bottom of the scanner enclosure, and added some felt feet. Now his scanner is closer to the size you’d expect. And on the plus side he gained a geared stepper motor, laser scanning unit, exhaust fan, and a couple of solenoids to use in future projects.