A Macro Keyboard In A Micro Package

Remember back in the early-to-mid 2000s when pretty much every cheap USB keyboard you could find started including an abundance of media keys in its layout? Nowadays, especially if you have a customized or reduced-sized mechanical keyboard, those are nowhere to be seen. Whenever our modern selves need those extra keys, we have to turn to external peripherals, and [Gary’s] Knobo is one that looks like it could’ve come straight out of a fancy retail package.

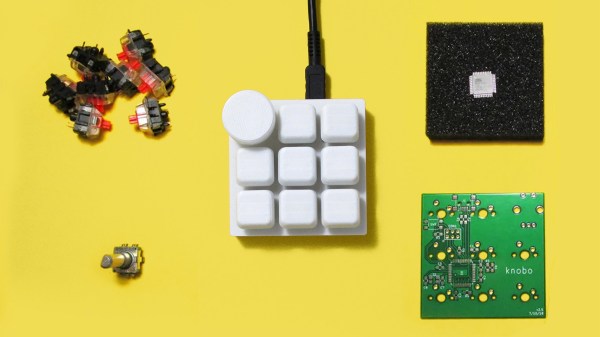
The Knobo is a small macro keypad with 8 mechanical Cherry-style keys and a clickable rotary encoder knob as its main feature. Each key and knob gesture can be customized to any macro, and with five gestures possible with the knob, that gives you a total of thirteen inputs. On top of that, the build and presentation look so sleek and clean we’d swear this was a product straight off of Teenage Engineering’s money-printing machine.

The actions you can do with those inputs range from simple media controls with a volume knob all the way to shortcuts to make a Photoshop artist’s life easier. Right now you can only reprogram the Knobo’s Arduino-based firmware with an In-Circuit Serial Programmer to change what the inputs do, but [Gary] is currently working on configuration software so that users without any programming knowledge will be able to customize it too.

Knobs are just one of those things that everyone wants to use to control their computers, much like giant red buttons. Alternative input devices can range from accessibility-designed to just downright playful. Whatever the inspiration is for them, it’s always nice to see the creativity of these projects.

Continue reading “A Macro Keyboard In A Micro Package”

Arduino Leonardo Gets A Lockable Bootloader

Security is something that’s far too often overlooked in embedded devices. One of the main risks is that if the device doesn’t verify the authenticity of incoming firmware updates. [Walter Schreppers] was working on a USB password storage device, so security was paramount. Thus, it was necessary to develop a secure bootloader.

[Walter]’s device was based upon the Arduino Leonardo. Starting with the Caterina bootloader, modifications were made to enable the device to be locked and unlocked for programming. This can be done in a variety of ways, depending on how things are setup. Unlocking can be by using a secret serial string, an onboard jumper, and [Walter] even suspects a SHA1 challenge/response could be used if you were so inclined.

It’s never too soon to start thinking about security in your projects. After all, we must stave off the cyberpunk future in which leather-clad youths flick all your lights on and off before burning your house down in the night by overclocking the water heater. Naturally, we’ve got a primer to get you going in the right direction. Happy hacking!

Vintage Atari Becomes Modern Keyboard

The modern keyboard enthusiast is blessed with innumerable choices when it comes to typing hardware. There are keyboards designed specifically for gaming, fast typing, ergonomics, and all manner of other criteria. [iot4c] undertook their own build for no other reason than nostalgia – which sounds plenty fun to us.

An Arduino Leonardo is pressed into service for this hack. With its USB HID capabilities, it’s perfectly suited for custom keyboard builds. It’s built into a working Atari 65XE computer, and connected to the keyboard matrix. The Keypad and Keyboard libraries are pressed into service to turn keypresses on the 80s keyboard into easily digseted USB data.

There’s plenty of room inside the computer for the added hardware, with the USB cable neatly sneaked out the rear. [iot4c] notes that everything still works and the added hardware does not cause any problems, as long as it’s not used as a computer and a keyboard at the same time.

It’s possible to do a similar hack on the Commodore 64, too. If you’re doing tricky keyboard builds yourself, you know where to send ’em.

Thomas The Terrifying Karaoke Robot

The junk bin can be a great source of inspiration, unless you’re too familiar with the contents to be imaginative with them. But thrift stores are another matter, like giant junk bins that are constantly replenished by underappreciated elves. You never know what kinds of goodies they will pile on the shelves, so it’s easy to become a fixture and visit them once or thrice a week.

[Hunter Irving] haunts a few choice thrift stores in his neighborhood, and a few months ago he found a knockoff Thomas the Tank Engine with an articulated face. It uses a simple mechanism to produce an impressive amount of movement, especially for a cheap knockoff toy. Both of its eyes slide sideways and its mouth opens, resulting in a very animated (and terrifying) range of expressions. Sensing an opportunity to turn his animatronic robot dreams into karaoke-singing nightmare fuel for the rest of us, he forked over a few bucks and took it home.

As luck would have it, a 9g micro servo fit perfectly in the back of the frightening little face. [Hunter] designed an axle to transfer motion to the face mechanism, but it broke almost immediately. We applaud his Plan B, though, which consists of a mounting block for the servo, and a cable tie armature connected with screws. Once that was sorted, [Hunter] designed a bulbous body for it in Blender.

This terrifying train-faced toy uses an Arduino Leonardo to read MIDI note-on and -off messages, and opens his mouth when appropriate to sing hit favorites in a smooth, speech-synthesized contralto. Pour yourself a strong beverage and enjoy the build/demo video after the break.

Interested in making your own? [Hunter] has all the files up on his Patreon page. For just $1, you can access the code, synth files, and STL files. While you’re there, you can also get the scoop on his Nintendo LABO waveform cards.

Continue reading “Thomas The Terrifying Karaoke Robot”

A Keyboard To Stomp On

Macros are useful things. They allow one to execute a series of commands with a single keypress. There exists a wide variety of hardware and software solutions to create and use macros to improve your workflow, and now [Evan] has brought the open-source ManyKey into the fray, along with a build tutorial to boot.

The tutorial acts as a great introduction to ManyKey, as [Evan] walks through the construction of a macro keyboard designed to be operated by the feet. Based around the Arduino Leonardo and using off-the-shelf footswitches commonly used in guitar effects, it’s accessible while still hinting at the flexibility of the system. Macros are programmed into the keyboard through a Python app which communicates over serial, and configurations are saved into the Arduino’s onboard EEPROM. The ManyKey source is naturally available over at GitHub.

[Evan] tells us he uses his setup to run DJ software with his feet while his hands are busy on the turntables. That said, there’s all manner of other applications this could be used for. Efficiency is everything, and we love to see keyboard projects that aim to improve workflow with new ideas and custom builds – this shortcut keyboard makes a great example.


Trackpad with Arduino PS/2-to-USB converter

Raspberry Pi Trackpad From Salvaged Trackpad Plus Arduino

Old laptops are easy to find and many have a trackpad with a PS/2 interface hardwired into the guts of the laptop. [Build It] wanted one of those trackpads for use in the DIY Raspberry Pi laptop he’s working on. But the Raspberry Pi has no PS/2 input, and he read that a PS/2 to USB adapter wouldn’t be reliable enough. His solution? Wire the trackpad to an Arduino and have the Arduino convert the trackpad’s PS/2 to USB.

After removing a few screws, he had the trackpad free of the laptop. Looking up the trackpad’s part number online he found the solder pads for data, clock and five volts. He soldered his own wires to them, as well as to the trackpad’s ground plane, and from there to his Arduino Pro Micro. After installing the Arduino PS/2 mouse and the Mouse and Keyboard libraries he wrote some code (see his Instructables page). The finishing touch was to use generous helpings of hot glue to secure all the wires, as well as the Arduino, to the back to the trackpad. By plugging a USB cable into the Arduino, he now had a trackpad that could plug in anywhere as a USB trackpad. Watch [Build It] put it all together step-by-step in the video below.

Continue reading “Raspberry Pi Trackpad From Salvaged Trackpad Plus Arduino”

Bootstrapping Motion Input With Cheap Components

Motion control is a Holy Grail of input technology. Who doesn’t want an interface that they can control with simple and natural movements? But making this feel intuitive to the user, and making it work robustly are huge hills to climb. Leap Motion has done an excellent job creating just such a sensor, but what about bootstrapping your own? It’s a fun hack, and it will give you much greater appreciation for the currently available hardware.

Let’s get one thing straight: This device isn’t going to perform like a Leap controller. Sure the idea is the same. Wave your hands and control your PC. However, the Leap is a pretty sophisticated device and we are going to use a SONAR (or is it really SODAR?) device that costs a couple of bucks. On the plus side, it is very customizable, requires absolutely no software on the computer side, and is a good example of using SONAR and sending keyboard commands from an Arduino Leonardo to a PC. Along the way, I had to deal with the low quality of the sensor data and figure out how to extend the Arduino to send keys it doesn’t know about by default.

The Plan

The plan is to take an inexpensive SONAR module (the HC-SR04) and an Arduino Leonardo and use it to perform some simple tasks by mimicking keyboard input from the user. The Leonardo is a key element because it is one of the Arduinos that can impersonate a USB keyboard (or mouse) easily. The Due, Zero, and Micro can also do the trick using the Arduino library.

I wanted to determine how many gestures I could really determine from the HC-SR04 and then do different things depending on the gesture. My first attempt was just to have the Arduino detect a few fingers or a hand over the sensor and adjust the volume based on moving your hand up or down. What I didn’t know is that the default Arduino library doesn’t send multimedia keys! More on that later.

Continue reading “Bootstrapping Motion Input With Cheap Components”