Build Some Entertainment For Young Holiday Guests

Need a good excuse to duck out on the family over the holidays and spend a few hours in your shop? [Jens] has just the thing. He built a color-mixing toy that looks great and we’d bet you have everything on-hand necessary to build your own version.

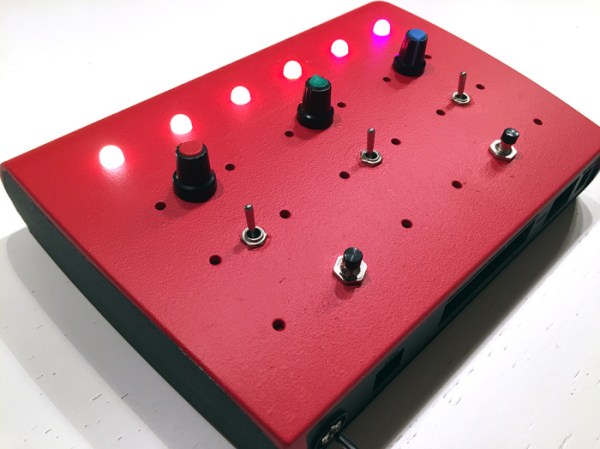
The body of the toy is an old router case. Who doesn’t have a couple might-be-broken-but-I-kept-it-anyway routers sitting around? Spray painted red, it looks fantastic! The plastic shell hosts 6 RGB LEDs, 3 toggle switches, and 2 buttons. [Jens] demonstrates the different features in the demo video below. They include a mode to teach counting in Binary, color mixing using the color knobs, and a few others.

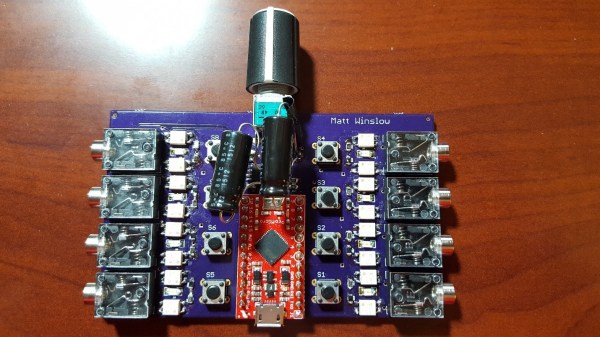
Everything is driven by an Arduino Pro Mini. The lights are APA106 LEDs; a 4-pin through-hole package version of the WS2812 pixels. You could easily substitute these for the surface mount varieties if you just hot glue them to the underside of the holes in the panel. We’d love to see some alternate arrangements for LEDs and a couple more push buttons for DIY Simon Says.

Continue reading “Build Some Entertainment For Young Holiday Guests”

RGB LED Ceiling Display

yP8PoV
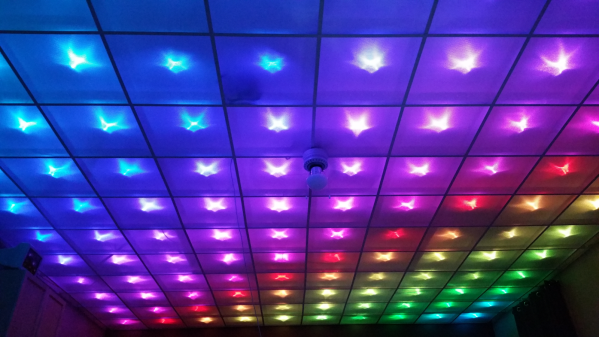
Disco Floor’s are passé. [dennis1a4] turned them upside down and built an awesome RGB LED ceiling display using some simple hardware and a lot of elbow grease. His main room ceiling was exactly 32 ft x 20 ft and using 2 sq. ft tiles, he figured he could make a nice grid using 160 WS2812B RGB LEDs. A Teensy mounted in the ceiling does all the heavy lifting, with two serial Bluetooth modules connected to it. These get connected to two Bluetooth enabled NES game controllers. Each of the NES controller is stuffed with an Arduino Pro Mini, a Bluetooth module, Li-Ion battery and a USB charge controller.

Bluetooth is in non-secure mode, allowing him to connect to the Teensy, and control the LEDs, from other devices besides the NES controllers. The Teensy is mounted at the centre of the ceiling to ensure a good Bluetooth link. Programming required a lot of thought and time but he did manage to include animations as well as popular games such as Snake and Tetris.

LED_Ceiling_deadbug
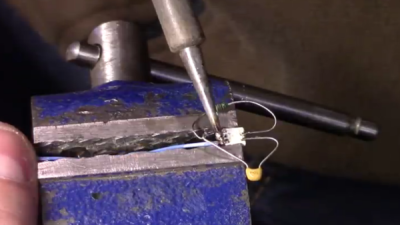
The hard part was wiring up all of the 160 LED pixels. Instead of mounting the 5050 SMD LED’s on PCBs, [dennis1a4] wired them all up “dead bug” style. Each pixel has one LED, a 100nF decoupling capacitor, and 91 ohm resistors in series with the Data In and Data Out pins – these apparently help prevent ‘ringing’ on the data bus. Check the video for his radical soldering method. Each SMD LED was clamped in a machine shop vice, and the other three parts with their leads preformed were soldered directly to the LED pins.

The other tedious task was planning and laying out the wiring harness. Sets of 10 LEDs were first wired up on the shop bench. He then tacked them up to the ceiling and soldered them to the 14 gauge main harness. The final part was to put up the suspended ceiling and close the 2 sq. ft. grids with opaque plastic.

[dennis1a4]  did some trials to figure out the right distance between each LED and the panel to make sure they were illuminated fully without a lot of light bleeding in to adjacent panels. This allowed him to get away without using baffles between the tiles.

Check out the video to see a cool time-lapse of the whole build.

Continue reading “RGB LED Ceiling Display”

Escape Cable Hell With An Audio I/O Multiplexer

If you ever find yourself swapping between a mix of audio inputs and outputs and get tired of plugging cables all the time, check out [winslomb]’s audio multiplexer with integrated amplifier. The device can take any one of four audio inputs, pass the signal through an amplifier, and send it to any one of four outputs.

The audio amplifier has a volume control, and the inputs and outputs can be selected via button presses. An Arduino Pro Mini takes care of switching the relays based on the button presses. On the input side, you can plug in devices like a phone, TV, digital audio player or a computer. The output can be fed to speakers, headsets or earphones.

At the center of the build lies a TI TPA152 75-mW stereo audio power amplifier. This audio op-amp is designed to drive 32 ohm loads, so performance might suffer when connecting it to lower impedance devices, but it seems to work fine for headphones and small computer speakers. The dual-gang potentiometer controls the volume, and the chip has a useful de-pop feature. The circuit is pretty much a copy of the reference shown in the data sheet. Switching between inputs or outputs is handled by a bank of TLP172A solid state relays with MOSFET outputs, and it’s all tied together with a micro-controller, allowing for WiFi or BLE functionality to be added on later.

[winslomb] laid out the design using Eagle and he made a couple of footprint mistakes for the large capacitors and the opto-relays. (As he says, always double-check part footprints!) In the end, he solder-bridged them on to the board, but they should probably be fixed for the next revision.

[winslomb] built the switch as his capstone project while on his way to getting a Masters in EE, and although the device did function as required, there is still room for improvement. The GitHub repository contains all the hardware and software sources. Check out the video below where he walks through a demo of the device in action. If you are looking for something simpler, here is a two input – one output audio switcher with USB control and on the other end of the spectrum, here’s an audio switch that connects to the Internet.

Continue reading “Escape Cable Hell With An Audio I/O Multiplexer”

A Wooden Based, CD Stepper Scribbler

[Rohit Gupta] is back with a plotter made from scrap CD drives and an old RC servo. [Rohit] is working on hacks to create CNC machines and sharing his activities with the world. His CNC design calls for salvaged stepper motors so he first built a device for testing them. You’ve got to admire his use of the language. He named his plotter project ‘Sketchy’ and his motor tester is called ‘Easy Peasy’.

sketchyAfter finding some CD drives at the scrap pile he tore them down to test with Easy Peasy. The raw materials for the frame came from a wooden crate for an AC unit but he didn’t just start cutting it up. Nope, first he created plans with CAD; now that’s a hack you have to admire.

With the steppers tested working, and the base build under way he moved onto the control system. Originally the hardware was demonstrated using an MSP430. This worked, but a flaw in the hardware design was found. With the pen attached directly to the servo horn, it would draw a long line when being rotated away from the drawing position.

The fix is a replacement servo setup which lifts the pen up instead of rotating it. But that showed that the drawing surface wasn’t smooth. The pen kept missing places or getting caught and destroyed. The use of a spring loaded pen solved this issue. Success!

One further change migrated away from the MSP430 in favor of an Arduino Pro Mini in order to use a GRBL library instead of the g-code generator which was performing questionably. Since he likes Hackaday so much one of his first attempts with the final version of Sketchy was our logo, shown in the video after the break.

When we last saw [Rohit] he had created a fancy PCB ruler to measure components.

Continue reading “A Wooden Based, CD Stepper Scribbler”

Neopixel Ring Compass Takes Things In A New Direction

A couple of years ago, [philo mech] came across [David Ratliff]’s NeoPixel compass project. Ever since then, he’s wanted to make his own. To his delight, [philo mech] was able to find time to do just that.

An Arduino Pro Mini drives an LSM303DLHC compass/accelerometer breakout board and a 12-LED NeoPixel ring. The heading is indicated with a red ‘Pixel between two yellow ones.  In the video after the break, [philo mech] gives several demonstrations of the ring’s red indicator in relation to a standard compass arrow.

This colorful compass currently boasts two very useful modes: one to track the whereabouts of North, and the other for determining the user’s current heading. Mk. II  will compensate for tilt and will employ a 16-Pixel ring to display finer degrees of directional change. Want to make your own? The code is pasted in the video’s comments.

Continue reading “Neopixel Ring Compass Takes Things In A New Direction”

Repurposing A Palm Portable Keyboard

Typing comfortably on a Smart Phone is best done using an external keyboard, especially if you spend a lot of time on IRC or use other chat apps. Obviously, the keyboard needs to be portable too. [cy384] felt the current crop of portable keyboards left a lot to be desired in terms of build quality and feel. That’s when the Palm Portable Keyboard (PPK) caught his eye. It’s small enough to fold up and fit in a pocket, yet unfolds to a size big enough to feel comfortable while typing. Unfortunately, the version he preferred to use did not have either a Bluetooth or a USB interface, so he built up this Palm keyboard adapter.

The portable keyboards have a serial interface and custom connectors depending on the Palm model they were designed to connect to. [cy384]’s goal was to adapt the PPK as a generic USB HID keyboard using an Arduino Pro Mini clone, with a 3D printed adapter for both of the keyboard types that he had. The keyboards  use inverted TTL logic at 9600 baud with no parity and one stop bit. Some handshaking needs to be taken care of and there’s a low power mode that needs to be managed via the Arduino code. He was lucky to get his hands on a reference document that provided the hardware and software details to help him crack all of this. His Github repository has the code and 3D printable files for the adapters.

Active “Dart-Sensing” Makes Your Nerf Gun Smarter

When choosing weapons to defend yourself in the next zombie apocalypse, dart jamming whilst firing your Nerf Gun can be a deal-breaker. This clogging is an issue with many “semi-automatic” Nerf Guns. When our trigger-happy fingertips attempt to shoot a dart that hasn’t finished loading into the firing chamber, the halfway-loaded dart folds onto itself and jams the chamber from firing any more darts. The solution, as intended by Nerf, would be to open the chamber lid and manually clear the pathway. The solution, according to [Technician Gimmick], however, is active sensing, and the resulting “smart” dart gun is the TR-27 GRYPHON.

To prevent jamming from occurring altogether, [Technician Gimmick] added a trigger-disable until the dart has fully loaded into the firing chamber. An IR LED, harvested from a mouse scroll wheel, returns an analog value to the microcontroller’s analog-to-digital converter, allowing it to determine whether or not a dart is ready for firing. The implementation is simple, but the results are fantastic. No longer will any gun fire a dart until it has completely entered the chamber.

The TR-27 GRYPHON isn’t just a Nerf Gun that enables “smart” dart sensing. [Technician Gimmick] folded a number of other features into the Nerf Gun that makes it a charmer on the shelf. First, a hall-sensor array identifies the current cartridge loaded into the Nerf Gun and it’s carrying capacity. To display this value and decrement appropriately, [Technician Gimmick] added a dual-seven segment display, a trick we’ve seen before. Finally, a whopping 3S LiPo battery replaces the original alkaline batteries, and the voltage-reducing diodes have been cropped, enabling a full 12.6 Volt delivery to the motors at full charge.

We’re glad to see such a simple trick go such a long way as to almost entirely eliminate Nerf dart jams. For all those braving the Humans-Versus-Zombies frontier this season, may this clever trick keep you alive for just a bit longer.

Continue reading “Active “Dart-Sensing” Makes Your Nerf Gun Smarter”