We’ve featured quite a few of [mitxela]’s projects here in the past, and many of them have the propensity to be labelled “smallest”. His Morse Code USB Keyboard Mk II adds to that list. It’s a Saturday afternoon project, with a few parts slapped onto a piece of perf-board, that allows using a Morse key as a USB keyboard. This project isn’t new or fresh, but we stumbled across it while trying to figure out a use for a Morse key lying in the author’s bin of parts. You can practise transmitting, by reading text and typing it out on the key, and then look it up on your computer to see if you made any mistakes. Or you can practise receiving, by asking a friend to punch it out for you. Either way, it’s a great way to hone your skills and prepare for your radio operators license exam.
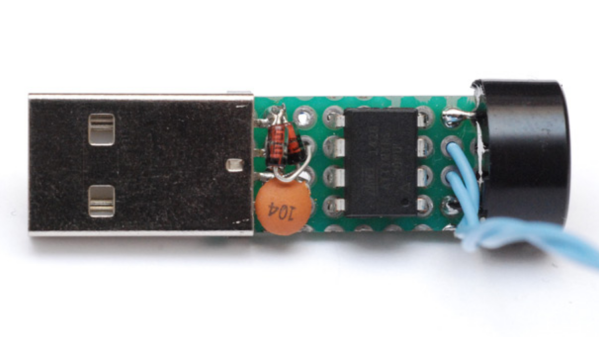
The project is a follow up to his earlier one where he hooked up the Morse key via a RS-232 — USB converter directly to a computer and let the code do all the work. That turned out to be a very resource hungry, impractical project and made him do it right the next time around. The hardware is dead simple. An ATtiny85, a piezo buzzer, some decoupling capacitors, and a few resistors and zeners to allow a safe USB interface. The design accommodates a straight key, but there is one spare pin left over in the ATtiny to allow for iambic or sideswiper keys too. There is no speed adjustment, which is hardcoded at the moment. That isn’t very user friendly, and [mitxela] suggests adding a speed potentiometer to that last remaining pin on the ATtiny. This would prevent use of iambic/sideswiper keys. Or, you could use the RST pin on the ATtiny as a (weak) IO. The RST pin can read analog values between 5V and 2.5V, and will reset when voltage falls below 2.2V. Or just use another microcontroller as a last resort.
For the USB interface, [mitxela] is using the V-USB library after wasting some time trying to reinvent the wheel. And since this is designed to work as a HID, there are no drivers required – plug it in, and the OS detects it as a keyboard. He’s borrowed code from the EasyLogger project to use the internal oscillator and help free up the IO pins. And to detect the characters being typed, his code uses a long string of compare statements instead of a dictionary lookup. Writing that code was tedious, but it makes the identification quicker, since most characters can be identified in less that five comparisons (one dit = E, two dits = I, three dits = S and so on). This “tree” makes it easier to figure it out.
If you’d like to look up some of his other “tiny” projects, check out The smallest MIDI synthesizer, Smallest MIDI synth, again! and the ATtiny MIDI plug synth.
Continue reading “Tiny Morse Code USB Keyboard” →


