There are some standard components that have been so continuously refined as to have become if not perfect then about as good as they’re going to get. Take the Arduino Uno for instance, and compare it with its ancestor from a decade ago. They are ostensibly the same board and they are compatible with each other, yet the Uno and its modern clones have more processing power, memory and storage, a USB interface rather than serial, and a host of small component changes to make them better and cheaper.
You’d think that just another Arduino clone couldn’t bring much to the table then. And you’d be right in a broad sense, just what is there left to improve?
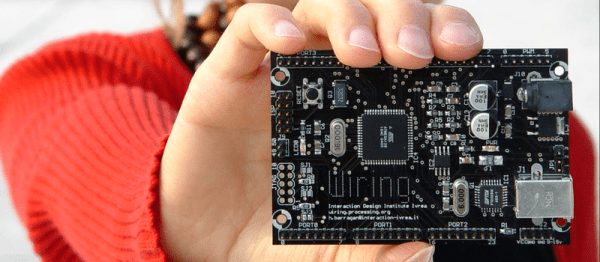
[Clovis Fritzen] has an idea for an Arduino clone that’s worth a second look. It’s not an amazing hardware mod that’ll set the Arduino world on fire, instead it’s a very simple design feature. He’s created an Arduino that mounts vertically on a single row of pins. Why might you find that attractive, you ask? A SIL vertical Arduino takes up a lot less breadboard space than one of the existing DIL Arduinos. A simple idea, yet one that is very useful if you find yourself running out of breadboard.
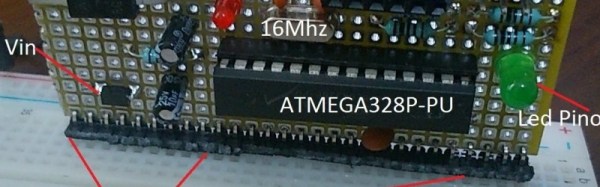
[Clovis] took the circuit of an Arduino Uno and simplified it by removing the USB interface, so this board has to be programmed through its ICSP header. And he’s made it a through-hole board for easy construction by those wary of SMD soldering. The resulting board files can all be found on GitHub.
Every now and then along comes a hack so simple, obvious, and useful that it makes you wonder just why you didn’t think of it yourself. Many of us will have used a DIL Arduino and probably found ourselves running out of breadboard space. This board probably won’t change the world, but it could at least make life easier in a small way for some of us who tinker with microcontrollers.
This is just the latest of many Arduino clones to find its way onto these pages. In 2013 we asked why the world needed more when featuring one made as a PCB design exercise. There’s even a Hackaday version called the HaDuino developed by [Brian Benchoff]. But while it’s true that Yet Another Vanilla Arduino Clone brings nothing to the table, that should not preclude people from taking the Arduino and hacking it. Every once in a while something useful like this project will come from it, and that can only be a benefit to our community.