Back To Basics With An Arduino And An EEPROM

There are plenty of techniques and components that we use in our everyday hardware work, for which their connection and coding is almost a done deal. We are familiar with them and have used them before, so we drop them in without a second thought. But what about the first time we used them, we had to learn somewhere, right? [TheMagicSmoke] has produced just what we’d have needed then for one component that’s ubiquitous, the I2C EEPROM.

These chips provide relatively small quantities of non-volatile memory storage, and though they are not the fastest of memory technologies they have a ready application in holding configuration or other often-read and rarely written data.

Since the ST24C04 512-byte device in question has an I2C bus it’s a straightforward add-on for an Arduino Mega, so we’re shown the wiring for which only a couple of pull-down resistors are required, and some sample code. It’s not the most complex of projects, but it succinctly shows what you need to do so that you too can incorporate an EEPROM in your work.

If learning about I2C EEPROMs piques your interest, perhaps you’d like to read a previous look we made at them.

Make Physics Fun With A Trebuchet

What goes up must come down. And what goes way, way up can come down way, way too fast to survive the sudden stop. That’s why [Tom Stanton] built an altitude recording projectile into an oversized golf ball with parachute-controlled descent. Oh, and there’s a trebuchet too.

That’s a lot to unpack, but suffice it to say, all this stems from [Tom]’s obvious appreciation for physics. Where most of us would be satisfied with tossing a ball into the air and estimating the height to solve the classic kinematic equations from Physics 101, [Tom] decided that more extreme means were needed.

Having a compound trebuchet close at hand, a few simple mods were all it took to launch projectiles more or less straight up. The first payload was to be rocket-shaped, but that proved difficult to launch. So [Tom] 3D-printed an upsized golf ball and packed it with electronics to record the details of its brief ballistic flight. Aside from an altimeter, there’s a small servo controlled by an Arduino and an accelerometer. The servo retracts a pin holding the two halves of the ball together, allowing a parachute to deploy and return the package safely to Earth. The video below shows some pretty exciting launches, the best of which reached over 60 meters high.

The skies in the field behind [Tom]’s house are an exciting place. Between flying supercapacitors, reaction wheel drones, and low-altitude ISS flybys, there’s always something going on up there.

Continue reading “Make Physics Fun With A Trebuchet”

A Ping Pong Ball LED Video Wall

Constrained builds are often the most fun. Throw an artificial limit into the mix, like time limiting your effort or restricting yourself to what’s on hand, and there’s no telling what will happen.

[bitluni] actually chose both of those constraints for this ping pong ball LED video display, and the results are pretty cool, even if the journey was a little rough. It seems like using sheet steel for the support of his 15 x 20 Neopixel display was a mistake, at least in hindsight. A CNC router would probably have made the job of drilling 300 holes quite a bit easier, but when all you have is a hand drill and a time limit, you soldier on. Six strings of Neopixels fill the holes, a largish power supply provides the 18 or so amps needed, and an Arduino knock-off controls the display. The ping pong ball diffusers are a nice touch, even if punching holes in them cost [bitluni] a soldering iron tip or two. The display is shown in action in the video below, mostly with scrolling text. If we may make a modest suggestion, a game of Pong on a ping pong ball display might be fun.

[bitluni] says that the display is on its way to Maker Faire Berlin this weekend, so stop by and say hi. Maybe he’ll have some of his other cool builds too, like his Sony Watchman Game Boy mashup, or the electric scooter of questionable legality.

Continue reading “A Ping Pong Ball LED Video Wall”

Stator Library Makes Your Arduino Code Easier To Read

The readability of your code can make the difference between your project being a joy to work on, or an absolute headache. This goes double when collaborating with others. Having easily parsed code reduces your cognitive load and makes solving problems easier. To try and help with this, [PTS93] developed the Stator library to make certain common tasks simpler to read.

The aim of the library is to get rid of piles of state tracking variables and endless if/else statements – hence the name. It’s designed primarily for the Arduino IDE but doesn’t have any dependencies on the API, so can be used in other C++ environments. It comes with a variety of neat tools for common jobs, such as reading an analog sensor with hysteresis around a trigger point, as well as easy ways to track state changes across multiple variables. By using basic English terms instead of condition checks and mathematical operators, it can make things more readable and easier to follow.

The power of the Arduino platform has always been in its easy to use libraries that make everything easier, from interfacing LCDs to working with Amazon Dash buttons.

Arduino’s Pluggable Discovery Programs With Any Protocol

The first Arduino was serial, and over the decade and a half, this has been the default way to upload code to an Arduino board. In 2008, support for in-circuit programmers was added, and later port detection was added. The latest version of the Arduino IDE adds something new: pluggable discovery. Now any protocol is supported by the Arduino IDE.

This feature is the brainchild of [Paul Stoffregen], creator of the Teensy. If you’ve ever used a Teensy, you’ll remember the Teensyduino application used to upload code to the board. The Teensy uses HID protocol instead of serial for uploading. After working to improve the integration between the Teensy and Arduino IDE, [Paul] stated extending the DiscoveryManager. After some discussion with the Arduino developers, this feature was then added to Arduino 1.8.9, released a month or so ago.

There are some issues with Pluggable Discovery, most importantly that it doesn’t yet exist in the Arduino Command Line Interface (yeah, that exists too). If you’re looking to contribute to Open Source, that would be a nice project to pick up.

With the right JSON, and configuration, it is now theoretically possible to extend the Arduino IDE to any sort of protocol. This means (again, theoretically), it’s possible to update the firmware in your DIY MIDI synth over SysEx message, or a parallel port, maybe. Someone is going to upload to an Arduino board over PCIe, eventually.

Arduino Leonardo Gets A Lockable Bootloader

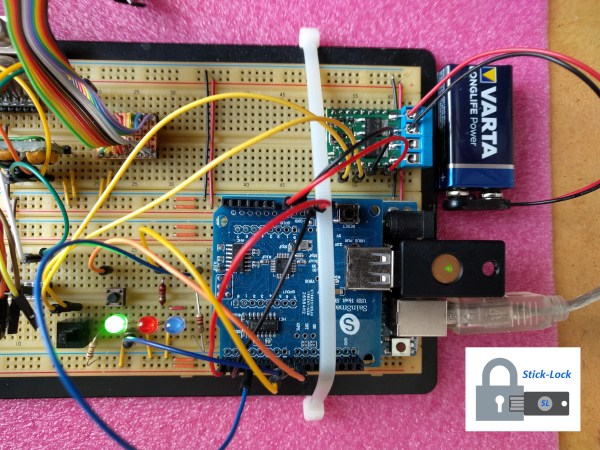
Security is something that’s far too often overlooked in embedded devices. One of the main risks is that if the device doesn’t verify the authenticity of incoming firmware updates. [Walter Schreppers] was working on a USB password storage device, so security was paramount. Thus, it was necessary to develop a secure bootloader.

[Walter]’s device was based upon the Arduino Leonardo. Starting with the Caterina bootloader, modifications were made to enable the device to be locked and unlocked for programming. This can be done in a variety of ways, depending on how things are setup. Unlocking can be by using a secret serial string, an onboard jumper, and [Walter] even suspects a SHA1 challenge/response could be used if you were so inclined.

It’s never too soon to start thinking about security in your projects. After all, we must stave off the cyberpunk future in which leather-clad youths flick all your lights on and off before burning your house down in the night by overclocking the water heater. Naturally, we’ve got a primer to get you going in the right direction. Happy hacking!

Insert Coin (Cell) To Play LedCade

In this era of 4K UHD game console graphics and controllers packed full of buttons, triggers, and joysticks, it’s good to occasionally take a step back from the leading edge. Take a breath and remind ourselves that we don’t always need all those pixels and buttons to have some fun. The LedCade is a μ (micro) arcade game cabinet built by [bobricius] for just this kind of minimalist gaming.

Using just three buttons for input and an 8×8 LED matrix for output, the LedCade can nevertheless play ten different games representing classic genres of retro arcade gaming. And in a brilliant implementation of classic hardware hacking humor, a player starts their game by inserting not a monetary coin but a CR2032 coin cell battery.

Behind the screen is a piezo speaker for appropriately vintage game sounds, and an ATmega328 with Arduino code orchestrating the fun. [bobricius] is well practiced at integrating all of these components as a result of developing an earlier project, the single board game console. This time around, the printed circuit board goes beyond being the backbone, the PCB sheet is broken apart and reformed as the enclosure. With classic arcade cabinet proportions, at a far smaller scale.

If single player minimalist gaming isn’t your thing, check out this head-to-head gaming action on 8×8 LED arrays. Or if you prefer your minimalist gaming hardware to be paper-thin, put all the parts on a flexible circuit as the Arduflexboy does.