A Hacker-Friendly Blinky USB Stick

The availability of Smart RGB LED’s, either as individual units, as strips or even as panels, have made blinky light projects with all kinds of color control and transition effects easy to implement using even the simplest of controllers. Libraries that allow control of these smart LEDs (or Smart Pixels as they are sometimes called)  make software development relatively easy.

[overflo] at the Metalab hackerspace in Vienna, Austria recently completed development of usblinky – a hacker friendly blinky USB stick. It can control up to 150 WS2812B smart LED’s when powered via an external power supply, or up to 20 LED’s when powered via a computer USB port. The micro-controller is an ATTiny85 running the Micronucleus bootloader which implements software USB using vUSB. The hardware is based on the DigiSpark platform. The usblinky software sources are available on their Github repo. The section on pitfalls and lessons learned makes for interesting reading.

Metalab plans to run workshops around this little device to get kids into programming, as it is easy enough and gives quick visual feedback to get you started. To round off the whole project, [overflo] used OpenSCAD to design a customizable, 3D printable “parametric orb” which can house the LED strip and make a nice enclosure or psychedelic night light. Check out the mesmerizing video of the usblinky Orb after the break.

Thanks to [papst] for sending in this tip.

Continue reading “A Hacker-Friendly Blinky USB Stick”

A protoboard layout for an ATtiny85 door chime

AES-CMAC On An ATtiny85

[Blancmange] built a custom door chime using an ATtiny85. Unlike most commercial products out there, this one actually tries to be secure, using AES-CMAC for message signing.

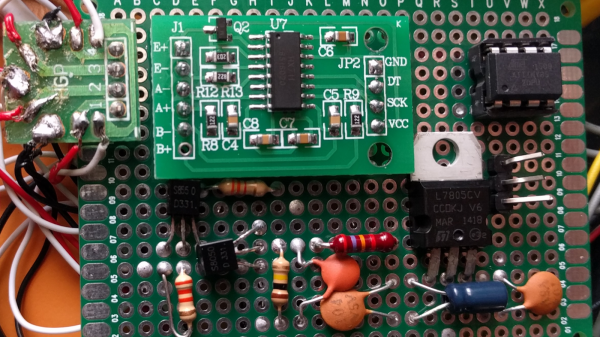
The hardware is pretty simple, and a protoboard layout is shown in the image above. It uses the ATtiny85 for control, with an LM380N audio amplifier, and a low cost 315 MHz receiver.

The more impressive part of the build is the firmware. Using AVR assembly, [Blancmange] managed to fit everything into the 8 Kbytes of flash on the ATtiny85. This includes an implementation of AES-CMAC, an AES cypher based message authentication code. The transmitting device signs the request with a key shared between both devices, and the receiver verifies that the message is from a trusted transmitter.

Fortunately, the assembly code is very well commented. If you’ve ever wanted to take a look into some complex ASM assembly, this is a great project to check out. The source code has been released into the public domain, so the rest of us can implement crypto on this cheap microcontroller with much less effort.

An ATTiny Bluetooth Board

Since just about everyone who would be interested in electronics has a decent cellphone now, there’s an idea that we don’t need USB or weird serial adapters anymore. Bluetooth LE is good enough for short-range communication, and there are a ton of boards and Kickstarter projects out there that are ready to fill the need.

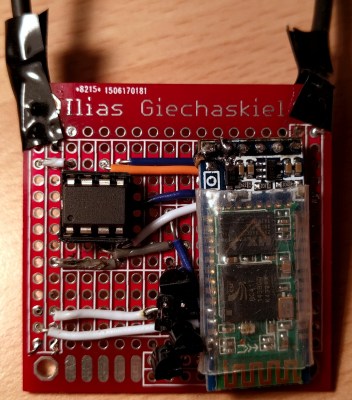
[Michah] has built what is probably the lowest-spec and cheapest BTLE board we’ve ever seen. It’s really just an ATTiny85 – a favorite of the crowd that’s just slightly above Arduino level – and an HM-10 Bluetooth 4.0 Low Energy module.

This board was developed as a means to connect sensors for a vintage motorcycle to an iOS device for display and data logging. A small, cheap board was needed that could be powered by a LiPo battery, and [Micah] created a board that fit his needs perfectly.

Four of the six IO pins on the ‘Tiny85 are broken out on a pin header; two are used to communicate with the BTLE module. It’s simple, fairly cheap, and can be powered by a battery. Exactly what you need if you want a wireless sensor board. All the files can be found in the Git repo and everything is open source. Not bad.

Music in a CD Case

This CD Jewel Case Plays Music Without A Disc

We’ve all heard the terrible greeting cards that have soundbites of 2 bit jingles that usually make you want to tear the battery out… but Hallmark is finally catching up with technology and now including real music in their cards — it might only be about 10 seconds, but hey, it’s a step!

They’re still pretty corny though, and we’re not really sure what even dictates an ideal situation to give someone an audible greeting card — but regardless, [Dmitry Grinberg] thought he could do better than Hallmark — and we’d have to agree. He’s created a New Year’s Greeting card using a CD jewel case, and what he’s packed inside is pretty incredible.

The case, when opened, will play a full-length song in full fidelity. Next time you open it, it’ll play something new and at random, from its very own micro SD card 300-song library.

Continue reading “This CD Jewel Case Plays Music Without A Disc”

Pandaphone

Pandaphone Is A DIY Baby Toy

[Tyler] was looking for a gift for his friend’s one year old son. Searching through the shelves in the toy store, [Tyler] realized that most toys for children this age are just boxes of plastic that flash lights and make sound. Something that he should be able to make himself with relative ease. After spending a bit of time in the shop, [Tyler] came up with the Pandaphone.

The enclosure is made from a piece of 2×4 lumber. He cut that piece into three thinner pieces of wood. The top piece has two holes cut out to allow for an ultrasonic sensor to poke out. The middle piece has a cavity carved out using a band saw. This would leave room to store the electronics. The bottom piece acts as a cover to hide the insides.

The circuit uses an ATtiny85. The program watches the ultrasonic PING sensor for a change in distance. It then plays an audio tone out of a small speaker, which changes pitch based on the distance detected. The result is a pitch that is lower when your hand is close to the sensor, but higher when your hand is farther away. The case was painted with the image of a panda on the front, hence the name, “Pandaphone”. Based on the video below, it looks like the recipient is enjoying it! Continue reading “Pandaphone Is A DIY Baby Toy”

Schematic for a boost converter based on the ATtiny MCU

An ATtiny Boost Converter

This schematic is all you need to build your own voltage converter. [Lutz] needed a converter that could boost 5 V to 30 V to power a string of LEDs. The solution was to use low cost ATtiny85 and some passive components to implement a boost converter.

This circuit follows the classic boost converter topology, using the ATtiny85 to control the switch. The 10 ohm resistor is fed back into the microcontroller’s ADC input, allowing it to sense the output voltage. By measuring the output voltage and adjusting the duty cycle accordingly, the circuit can regulate to a specified voltage setpoint.

A potentiometer is used to change the brightness of the LEDs. The software reads the potentiometer’s output voltage and adjusts the voltage output of the circuit accordingly. Higher voltages result in brighter LEDs.

Of course, there’s many other ways to implement a boost converter. Most practical designs will use a chip designed for this specific purpose. However, if you’re interested in rolling your own, the source and LTSpice simulation files are available.

Now Let’s See The World’s Largest Arduino

A few days ago we saw what would have been a killer Kickstarter a few years ago. It was the smallest conceivable ATtiny85 microcontroller board, with resistors, diodes, a USB connector, and eight pins for plugging into a breadboard. It’s a shame this design wasn’t around for the great Arduino Minification of Kickstarter in late 2011; it would have easily netted a few hundred thousand dollars, a TED talk, and a TechCrunch biopic.

[AtomSoftTech] has thrown his gauntlet down and created an even smaller ‘tiny85 board. it measures 0.4in by 0.3in, including the passives, reset switch, and USB connector. To put that in perspective, the PDIP package of the ‘tiny85 measures 0.4 x 0.4. How is [Atom] getting away with this? Cheating, splitting the circuit onto two stacked boards, or knowing the right components, depending on how you look at it.

USB [Atom] is using a few interesting components in this build. The USB connector is a surface mount vertical part, making the USB cord stick out the top of this uC board. The reset button is extremely small as well, sticking out of the interior layer of the PCB sandwich.

[AtomSoft] has the project up on OSH Park ($1.55 for three. How cool is that?), and we assume he’ll be selling the official World’s Smallest Arduino-compatible board at Tindie in time.