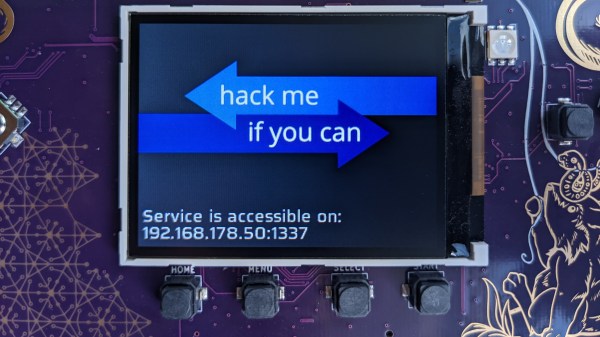
Photo of the MCH2022 badge's screen, showing the "Hack me if you can" app's start splashscreen, saying "Service is accessible on IP ADDRESS : 1337"

MCH2022 Badge CTF Solved, With Plenty To Learn From

Among all the things you could find at MCH2022, there were a few CTFs (Capture The Flag exercises) – in particular, every badge contained an application that you could  try and break into – only two teams have cracked this one! [dojoe] was part of one of them, and he has composed an extensive reverse-engineering story for us – complete with Ghidra disassembly of Xtensa code, remote code execution attempts, ROP gadget creation, and no detail left aside.

There was a catch: badges handed out to the participants didn’t contain the actual flag. You had to develop an exploit using your personal badge that only contained a placeholder flag, then go to the badge tent and apply your exploit over the network to one of the few badges with the real flag on them. The app in question turned out to be an echo server – sending back everything it received; notably, certain messages made it crash. One man’s crashes are another man’s exploit possibilities, and after a few hacking sessions, [dojoe]’s team got their well-deserved place on the scoreboard.

If you always thought that firmware reverse-engineering sounds cool, and you also happen to own a MCH2022 badge, you should try and follow the intricately documented steps of [dojoe]’s writeup. Even for people with little low-level programming experience, repeating this hack is realistic thanks to his extensive explanations, and you will leave with way more reverse-engineering experience than you had before.

The MCH2022 badge is a featureful creation of intricate engineering, with the ESP32 portion only being part of the badge – we’re eager to hear about what you’ve accomplished or are about to accomplish given everything it has to offer!

DOOM Runs On The EMFCamp Tidal Badge

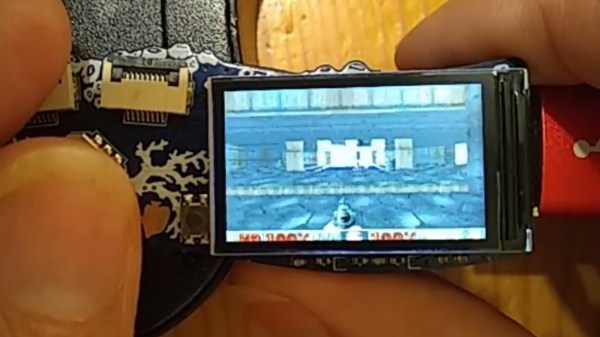
If it’s got a chip and a screen, someone’s trying to run DOOM on it. The latest entry in this fad is from [Phil Ashby], who figured out how to get the game running on the EMFCamp Tidal Badge as seamlessly as possible.

The badge is based on the ESP32-S3. It’s the latest version of the ESP32, which can run the iconic shooter pretty easily. However, [Phil] set himself a trickier challenge. He wanted to port DOOM to the badge while having it remain compatible with the MicroPython platform already on it. Plus, he wanted to be able to distribute it easily with the TiDAL Hatchery, a platform for sharing apps for the badge.

In the end, it took some deft hacking to make the game run on a microcontroller platform that isn’t really set up for running “applications.” It took some tricks to scale the video output and get the colors right, of course, but it’s there and working.

The state of the art is now so advanced that they managed to port DOOM into DOOM so you can DOOM while you DOOM. Video after the break.

Continue reading DOOM Runs On The EMFCamp Tidal Badge”

Ride DIY Or Die This Badge-Less Suzuki

A few years ago, [Charles] picked up a sweet Suzuki motorcycle that checked all the boxen: it was in good shape, bore a few useful upgrades and a box of spare parts, plus the price was right. Though he assumed that he had pored over every picture on the classified site before buying, it wasn’t until later that [Charles] realized that something was indeed missing from the bike — a piece of chrome that does little more than to cover the tee in the brake line and bear the Suzuki brand. Once he saw the problem, he couldn’t un-see it, you know? And at that point, he just had to have that little piece, even if he had to make it himself.

That wasn’t the original plan, of course, but bike parts are expensive to begin with and only get worse as size, condition, and rarity increase. [Charles]’ quest to find this piece was halfway successful; he found a reasonable-but-rusty facsimile of the right part, although the emblem portion was long gone. Then he remembered the wife’s vinyl cutter.

Now, let’s stop right there. If you know anything at all about these vinyl cutters, you know that they are basically glorified 2D plotters with a knife attached where a pen would be. Send it any 2D file and you’re good? No, no; of course not. These things are locked down by the manufacturers.

Fortunately, [Charles] found inkscape-silhouette, which makes light work of sending SVGs to the machine. After much back and forth and maybe a bit of coin-flipping, [Charles] settled on the classy, stylized ‘S’ version rather than the full-on Suzuki badge. We think it looks great, and we’ll never tell anyone.

While this isn’t quite the type of badge we’d normally talk about, it’s a great project nonetheless, and it’s always nice to hear about projects that open up otherwise closed-source hardware.

Kamehameha!! PCB Badge

PCB Art has surely captivated us over the past few years and we’re ever intrigued with the intricate detail the community puts into their work. We’re no strangers to [Arnov]’s work and he has impressed, yet again, with his Kamehameha PCB badge.

Unfortunately, no 555 timer was used in the making of this project, but don’t let that turn you away. Instead, we have an ATtiny84 microcontroller for implementing the logic to control the LEDs, a MOSFET-based driver for driving current through the LEDs, and, of course, the LEDs to give the “turtle destruction wave” its devastating glow. Pay really close attention to the detail [Arnov] put into the silkscreen as you can see that’s a pretty crucial part of this build.

Aside from marveling at [Arnov]’s work, fans of the OrCAD PCB designing software will learn how to import an image file into their project as [Arnov] walks through that step in his tutorial. He even has some pretty good reflow soldering tips if you’re looking to try your hand at SMD soldering.

Another cool build [Arnov]. Keep it up!

Continue reading “Kamehameha!! PCB Badge”

Star Trek Tap Controller, Take Two

Engineering student and DIY enthusiast [Xasin] thought that the usual ways of controlling various home devices, such as phone apps and web interfaces, were too boring. Instead, he developed the wearable Tap interface which is a cross between a Star Trek comms badge and mobile holo-emitter. The basic idea is to control stuff by tapping the pendant. But things got a little out of hand since this project started two years ago.

[Xasin] began with Tap version 1 back in 2019, and learned all about coding for BLE, making 3D printed cases, and eventually working out all the kinks in the system. Tap v1 used capacitive touch sensing, but the current version detects physical taps using an accelerometer and also can detect gestures. Feature creep along the way brings a sensor array, an array of emotive LEDs, an OLED screen, and a speaker. The whole thing is powered by a dual-core ESP32 Pico MCU. [Xasin] has published his project on GitHub in case you want to explore some of these other features on your own.

The project is only partially up and running because a few critical components are unavailable due to the global parts shortage. But it will soon be able to control smart home devices, such as [Xasin]’s standalone Dragon’s Home smart home system that we wrote about earlier this year. If you want to learn more about tap controlling in general, check out this article from 2018. You can see the Tap introduce itself and its features in the short video below the break.

Continue reading “Star Trek Tap Controller, Take Two”

The Hackaday Remoticon 2 Badge: An Exercise In Your Own Ingenuity

The twin challenges of the pandemic and now the semiconductor shortage have been particularly hard on the designers of event badges, as events have been cancelled and uncertain supply issues render their task impossible. When an event goes virtual, how do you even start to produce a badge for it? Make the badge and rely on enough stalwarts buying one? Or maybe produce a badge that’s a fancy take on a prototyping board?

For Hackaday Remoticon 2021, [Thomas Flummer] has produced a novel take on the second option by distributing a badge as a set of KiCAD files that can either be ordered from a PCB fab as a prototyping board or used as the canvas for a PCB to use whatever components are to hand. To demonstrate this, he’s produced an example badge that’s a MicroMod carrier.

So if you’d like to chase the full Remoticon experience with a badge there should still be enough time to order a set of boards, but to design your own electronics you’ll need to get a move on. What you might build upon it is up to you, but if you have an ESP32 module lying around you might wish to consider cloning the SHA2017 badge or its successors with the badge.team platform.

We’ve seen Thomas’ work before more than once on these pages, most notably as the man behind the BornHack badges.

Hands-On: BornHack 2020 Badge Has 9×32 Of Bling Fed By CircuitPython

Despite widespread pandemic cancellations, BornHack still happened this year and they even managed to once again bring an electronic badge to all attendees. If you missed it, I’ve already published an overview of the hacker camp itself. Today let’s dig into the 2020 BornHack badge!

Designed by Thomas Flummer and manufactured in Denmark, it takes the form of a PCB in the shape of a roughly 60 degree circular arc with most of its top side taken up by a 9 by 32 array of SMD LEDs. There is the usual 4-way button array and space for an SAO connector on the rest of the front face, while on the rear are a set of GPIO pads and a pair of AA battery holders for power. Connectivity is via USB-C and infra-red, and usefully there is also a power on/off switch.

At the heart of its hardware is a SAMD21G18A ARM Cortex M0+ microcontroller which is perhaps not the most exciting of chips, but the hardware becomes more interesting with the LED drivers. A pair of the IS31FL3731 chips (you may recognise from Brian Benchoff’s Mr. Robot badge) each drive half of the Charliplexed LED array. These versatile chips take the bother of scanning the LED matrix away from the microcontroller with their own internal frame registers fed from an I2C interface. This choice both makes the best use of the relatively meagre microcontroller in this application, and opens the way for the software choice. This badge runs Adafruit’s CircuitPython, and can thus be programmed over the USB connection in the same way as any other CircuitPython board. To test this I put aside my GNU/Linux laptop, and picked up something considerably less versatile to test its ease of use: a Chromebook.


# configure I2C
i2c = busio.I2C(board.SCL, board.SDA)

# turn on LED drivers
sdb = DigitalInOut(board.SDB)
sdb.direction = Direction.OUTPUT
sdb.value = True

# set up the two LED drivers
display = adafruit_is31fl3731.Matrix(i2c, address=0x74)
display2 = adafruit_is31fl3731.Matrix(i2c, address=0x77)

text_to_show = "BornHack 2020 - make clean"

CircuitPython devices mount as a disk drive in which can be found a Python file that can be edited with the code of your choice. The BornHack badge ships with code to display a BornHack banner text, which serves as a quick introduction to the capabilities of its display. It’s noticeable that the text scrolling performance leaves something to be desired, but this microcontroller is hardly one of the more powerful supported by the CircuitPython platform. The Chromebook was happily able to edit the code, though viewing the Python serial console necessitated diving into its Linux virtual machine.

The BornHack badge then, an attractive design that fulfils the aim of being capable and easy to program through its use of the popular CircuitPython platform, and through its decent sized LED matrix and available GPIOs with the chance of seeing a use beyond the camp as a general purpose display/experimentation platform. It may not be the most powerful of badges, but it does its job well. In particular it has achieved the feat missed by so many others, of arriving at the camp fully assembled and with working hardware and software. You can see more about it in Thomas’ badge presentation at the camp (cut from a stream, talk begins at 5:27) which we’ve placed below the break.

We look forward to seeing its influence upon other similar badges. Meanwhile if you are interested, you can compare it with the 2019 BornHack badge which we reviewed last year.

Continue reading “Hands-On: BornHack 2020 Badge Has 9×32 Of Bling Fed By CircuitPython”